Yeah, yeah…I’m delaying the next article on Kubernetes – again. But I have an excellent reason for it. After I published last week’s article, I saw this lovely gem of a stat.

Ninety-nine posts published, which would make this article here number 100. And yes, it may be arbitrary, but it deserves something more than a third part in a series of posts. I mean, when I started writing these things, I could have sworn I had two – maybe three – months’ worth of posts in me. So dang it, I’m going to celebrate!
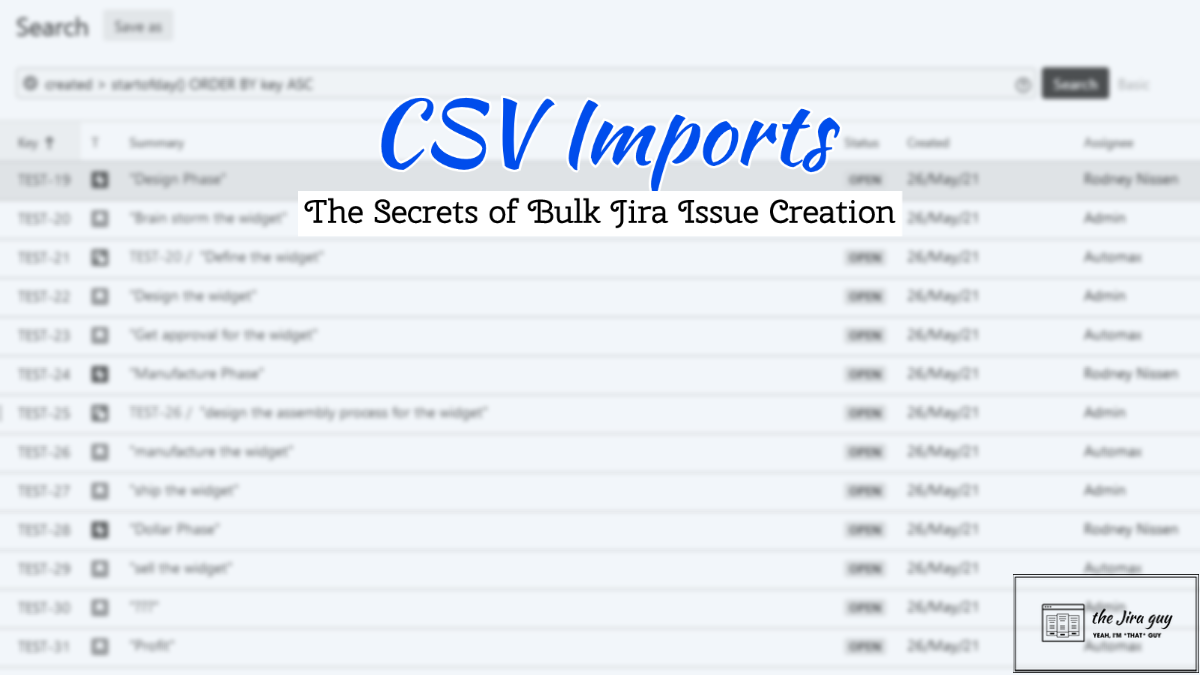
However, I’ve been trying to figure out what I would write for #100 for a few months. That was until yesterday when I saw a question about CSV Imports on the Certification Accelerator Group I am helping lead. That’s when I had a “How have I not talked about this already?” lightbulb moment. So today, we are going to talk about CSV Imports, what they do, and how to abuse the system to bulk-create issues.
So what even?
Imagine it’s 2010, and you’re an admin of some project management system, and some higher up just told you that you have to move to this new-fangled thing called Jira. But the project managers want their existing backlog moved over from their current system to this new deal. How do?
My best answer for this scenario even today is a CSV import. Most systems allow you to export the data as a CSV or Comma Separated Value file. And Jira will ingest this natively – even today.
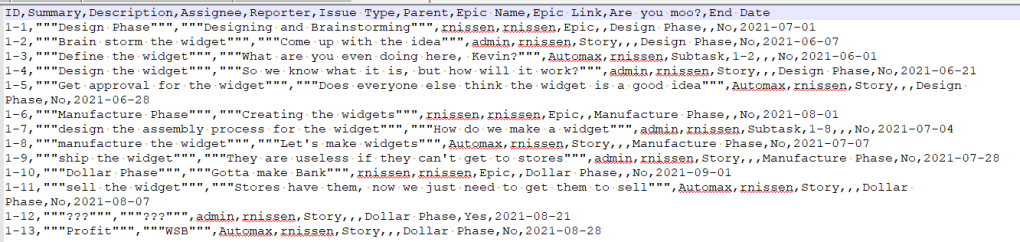
However, here’s the trick. Your source file does not have to be from some other system. You can hand-write a CSV File and import that too. So if you do this, the result is you can bulk-create issues out of nothing but a properly formatted text file!
Creating your CSV File
So the best tool you likely already have to create CSV files is Excel. It won’t handle huge files well, but it will work just fine for most hand-crafted CSV files.
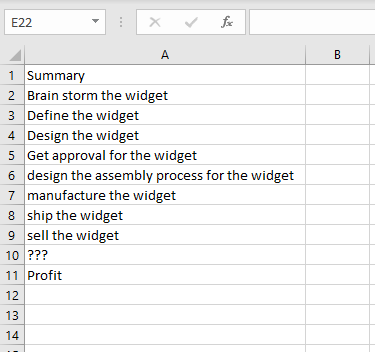
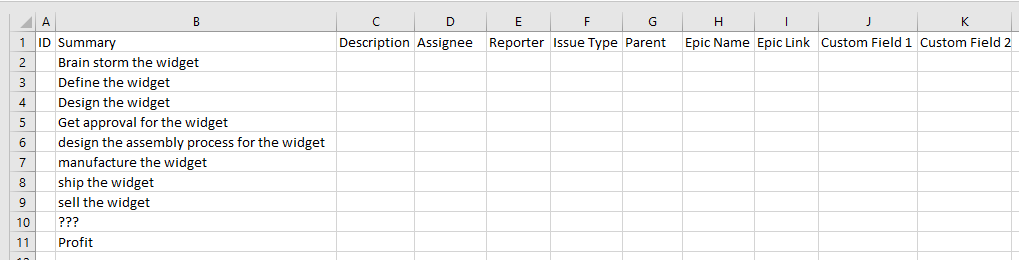
The absolute minimum Jira requires to create an issue is a Summary, so this is a perfectly valid bit of CSV in Excel. Not particularly interesting, but it will work to start us off.
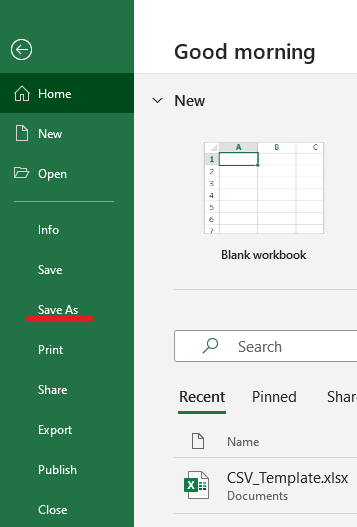
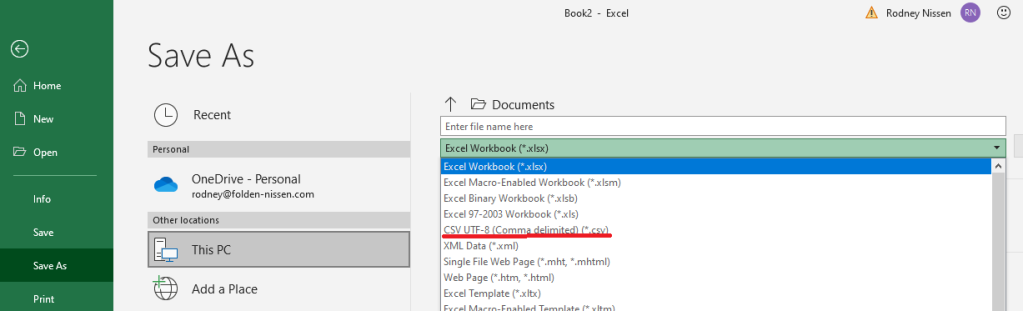
To export this as an actual CSV file, go to file -> Save As, and underneath your filename is, click the dropdown for the filetype. Then find “CSV UTF-8 (*.csv) and click that. Click save, and boom, your file is ready to import.
However…yeah, this is boring. So let’s add a few other fields! This is my “default” template for a CSV Import – and it adds a lot of possibilities just here.

So let’s copy over all the summaries we have from our previous example and start fleshing things out.
ID
So the ID Field is used to allow you to reference other imported issues in a given issue. This field is helpful for things like Issue Links and Subtasking – the latter of which we’ll talk about shortly. The good news here is it does not have to be numerical, which is good news because it does have to be unique across all imports you have ever done on that instance. Yes, I mean ever. So what I’ll do is number the is “1-1, 1-2,…1-n” for my first ever import, with the next being “2-1,…2-n”, so on and so form. The first number is the import run, and the second is the unique ID number within this sheet.
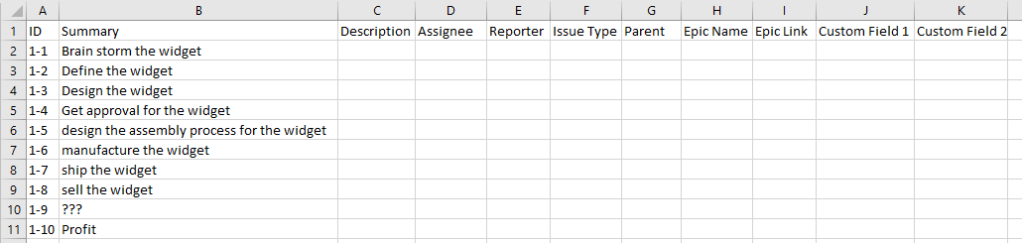
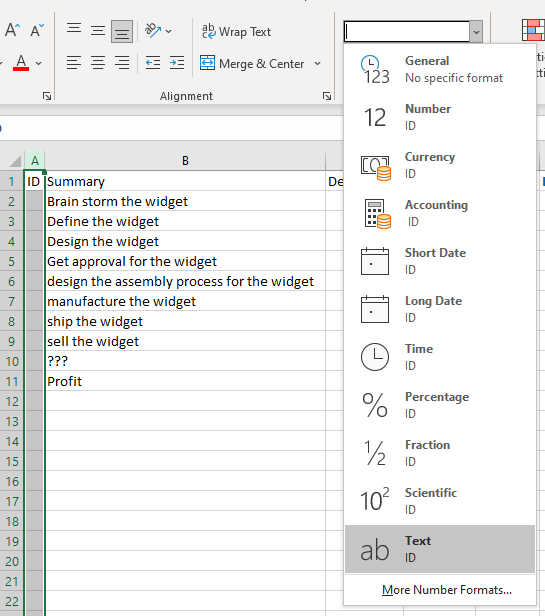
Just another note here – if you are using excel, you might want to highlight the “ID” column and change it’s formatting to “Text.”
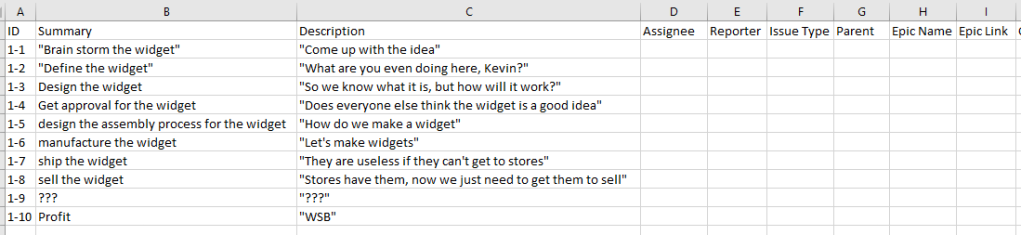
Summary and Descriptions
For these fields, I consider it best practice to surround them with double-quote (“) marks. That way, things like new line feeds, special characters, etc., are taken care of already. You need to be aware that the Description or Summary themselves cannot contain double quotes, or it kind of breaks things. But this is why you plan to test, right? RIGHT!?
Users (Reporters and Assignees)
For Reporters and Assignees, I like to put the user’s usernames where possible. If a username does not exist in the system when you import, you can have Jira create a user for that entry and move on without failing everything. I will, however, show you how to manually map all entries to users, which should also avoid this issue.
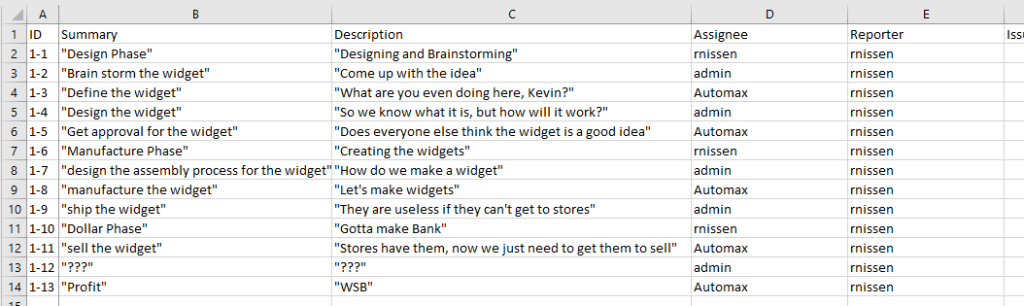
Issue Types (and their Peculiarities)
Issue Type, for the most part, is self-explanatory too. However, there are two particular use-cases you need to be aware of.
The first are sub-tasks. If you want to include a sub-task, that line MUST specify a parent – either an existing issue key in Jira or an ID number of the parent from this sheet. Jira will look for this during the import and automatically create those parent/sub-task links as long as everything is set up correctly. If you are using another issue type, feel free to leave “Parent” blank.
The second issue type to be aware of is Epics. If you are importing an Epic, you must include an Epic Name in addition to the Summary. However, once you define that Epic Name, copy that into the Epic Link field for any stories under that Epic to create the associated links automatically.
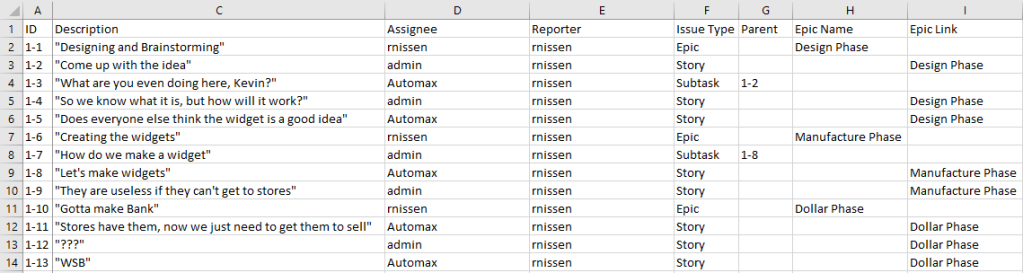
Custom Fields
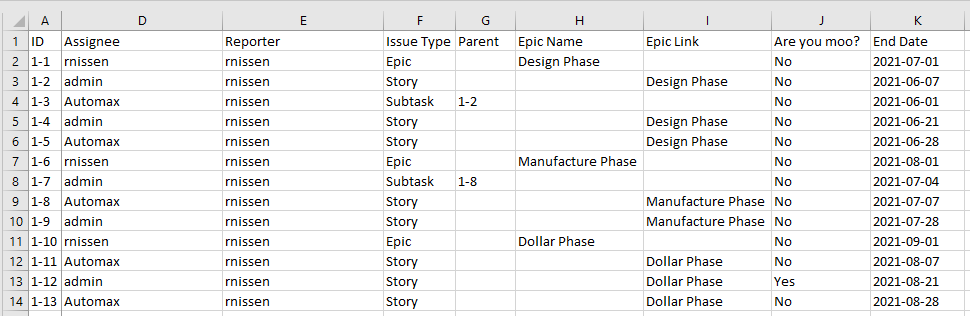
You can also import Custom fields. You can create the custom fields as part of your import or use one already on your system. I two examples (Custom field 1 & 2) in my default template, but I’ll replace these in my example import with two fields from my actual test instance.
Take special care to keep your date format consistent, as you will need to specify that during the import process to have it come over cleanly.
Importing your CSV File
So now you have a fully prepared CSV File, time to do the import. Thankfully, the procedure and location are consistent across Data Center, Server, and Cloud, so I only have to write this once!
On your Jira Administration Panel, go to System -> External System Import to bring up your Jira import wizard, then click CSV.
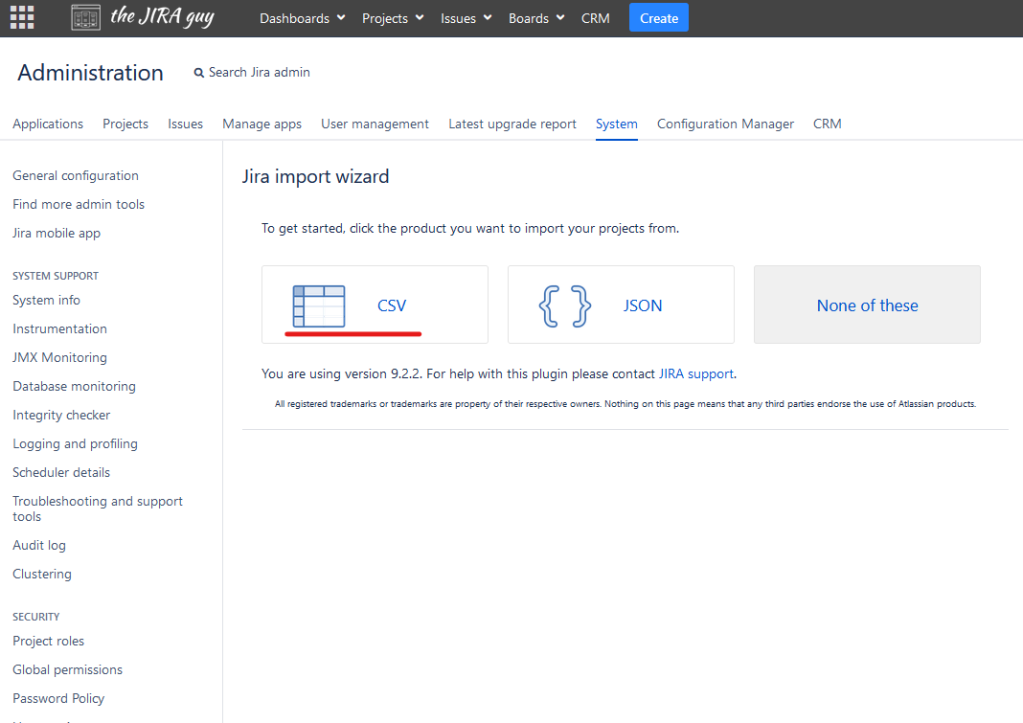
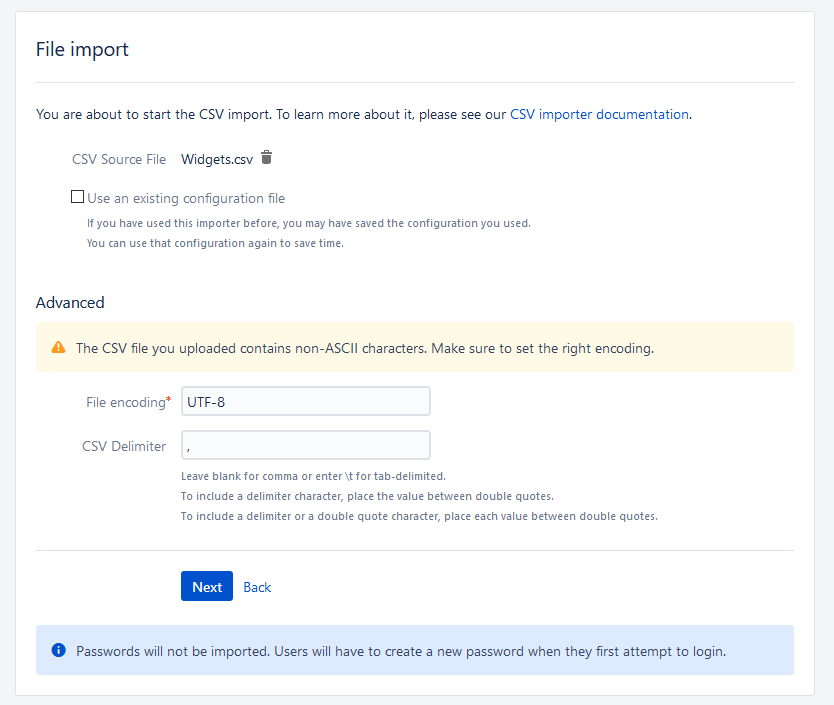
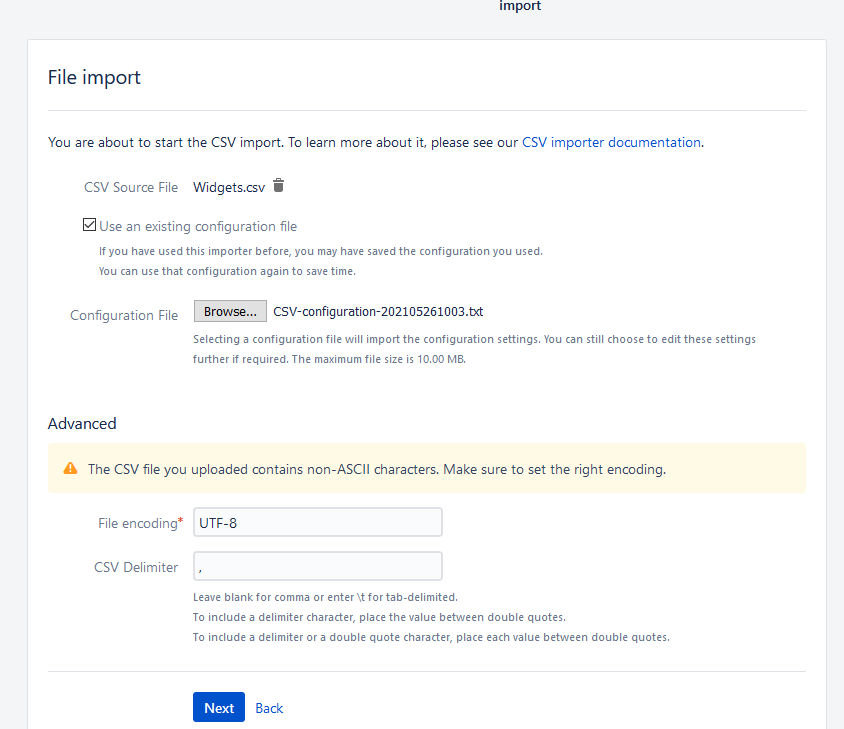
Your first step will be to upload the CSV file to your Jira system. If you have a configuration file from your tests, you will select the checkbox and upload that file as well. After you upload, you’ll get a question about file encoding and your delimiter. The defaults are correct if you saved it how I have earlier.
In speaking of testing…
If I said it once, I’ve said it a million times; Test First!
Look, no matter how many times you do it, this is not 100% clean process, and you will want to test a given import until you have all the settings dialed in *just* so. My recommendation is to do this on your test instance as many times as it takes to get a perfect run. Always get the configuration file at the end of each import attempt. That way, you build on your previous import and only have to change what factors didn’t work. Once you have a configuration that imports your file perfectly, use that configuration on your production instance, so you only have to worry about importing there once.
Entering Starting Data
After you upload your CSV file (and configuration if you have it), click next. It will then ask for some basic information. In Project, you select a destination for your issues. If you are importing to multiple projects, it’s best to define a Project field in your CSV and specify the destination project for each issue. In our case, we will be using our TEST project.
The following field will be the email suffix for each new user. Although we don’t intend on creating any new users in this process today, I’ll still enter “thejiraguy.com” here.
The last entry we have here is the date format. For the date setup we have, we’ll enter “yyyy-MM-dd” here. You can look up this document to learn how to specify the format string for your given format.
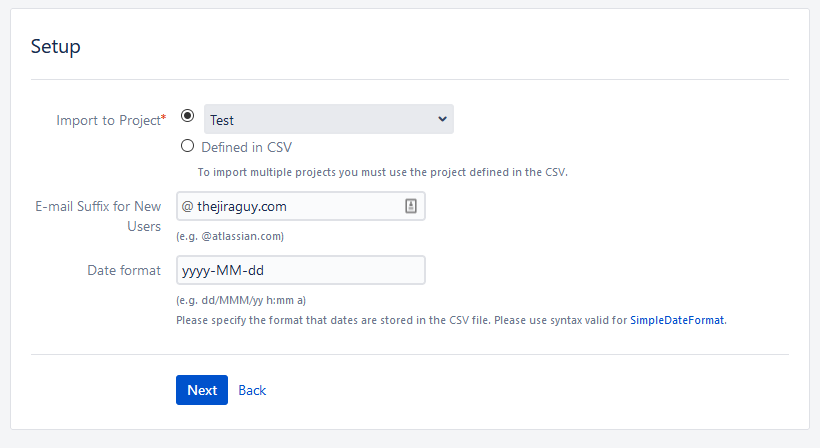
Once you are happy with everything, click “Next” to proceed.
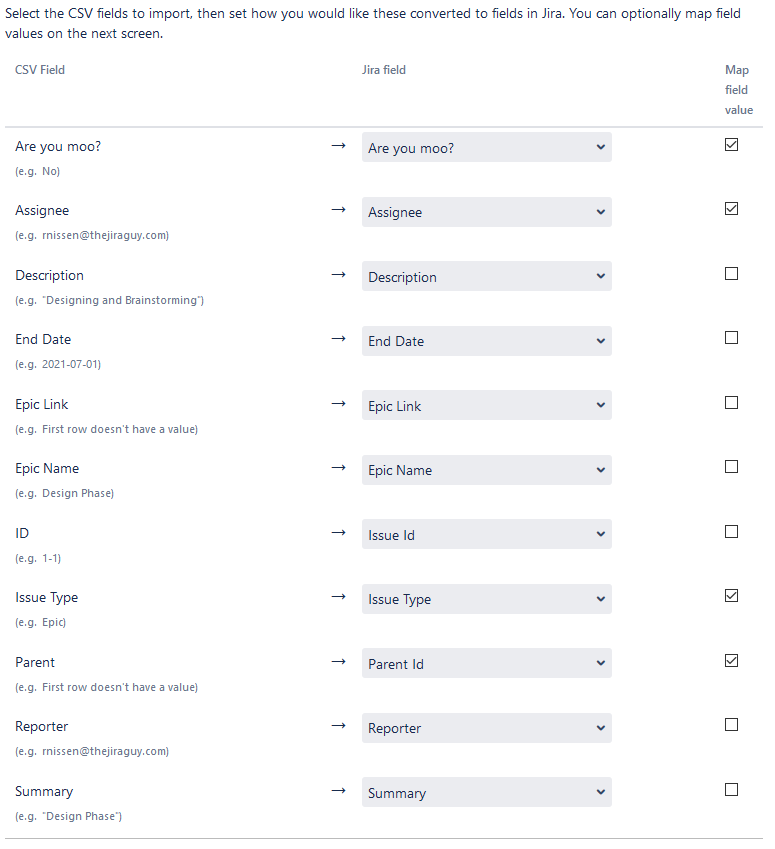
Defining your fields
Now you need to define what each column represents. For each field you intend to import, select the appropriate field in the dropdown. I prefer to start with the system fields first then work my way back to the custom fields but to each their own.
For each field, as you select its destination, a checkbox will light up next to it. You can select this checkbox to later select the value in Jira for each value in the CSV Value (known as value mapping). This ability is a pretty powerful feature, and we’ll be using it on several fields, including Reporter, Assignee, Issue Type, and “Are you moo?”. In general, I’ll map fields that have definite, discrete values, and avoid mapping “Freeform” fields like text, numbers, or dates.
For the field “ID,” we’ll map this to “Issue ID,” and “Parent” will map to “Parent ID”. These two fields are what is used in issue linking, and in particular, sub-task/parent linking.
I should also note that sometimes a custom field will not appear in your dropdown. This situation is likely because this field is not configured for your destination project. If this happens, update the field configuration, and on your import, click “Back,” then “Next” to refresh the field page.
Once you are happy with your Field mapping, click “Next” to get to the Field Value mapping screen. Jira is actually pretty smart, and will try to map as many values as makes sense.
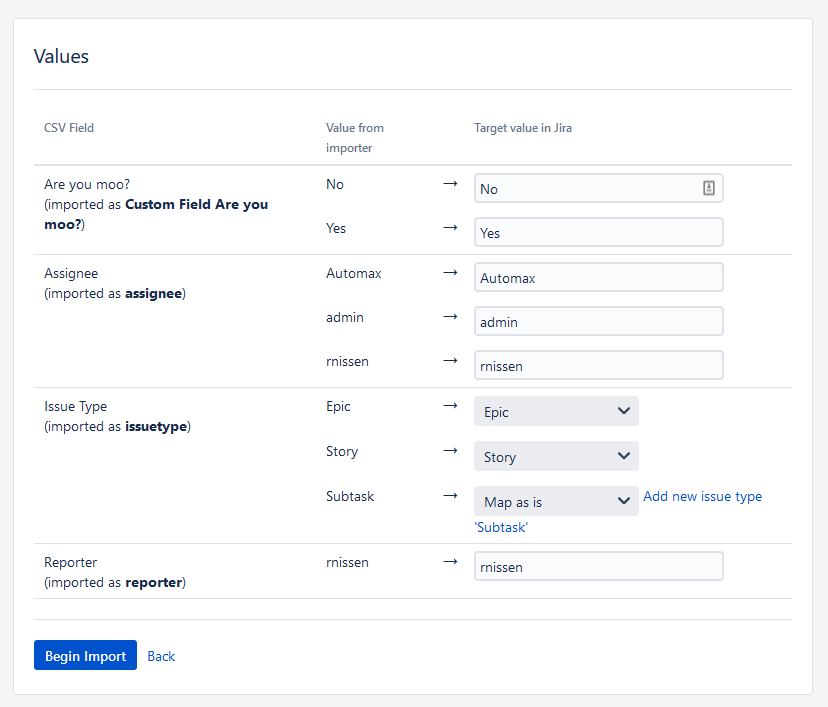
So we only need to change “Subtask” to map it to the actual Issue Type “Sub-task” (which fixes my typo!).
Once we are satisfied with our value mappings, we can click “Begin Import”!
Processing
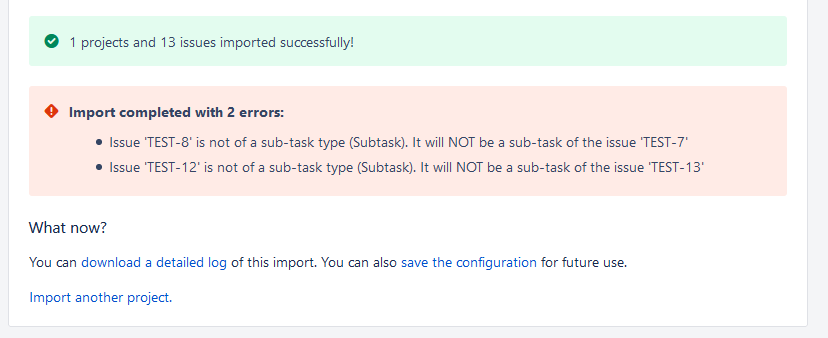
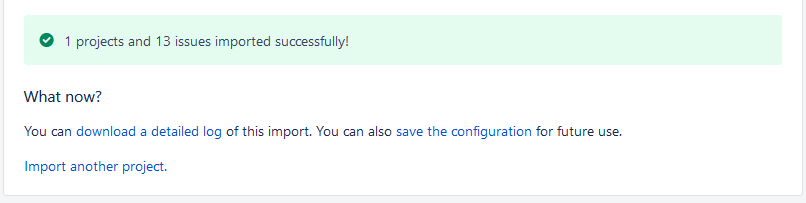
So – you double-check everything, and stuff still went wrong, huh? This is why we test. Go ahead and download the detailed log and save the configuration. Then delete the issues and try again.
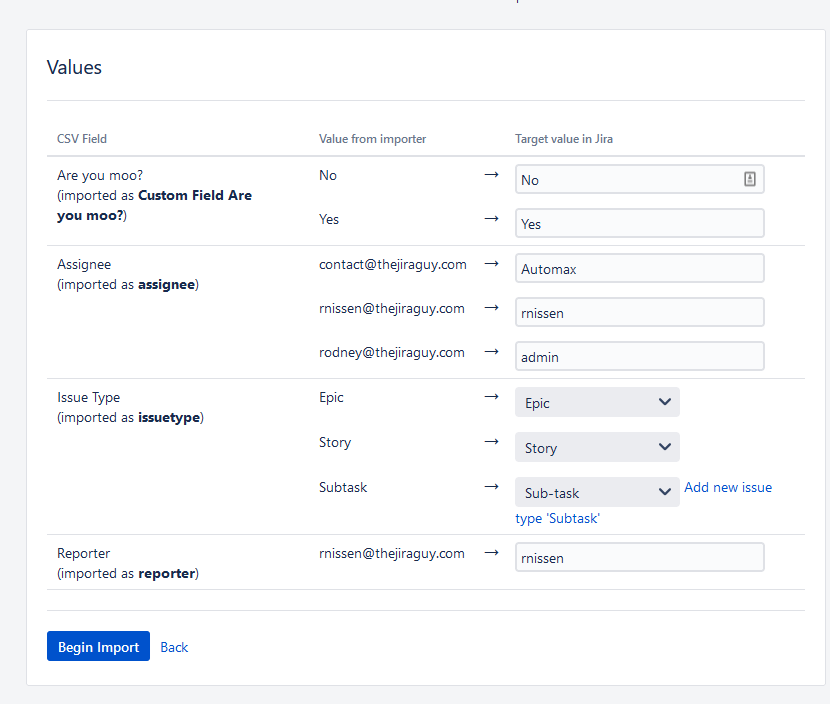
In my case, I misclicked the “Sub-task,” and it created a new standard issue type called “Subtask,” – which given it’s not a sub-task issue type, failed. Fix that, import again, and if everything goes well, you should see this.
The importance of Setting Boundaries
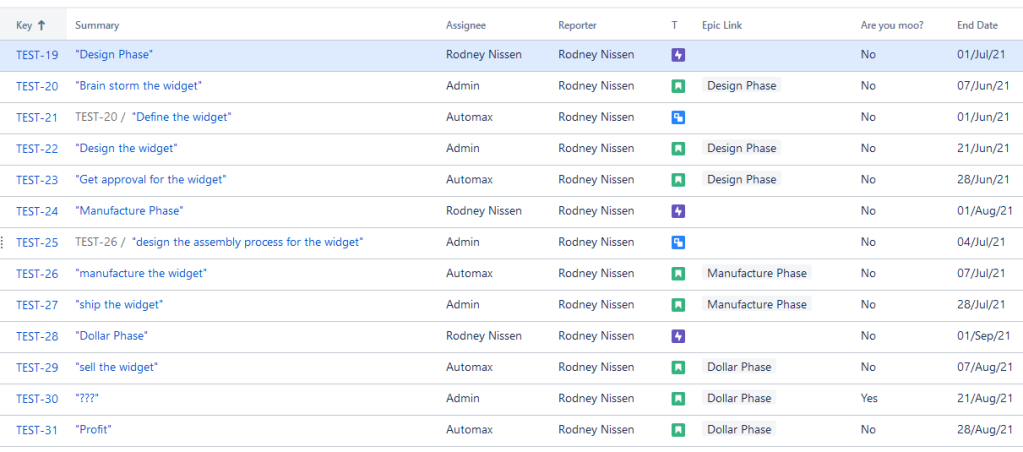
So, I’m showing an example here where I do 13 issues. However, you need to be careful here. When I accept submissions from PMs for issue creation, I try to put a hard limit on it of greater than 100 issues created. Why?
In this case, I had the best-case scenario. As the Jira Admin, I knew what format everything needs to be in to correctly create the CSV from the excel sheet and streamline things. PMs won’t do this. I usually schedule around two to four hours when doing this for a PM *just* to clean up the excel sheet before turning it into a CSV. Then the actual mapping will take more time still – as it scales with the number of issues you are entering, the number of fields you are specifying, etc. So, when I get one of these in from a PM, I usually expect to spend most – if not all – of that day just doing that.
At one point, I had a PM who particularly hated creating issues in Jira. So when he found out that I could do bulk issue creation, he went a bit crazy with it. One time, he handed me 5 of them to do, you know, just whenever. Another time he handed me one with only twelve issues. For the amount of time it would take me to bulk-create these twelve, he could have just gone and done it and been on with his day. But, my time wasn’t on his budget, and as “the Jira guy,” it was my job, no?
No. My job is to make sure the instance is runs smoothly for everyone. If I am constantly focusing on requests for one user – especially tasks he could do quicker himself – I cannot do that. So I kicked that one back and put up a rule that you had to have more than 100 issues to be considered for a CSV import.
So I add this tale for you to consider. CSV Imports can be a powerful tool to allow you to streamline your user’s experience. But it can also be a gigantic pain the rear if you aren’t careful with it and put boundaries in place early.
Tell me what you think?
Have you ever done a CSV Import to bulk-create issues for users? Is this something you think will be useful in the future? Let me know what you think! I’d love to hear from you here or in the comments on social media! You can find me on Facebook, Instagram, Twitter, and LinkedIn. If you want to get the latest from the blog as soon as it publishes, you can also subscribe below to get it delivered to your email!
And also: That’s officially 100 posts published! Thank you all for visiting my little corner of the internet. Even in my wildest imaginings, I never thought that the blog would ever become this popular in the community. So please keep sharing, posting comments, liking, and telling your colleagues about thejiraguy.com, and I’ll keep posting! Lets see if together, we can get this to 200 posts!
But until next time, my name is Rodney, asking, “Have you bulk-created your Jira issues today?”

Great reminder to set boundaries. Whatever we can do to enable our clients to get their jobs done we should do, as long as it doesn’t compromise our actual ability to deliver value for our clients at scale.
Never thought I’d write a comment like that this close to midnight. 😂
LikeLike
Great information. But how do you get your subtasks to stay grouped with their parent task after importing? Say you have the following ~30 issues: 10 initial Tasks (Issue Id’s 1-10), followed by 10 sub-tasks for Task 10, and finally you have another 10 or so regular tasks (Issue ID’s 21-30) The problem is that subtasks are not grouped with their parent task 11. They always appear at the end of the issue queue with auto-assigned issue IDs, In this example as Issue ID’s 30 – 40, instead of being grouped visually in the Jira project list queue with their parent task in sequence – in this example issue id’s 11-20.
Is there a way to keep them grouped with their parent task?
LikeLike
Thank you so much for this blog-post, you saved me after hours of head-scratching and googling. I had not realised one could download the configuration file (reading helps -.-) and was desperately trying to modify an existing configuration file without knowing the field identifier. SO THANK YOU FOR MENTIONING IT IN YOUR POST!
LikeLike
Thanks. Is the reverse process able to export CSV into the same original format that imported?
LikeLike
Is there a way to add the fields “given” “when” “then” as well for all stories thru CSV. Can you share an example on same
LikeLike
Thanks Rodney. This is what I was looking for and the way you have explained it step by step is
LikeLike