
Before we get started, I just wanted to say thank you yet again. Thanks to your sharing, comments, suggestions, and support, We hit yet another record month for page views. Fun fact: The month I put out my first article here, I got four views. No joke:
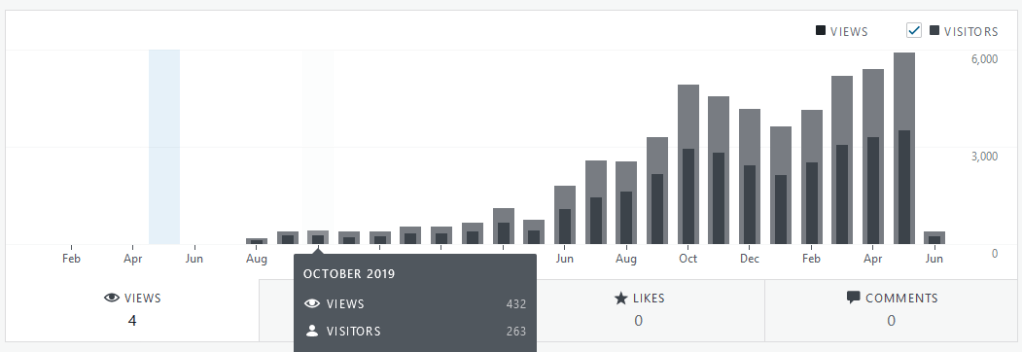
Heck, the first month I started to get any traction, I still got just shy of 200 views. Now I get that in a day more often than not. I don’t know how far we’ll get or how many views the Atlassian community can support, but I know that none of this would be worth it if it weren’t for all the messages I get telling me how much people are learning from this little weekly exercise. So thank you, and let’s see what we can do in June!
Anyways, where were we?
Oh yes, we had managed to get a single node up and running on Kubernetes and were at the point where we would typically set up the Database, initial settings, etc. One teensy problem with all that, though.
For licensing reasons, Atlassian cannot distribute the library to access MySQL with Jira – whether in the traditional form, in a docker container, or a Helm chart. So, we’ll need to add this library to the containers ourselves. And honestly, I was hoping this was no longer the case. This requirement was one of the biggest headaches last time I played with Jira and Kubernetes. But alas, this time there is hope:
# -- Specifies a list of additional Java libraries that should be added to the Jira container.
# Each item in the list should specify the name of the volume which contain the library, as well as the name of the
# library file within that volume's root directory. Optionally, a subDirectory field can be included to specify which
# directory in the volume contains the library file.
additionalLibraries: []
  # - volumeName:
  # subDirectory:
  # fileName:
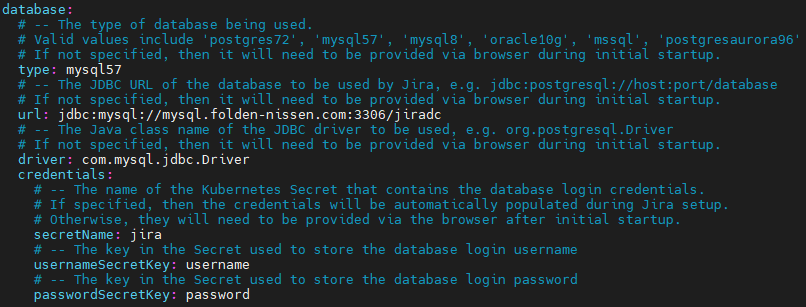
This snippet is from the values.yaml we’ve been using with Helm to customize our deployment. So we need a volume that contains the MySQL JDBC library, and Helm will take care of getting it into the nodes for us. Sweet.
So to do this, we will create a new directory on our NFS Shared Home called “mylibs,” put in the appropriate JDBC library, then add the following code snippet to values.yaml
  additionalLibraries:
    - volumeName: shared-home
      subDirectory: mylibs
      fileName: mysql-connector-java-8.0.25.jar

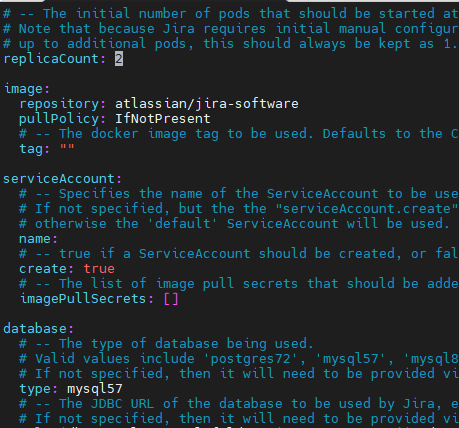
And while we are at it, we can update our values.yaml a bit more to include everything we need to have Jira configure the Database for us (and yes, this works even for fresh installs!)
database:
  type: mysql57
  url: jdbc:mysql://<<DB URL>>:3306/<<DB NAME>>
  driver: com.mysql.jdbc.Driver
  credentials:
    secretName: jira
    usernameSecretKey: username
    passwordSecretKey: password
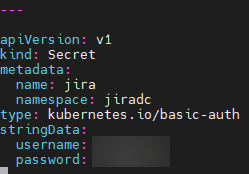
We’ll also add a section to the claims.yaml we built to enter the password and username for the DB into the Kubernetes vault. A note here, though – Helm isn’t always good about going back and updating an existing dbconfig.xml, so you might need to uninstall the helm chart, go to your various volumes on your worker nodes, and then reinstall your helm chart.
---

apiVersion: v1
kind: Secret
metadata:
  name: jira
  namespace: jiradc
type: kubernetes.io/basic-auth
stringData:
  username: <<DB Username>>
  password: <<DB Password>>
Then we’ll uninstall and reinstall the helm chart as follows.
kubectl apply -f claims.yaml
helm uninstall jira813 --namespace jiradc
helm install jira813 atlassian-data-center/jira --namespace jiradc --create-namespace --version 0.7.0 --values ~/values.yaml
An additional note for you to be aware of, and one that caused me to be late posting this article: I had everything up to this part working, but when I started Jira and entered my DB Credentials, it kept giving me an error saying to use an empty DB. Thankfully, one of the managers at Coyote Creek had heard of this and suggested using a dedicated user per Jira DB. And well, it worked! Just something to be aware of.
Setting Up and Scaling Jira
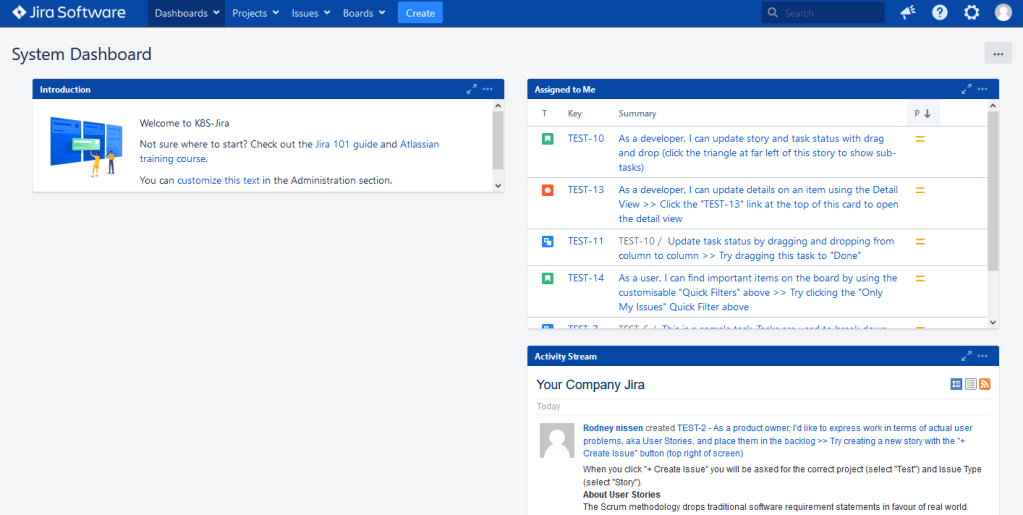
So, with Jira now up and running, we can do our standard setup. The DB credentials set will be skipped, as we are configuring that with Kubernetes, so Jira will go straight into setting up the DB. If you mapped the volumes to a local disk as I did, you could also tail the log to follow the process. Just find the active volume (/mnt/jira-home-1 or /mnt/jira-home-2, on the appropriate worker), then go to logs/atlassian-jira.log to see what Jira is doing.
After that, it’s a standard Jira set up – and as I’ve covered this already, I won’t bore you with the details. But after a bit, you’ll have this!
So – running on one node is excellent, but that’s not what you’re here for. This is Jira Data Center on Kubernetes, and you want to scale! So let’s talk scale. From my experience, Kubernetes is like any automation. You’re going to spend a lot of time upfront to perfect it, but you save much more time on the backend once you’ve done that.
To get started, go back to your values.yaml and update the fourth line that says “replicaCount” to match the number of nodes you want. Be aware you will need a Persistent Volume for each node you want to run. So, in this case, we’ll set it to “2.”
From there, we’ll execute a “Helm Upgrade” so it can bring in the configuration.
helm upgrade jira813 atlassian-data-center/jira --namespace jiradc --create-namespace --version 0.7.0 --values ~/values.yaml
kubectl get po,svc,ing,pv,pvc -n jiradc
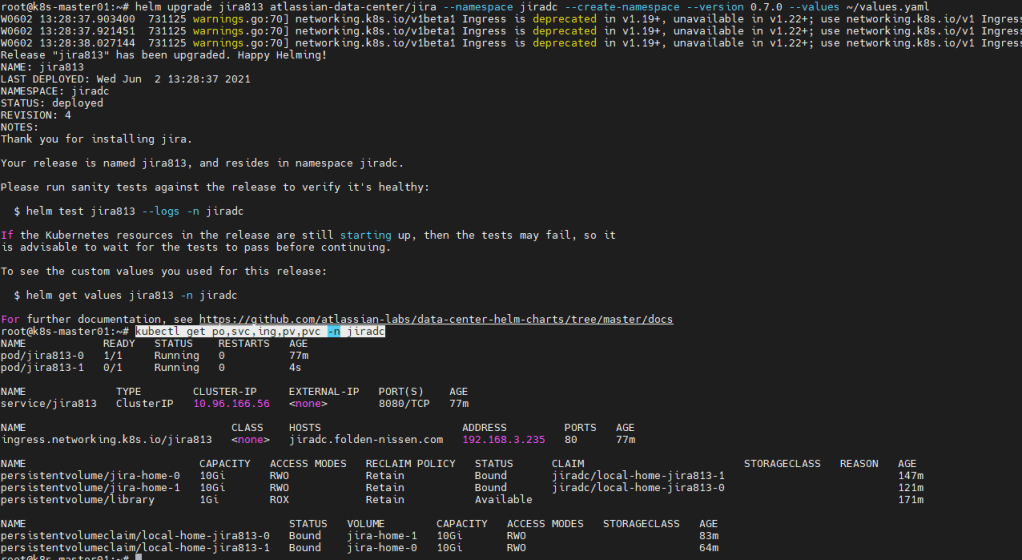
Then if you look at your active pods, you should see a new Jira node spinning up. Please wait a few moments for it to come online, and then check your system info to see the new Jira node running and ready. Yes, it was that easy. Scaling down will also work the same way to tune your usage to exactly your load.

What could go wrong?
So several things I noted while running this test. I showed you the best way I found to run this – but you missed out on the hours it took me to perfect this.
First, for some reason, the log folder in the home directories are being created by root instead of the jira user. Which means your pods could fail to start. To fix this, go to your active worker for that pod, go to its home directory, and change the owner and group to 2001:2001.
After this, delete the pod to have Kubernetes recreate it, and it should run great.
Second, sometimes if the claim was deleted, the Persistent Volume would still count itself as claimed and block other claims from coming up – thus blocking your pods from coming online. If this happens, uninstall your helm chart, delete the claim and volume, then run your claims.yaml again to recreate the PV. After that, it’s just a matter of reinstalling the helm chart, and you should be good to go.
And lastly, I noticed this annoying little notification when I installed the instance.
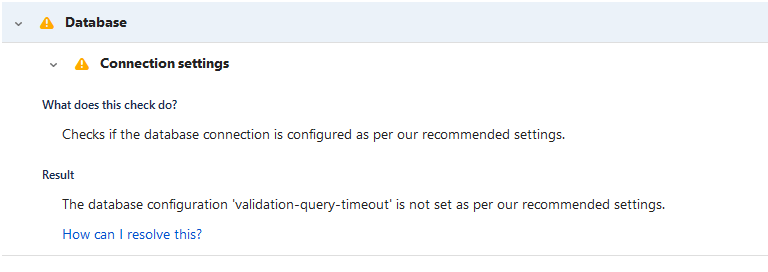
If it bothers you, you can add it to your dbconfig.xml, then restart the pods, but I’m not sure it’s 100% worth it. To be clear, the helm chart is authored by Atlassian, and it’s what is generating the dbconfig.xml, so ultimately I think this is an Atlassian bug to fix, but it’s not anything truly worrying.
Would I recommend this?
That is a loaded question. First off, I don’t know anything about each individual’s skill set and technical expertise. And almost every deployment is going to be unique in some way. But if you are technical and want to learn something new (and honestly, just a bit challenging), it’s not a bad way to go. If you are successful, you are the hero who saved your team a ton of time by moving to Kubernetes. I will say this: having gone through and figured this out, I can see some arguments for its use that I didn’t see before.
I am so sorry for having this come out late.
That being said, I will not put out a broken how-to, so I always run and check my instructions first before I release anything to the public. And today – well – there was a problem. But it’s fixed now, and it so elegantly fixed some issues I was having with this cluster that I’m happy!
As always, you can find the latest from me on LinkedIn, Facebook, Twitter, or Instagram, where you can find the latest news on the blog, exciting finds, and always the latest post. You can also subscribe below to get the newest posts delivered to your email. It is hands down the fastest way to get the latest from me. But until next time, my name is Rodney, asking, “Have you updated your Jira issues today?”
Discover more from The Jira Guy
Subscribe to get the latest posts sent to your email.
