How is it going, Jira Guys and Gals? Today we will be continuing our look into running Jira Data Center on Kubernetes. Last week we got our environment set up and ready for service.

As I said before, I’ve done some experiments on this before. And given that experience, I do have some concerns moving forward. First of all, most DC installs require you to seed the local home directory with some information. This task was tricky for me to do with the tools that existed then, so I’ll be interested in seeing Atlassian’s approach to this problem.
However, the biggest issue I encountered during my previous experiments was that I’d always have one issue or another pop up in the health checks. I’d either have trouble keeping all the containers at the same time settings (which, all nodes were using the same NTP servers, so…why?). Or I’d have trouble with the load balancing on the system.
But this time, I’ll be using Atlassian’s helm chart, not some home-brewed experiment, so I think that will give me the edge to be successful this time.
Corrections from last week
So – I’m not perfect. In my post last week, there was an error in how I had you add nodes to the cluster. In it, I gave the following command.
kubeadm join k8s-cluster.folden-nissen.com:6443 --token <some numbers & letters> --discovery-token-ca-cert-hash sha256:<some more letters & numbers> --control-plane --certificate-key <even more letters and numbers>
The error came in including the option –control-plane. This essentially creates a second, redundant master node. And in a production instance, this would be something you want. However, you can only have two control-plane nodes, which means you can’t add the third node. So to make sure you can add both nodes, we need to drop the –control-plane option from the join command.
kubeadm join k8s-cluster.folden-nissen.com:6443 --token <some numbers & letters> --discovery-token-ca-cert-hash sha256:<some more letters & numbers> --certificate-key <even more letters and numbers>
So, I have fixed this already in last week’s article, but I wanted to make anyone who read it before I posted the fix aware and tell you how to fix it.
First off, on the Worker node that is added, we need to reset kubeadm.
kubeadm reset
Then on the Master node, we delete the node:
kubectl delete node k8s-worker01
After that, we re-add both nodes using the corrected command (without the –control-plane option).
Additionally, their roles, by default, will be . This isn’t a problem, but if it bothers you as it bothered me, you can add a label to the worker nodes with the commands below. I’ve decided to call their role “node,” but you can put whatever makes sense for your environment.
kubectl label node k8s-worker01 node
kubectl label node k8s-worker02 node
Prep Work: Ngnix, MetalLB, and Persistent Volumes
So, before we get to the meat and potatoes of the Jira install, we have some prep work to do first. Mainly, we need to install a way for you to get access to Jira, as well as setup someplace for Jira to store it’s local home directory.
First things first, we’ll install MetalLB onto our system. Thankfully, this can be done with a few commands run on our master node:
kubectl apply -f https://raw.githubusercontent.com/metallb/metallb/v0.9.6/manifests/namespace.yaml
kubectl apply -f https://raw.githubusercontent.com/metallb/metallb/v0.9.6/manifests/metallb.yaml
# On first install only
kubectl create secret generic -n metallb-system memberlist --from-literal=secretkey="$(openssl rand -base64 128)"
Easy enough, right? Now we need to setup some configurations. Open a new file, and paste the following in.
apiVersion: v1
kind: PersistentVolume
metadata:
  name: jira-home-1
spec:
  capacity:
    storage: 10Gi
  accessModes:
    - ReadWriteOnce
  persistentVolumeReclaimPolicy: Retain
  hostPath:
     path: "/mnt/jira-home-1"

---

apiVersion: v1
kind: PersistentVolume
metadata:
  name: jira-home-0
spec:
  capacity:
    storage: 10Gi
  accessModes:
    - ReadWriteOnce
  persistentVolumeReclaimPolicy: Retain
  hostPath:
     path: "/mnt/jira-home-2"

---

apiVersion: v1
kind: ConfigMap
metadata:
  namespace: metallb-system
  name: config
data:
  config: |
    address-pools:
    - name: default
      protocol: layer2
      addresses:
      - <some IP Range>
You should note that I’m placing the home into the actual file systems on the node. Therefore, you need to make sure that /mnt/jira-home-1 and /mnt/jira-home-2 exist on both nodes.
Also, I’m specifying a range of IP addresses for the Load Balancer. Be sure this IP range is free and won’t cause any IP conflicts.
After you save the file as a .yaml file, run the following command:
kubectl apply -f <your filename from above>.yaml
This should setup the claim and finish configuring MetalLB. Now we need to install nginx-ingress:
kubectl apply -f https://raw.githubusercontent.com/kubernetes/ingress-nginx/controller-v0.46.0/deploy/static/provider/cloud/deploy.yaml
Another simple command, and we should be ready for the Helm chart. In speaking of which…
Helm Chart
We’ll be following the instructions provided by the Atlassian Labs Helm chart on Github. According to the instructions provided, we have the following prereqs:
- A Kubernetes cluster, running Kubernetes 1.17 or later
- earlier versions may work, but haven’t been tested
- as of November 2020, 1.17 is the oldest maintained release of Kubernetes
- Helm 3.3 or later
- again, earlier versions may work, but have not been tested
- In order to install the charts to your Kubernetes cluster, your kubernetes client config must be configured appropriately, and you must have the necessary permissions.
- A database provisioned and ready to go
- Must be of a type and version supported by the Data Center product you wish to install
- Must be reachable from the product deployed within your Kubernetes cluster
- The database service may be deployed within the same Kubernetes cluster as the Data Center product, or elsewhere.
- All of the Data Center products require a shared network filesystem if they are to be operated in multi-node clusters.
- If no shared filesystem is available, the products can only be operated in single-node configuration.
So we have the first three requirements cleared last week, so we have to set up a share and a database. For both, we will be consulting our old friend, the Supported Platforms document. I’ll be targeting Version 8.13 of Jira, as it’s the latest LTS release.
For the Database, I’ll be using MySQL5.7, as I have that server ready to go. And I’ll be following the Connection guide to set up the Database for Jira on the DB Server. I’ll use free space on my FreeNAS Server to host a dedicated NFS Share for Jira DC. So that will be the other two requirements ready to go.
Defining variables
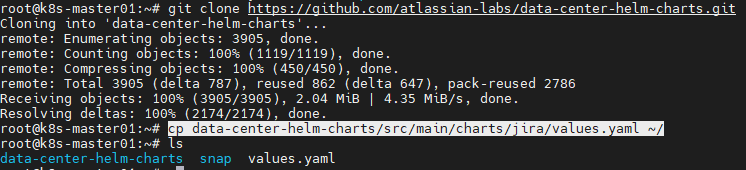
So the first thing we need to do is download a copy of the repo locally so we can get some source files used to define the specifics of our instance.
git clone https://github.com/atlassian-labs/data-center-helm-charts.git
cp data-center-helm-charts/src/main/charts/jira/values.yaml ~/
After that, we can go into our values.yaml file and start modifying some things we’ll need. Opening it up in the text editor, we see options for Database, JIra, Ports. However, the first setting we are going to modify is the clustering: section. By default, it’s set to enabled: false. We will change this to be enabled: true.

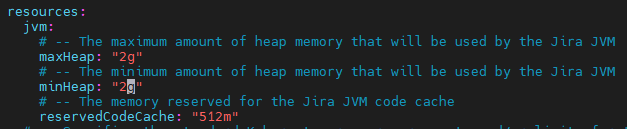
The next section we’ll update is the resources. One GB for the heap seems a bit small, so I’ll be upgrading that to two.
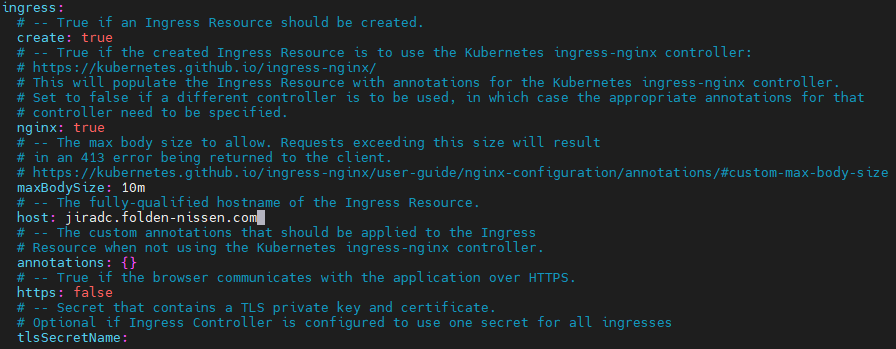
After that, we’ll move on down to the ingress: section. Here, we’ll need to change “create: false” to be “create: true”. We’ll also add a host name to the ingress.
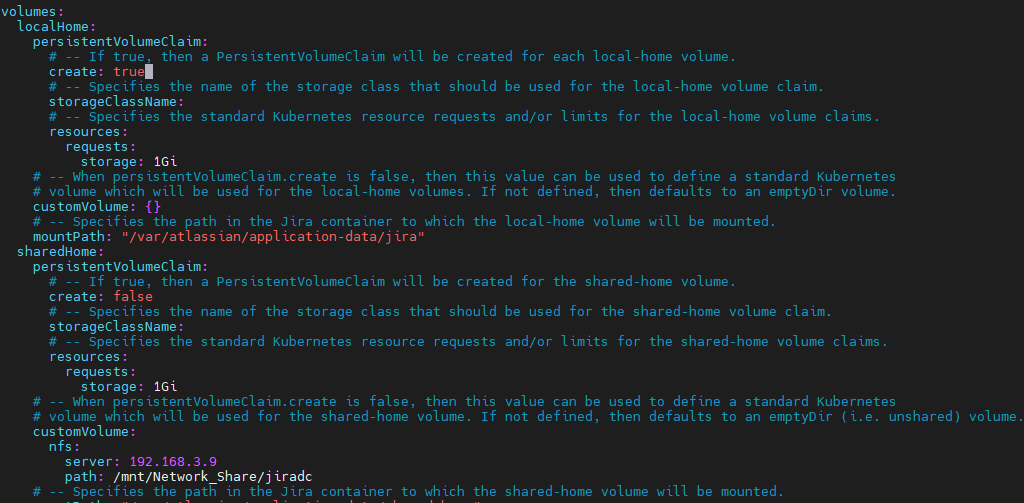
Lastly, we’ll move down to Volumes. Under localHome:, we’ll also updated “create: false” into “create: true”. We’ll also updated sharedHome:, where we’ll remove the braces from after customVolume: and add the following:
  shared-home:
    customVolume:
      nfs:
        server: 192.168.3.9
        path: /mnt/Network_Share/jiradc
Deploy chart
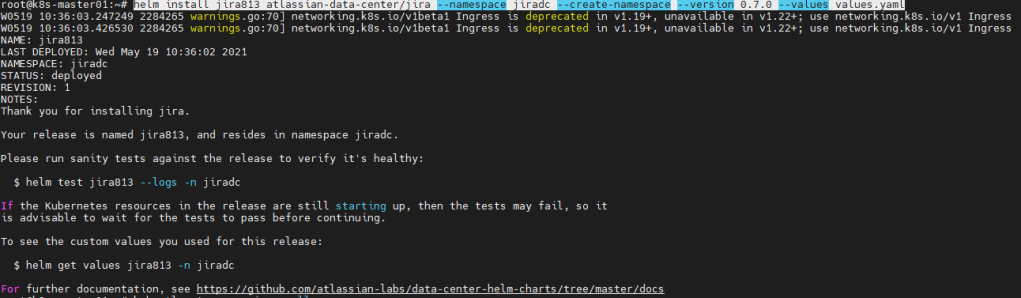
Now that we have all our values we are currently interested in defined, we’ll add the chart into Helm and start our deployment. We start by adding the repo to Helm.
helm repo add atlassian-data-center https://atlassian-labs.github.io/data-center-helm-charts

After we add the repo, we should be clear to add our chart.
helm install jira813 atlassian-data-center/jira --namespace jiradc --create-namespace --version 0.7.0 --values values.yaml
Now wait until your jira node is ready. We are just starting out with the one node, for now.
kubectl get po,svc,ing -n jiradc
kubectl describe pod jira813-0 -n jiradc
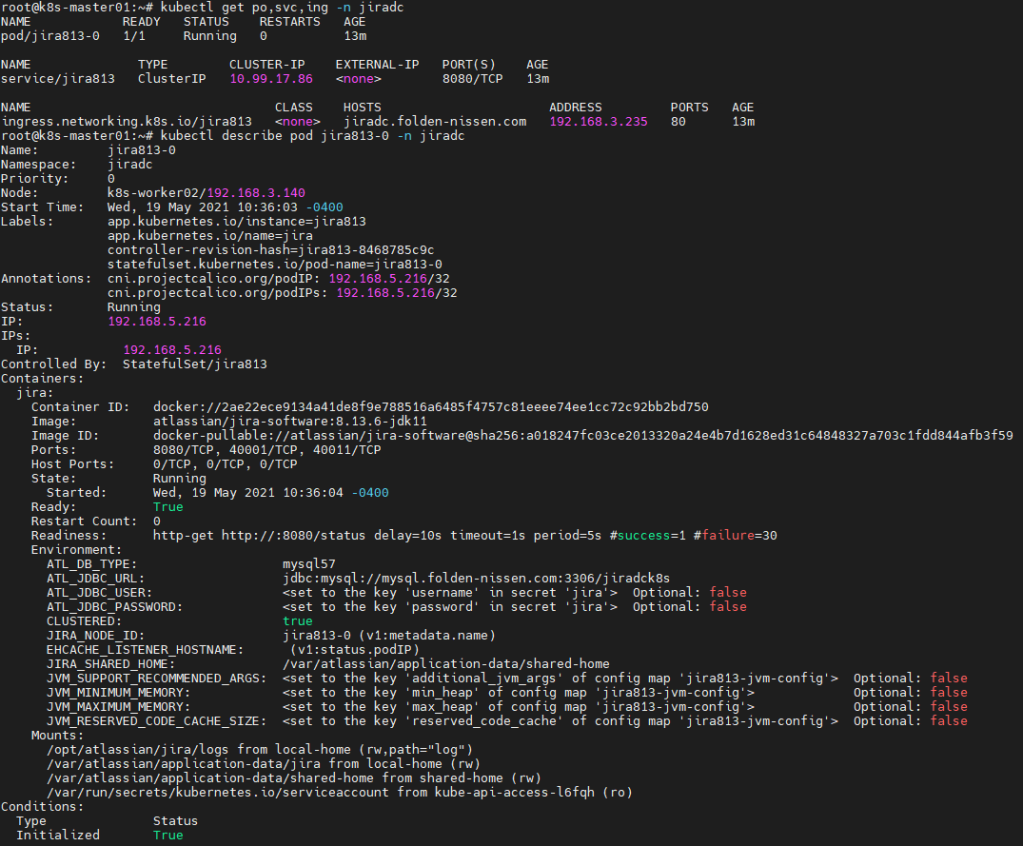
Note that your Pod should have “Ready: True”
Also note your Ingress should have an IP associated with it. In my case, this was 192.168.3.235. You should set your jiradc url to resolve to that IP Address, as the ingress controller won’t route to your node without a proper URL set up.
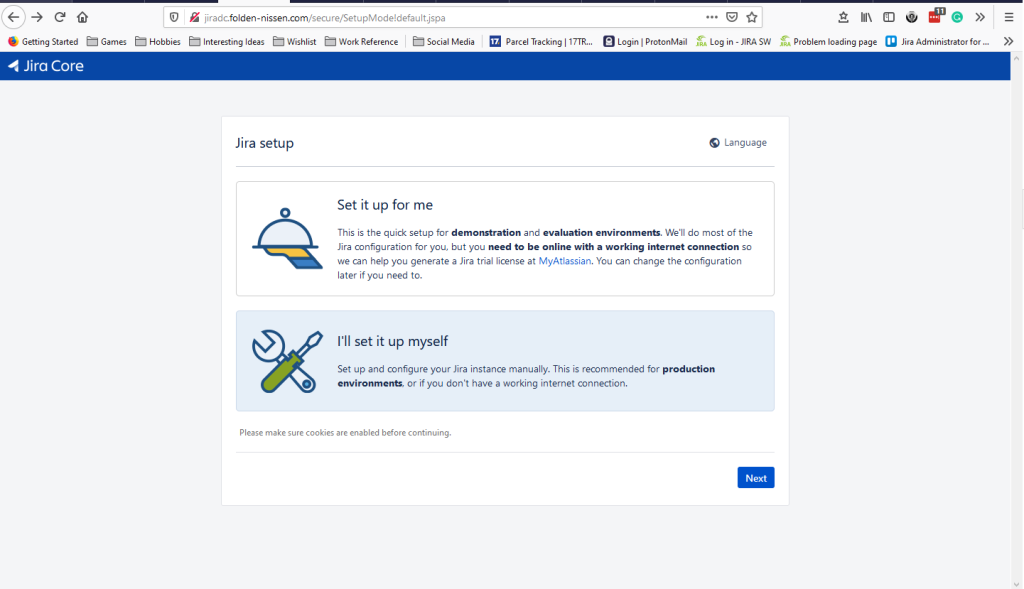
However, once you set up the URL, you should be greeted with this Oh So Glorious site!
Tune in Next week
This feels like a good stopping place, as I’m out of time to write on this! I spent you don’t want to know how long in debugging and research! However, there will be one more followup where we’ll discuss what to do if something goes wrong, how to add libraries to your containers (like, say, the MySQL Driver), and how to scale your new cluster.
Don’t forget that if you want to get the latest from the blog, subscribe below to get new articles delivered to your inbox! You can also follow me on LinkedIn, Facebook, Instagram, and Twitter to get the latest from me! But until next time, my name is Rodney, asking, “Have you updated your Jira issues today?”

Hi Rodney – awesome guide. This might come in handy in the near future. Just wondering, how many users do you support using a setup like this?
LikeLike
How many users do I support? well, you see…
I use a personal Jira test instance for writing the blog. This means the system I’m setting up here will only ever have one user – me.
However, I know ADP currently runs their Jira Data Center instance on Kubernetes, and while I cannot know exact numbers, I imagine their user base must reach the thousands.
LikeLike
Hi Rodney!
Thanks a lot for the guide! I’m trying to follow it.
Unfortunately I got an error in the step of deploying the chart:
helm install jira813 atlassian-data-center/jira –namespace jiradc –create-namespace –version 0.7.0 –values values.yaml
ERROR: INSTALLATION FAILED: unable to to build kubernetes objects from release manifest: unable to recognize “”: no matches for kind “Ingress” in version “networking.k8s.io/v1beta1”
I’m a beginner. Do you see, how I could resolve this issue?
Best regards – Christoph
LikeLike
I’m not sure yet if it will really work; but I was able to deploy the chart. I left out the “-version 0.7.0.”
Hope, it will start (no time to make further tests right now) – kind regards – Christoph
LikeLike