
So welcome back to the third (and final) post about installing JIRA from a clean linux setup. Last week we deviated a bit from this series, but there was a reason. I needed the extra time to study, and well, this is going to be a long post.
Study for what you say? I’m glad you asked! As of last Thursday, I can officially add this shiny thing to my resume:

I also took the opportunity to get my Scaling JIRA badge (ASB-SCJ) to extend my ACP-JA. But I did pass the test! Needless to say, this is an actual video me last week.

But with self-congratulations out of the way, I think it’s time we continue on with the series!
What were we working with again?
So, as it’s been a few weeks, lets take a look at where we are. We started with a clean CentOS install on a VM with the following specs:
- OS: CentOS 7 Linux
- RAM: 4 GB
- Processors: 2
- Root Hard drive of 30 GB
- Extra Hard drive of 50 GB to house the database and JIRA’s home directory
On top of this, we installed MySQL 5.7 and JIRA Software 8.1.3, and had everything in a working state, but running off of port 8080.
However…Security Updates…
Fun fact, did you know that before I started with my current job, I had about three weeks of posts saved up to allow me to focus on my career for a bit? That means I had the Part 2 for this series finished and in the can about two weeks before it was published. And honestly, I had done the install and captured the pictures weeks before that. Which leads me to the reason I bring this up…
On Sept. 18, I got a nice message from Atlassian, letting me know about a security vulnerability. As the version I installed was not covered under this or any previous alert, I opted not to change my post to address it – opting instead to disclose the fact now. However, I do *highly* recommend you check back with this page regularly, and plan your upgrades and installs accordingly.
So why do we need a reverse proxy?
So, for most seasoned people, this will be obvious. But I’m going to cover it because it’s always helpful to explain the why of what we are doing. Especially when it seems like an extra step.
When Tim Berners-Lee created the original http protocol, he did not imagine a world where we’d be handling everything through websites. Honestly, he was just making a mechanism to share public research papers. Being public, he didn’t foresee the need for security.
The end goal of all this is to say, if you aren’t specifically using https (<-note the “S” at the end), every time you or someone logs into your JIRA instance, you are sending that password in clear text to the server. Sounds bad? It’s because it is.
The HTTPS protocol is how we fix this. It takes the web traffic you send, encrypts it in such a way that only the server can decrypt it, and sends it on to the server.
JIRA’s tomcat can do this encryption/decryption with some work and time – however, it’s not great at it. Combine that with the fact that it will use resources in your JVM heap that could go to JIRA, it’s generally agreed that this isn’t the best solution.
So we setup what’s called a “Reverse Proxy”. It sits in front of the web traffic, and handles the encryption/decryption much better than JIRA can. That is to say, JIRA will feel much more responsive while still staying secure.
Sounds Great, how do we get started?
First we need to ask: Which service we are using as a proxy? There are several options, with two being the ones most people choose: Nginx and Apache. Today I am going with Apache for two reasons.
The first, and likely most important for me, it’s what I know. I’ve been setting up some variation of LAMP servers for over 15 years now. It’s a system I know well by now.
Second, and likely most important for you: It’s the one I found documentation for on Atlassian’s knowledge base. When in doubt, follow the docs.
So…more reading material then?
You got it! In today’s reading corner, we have “Securing your Atlassian applications with Apache using SSL” from Atlassian. Thankfully it’s the only one we’ll need this week.
I’ll be deviating from it in a place or two (mainly in the Apache Configuration), but I will note where I do this. These changes are quality of life improvements, which makes my (and hopefully your) life easier.
SSL Certificates
If you are lucky, you will have someone at your company who can grant you access to – or otherwise get – an SSL Certificate for you. Unfortunately, you are the JIRA Administrator, so if you don’t have this resource, you will need to get one yourself.
You can get them from a variety of sources, but I recommend you stick with reputable Certificate Authorities. It would very much ruin your day if you went cheap just to find Mozilla or Google pulled that CA, causing your site to stop working across the internet.
For my home environment, I use a wildcard certificate from Comodo. No matter who you use, if they are reputable, they will have a knowledge base to help you through the process, so I won’t cover that at this time, instead assuming we are starting after you have received your certificate.
When I ordered mine last, I got it within the hour, so if you have to wait to get one, you won’t have long to wait.
So, what will I get when I finish
When you finish, you’ll likely get a zip or other compressed file containing, your certificate, several other certificates, and a key file. Save the key, it will look something like this.
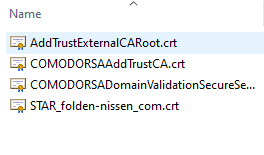
Now you will notice my key file is missing. Please, for all that is good, keep your key secure at all times. With that file, anyone can decrypt the packets heading to your server.
Of what you can see here, we have three chain certificates, plus my certificate (Star_folden-nissen_com.crt). You will need to know what parts are what. Transfer all these files plus your key to your server’s filesystem, taking note where each is.
So, we’re finally going to do something on the server?
Yes! First thing first, we want to make sure Apache is installed on your system. Here we’ll use a variant on CentOS called httpd. This still very much is Apache, just with focus on only putting out the most important updates – in such a way that doesn’t break your configuration.
yum install httpd mod_sslIf you need to install it, you’ll see the familiar confirmation. Type “y”, followed by enter to proceed.

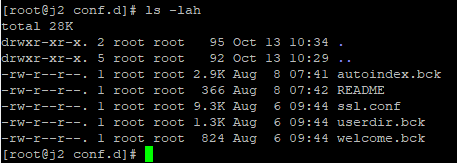
Looking at the configuration directory, we should see the following files
cd /etc/httpd/;ls -lah
For the next section, we’ll be focusing in on the conf.d folder.
Configuring Apache
I told you when I’d be deviating from the Atlassian Documentation, and where it is. I like to separate each service a reverse proxy is supporting into it’s own conf file, as it makes everything easy to look through. While not expressly explained in the documentation, it doesn’t go against it, but I’d like to be clear about any deviations I make and why.
Moving into the conf.d folder, we’ll see the following files:
- autoindex.conf
- README
- ssl.conf
- userdir.conf
- welcome.conf
Really, the only one we’ll care about today is ssl.conf, however we’ll want to disable the rest from apache. This can be done by renaming the extension of each from .conf to anything else. For example:
mv autoindex.conf autoindex.bckAfter you run this for everything but ssl.conf, you should see this:
Now lets dive into ssl.conf. Open it up with the text editor of your choice (I prefer vim, but nano is admittedly much easier to learn). You will see a bunch of settings required for ssl. We’ll keep most of these, instead commenting out anything between <VirtualHost _default_:443> and </VirtualHost> (including these two lines).
After this, we are going to create a new file, “jira.conf”, and entire the following.
<VirtualHost *:80>
    ServerName <subdomain>.<domain>.com
    Redirect Permanent / https://<subdomain>.<domain>.com/
</VirtualHost>


<VirtualHost *:443>
    ServerName <subdomain>.<domain>.com

    ProxyRequests Off

    <Proxy *>
         Require all granted
    </Proxy>

    ProxyPass / http://<subdomain>.<domain>.com:<port>/
    ProxyPassReverse / http://<subdomain>.<domain>.com:<port>/

    SSLEngine On
    SSLCertificateFile /path/to/your/cert.pem
    SSLCertificateKeyFile /path/to/your/privkey.pem
    SSLCertificateChainFile /path/to/your/first_chain.pem
    SSLCertificateChainFile /path/to/your/second_chain.pem
    ...
    SSLCertificateChainFile /path/to/your/nth_chain.pem

</VirtualHost>
A few notes here. You need to put in as many SSLCertificateChainFile entries as you have chain files, but be sure to include them all. This example list the files in a .pem format, but in reality they can be any number of different file extensions, so don’t think you need to chain it to be a .pem specifically.
But what if I have my JIRA on a sub-directory?
This is supported, but we’ll need to make Apache aware of this fact. Assuming your sub-directory is <subdomain>.<domain>/<contextpath>, we’ll get
<VirtualHost *:80>
    ServerName <subdomain>.<domain>.com
    Redirect Permanent /<contextpath> https://<subdomain>.<domain>.com/<contextpath>
</VirtualHost>


<VirtualHost *:443>
    ServerName <subdomain>.<domain>.com

    ProxyRequests Off

    <Proxy *>
         Require all granted
    </Proxy>

    ProxyPass /<contextpath> http://<subdomain>.<domain>.com:<port>/<contextpath>
    ProxyPassReverse /<contextpath> http://<subdomain>.<domain>.com:<port>/<contextpath>

    SSLEngine On
    SSLCertificateFile /path/to/your/cert.pem
    SSLCertificateKeyFile /path/to/your/privkey.pem
    SSLCertificateChainFile /path/to/your/first_chain.pem
    SSLCertificateChainFile /path/to/your/second_chain.pem
    ...
    SSLCertificateChainFile /path/to/your/nth_chain.pem

</VirtualHost>
Please note the subdirectory here includes a leading slash, but not a trailing one. Be sure yours looks like that as well, otherwise you will have problems.
Also keep note of what you have as <contextpath> – we’ll need it again here in a bit.
So what now?
Before bringing Apache online, we’ll need to test the configuration.
apachectl configtestAssuming everything is alright, you’ll see a “Syntax OK”. It won’t catch every problem, but it will catch some, which is better than nothing.
Next we’ll need to allow firewall traffic to ports 80 and 443:
firewall-cmd --zone=public --permanent --add-service=http
firewall-cmd --zone=public --permanent --add-service=https
firewall-cmd --reload;
And finally, we need to tell SELinux that Apache can be allowed to do an HTTP Relay.
setsebool httpd_can_network_relay onAfter all of these steps are completed, we can start, enable and test our JIRA proxy
systemctl start httpd
systemctl status httpd
systemctl enable httpd
And we’re done?
If you’ve done everything correctly, browsing to your JIRA Server on port 80 should automatically redirect you to port 443 and show JIRA.
Note: if you are using a subdirectory, JIRA will not come up at all. But you should still see a secure connection. We’ll fix this in a later section.
Notice the notification bar across the bottom. This is because we need to make JIRA aware it is running through a proxy.
On the filesystem, navigate to <jira_install_dir>/conf/, and open up server.xml in your text editor of choice. You should see something like this.
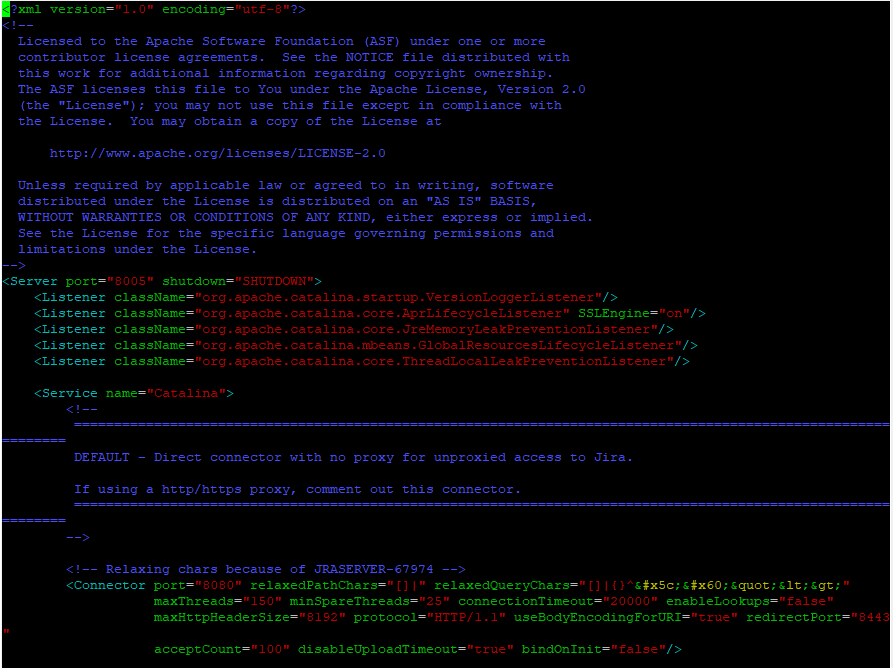
Under the connections section, add the following without modifying anything else in there.
scheme="https" proxyName="<subdomain>.<domain>.com" proxyPort="443"When done, the connector should look something like this:

Remember that context path from earlier?
If you are hosting your JIRA on a subdirectory, you will need to make JIRA aware of that here as well. Go down to the context section, and where it says path, enter “/<contextpath>”. As with earlier, note the leading slash, and do not put a trailing one. It should look something like this when you are done.

Anytime you make changes to server.xml, they will not be reflected until you restart JIRA.
systemctl restart jira;tail -f <jira_home_dir>/atlassian/application-data/jira/log/atlassian-jira.logThis should restart JIRA if you have installed it as a service, and then bring up the log file for you to follow as it boots. Anytime you make changes to configuration files, it’s always a good idea to monitor the logs during startup – just to make sure the system comes up cleanly.
SO ARE WE DONE NOW!?!?!?!?!?
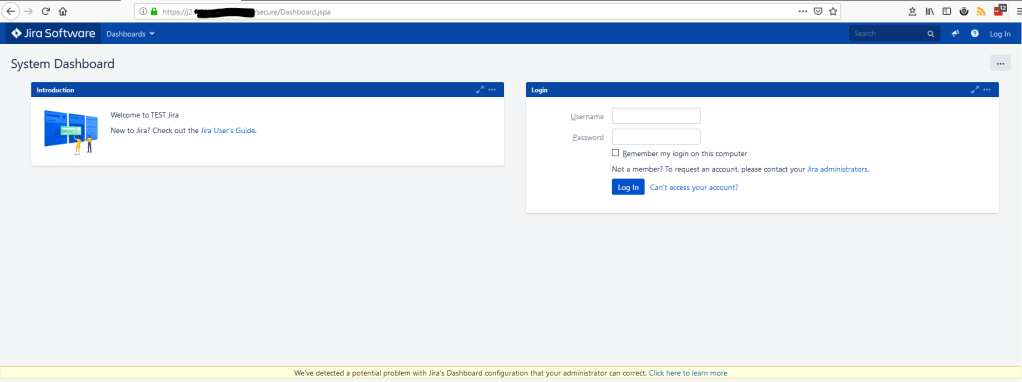
Uh…no. We have two last things to do. If we go to the site now, we no longer see that notification bar. HOWEVER, if we log into our admin account, we see the following message.

Here, we simply click “Update Jira’s base URL” and it should update to the URL you are accessing it from.
While we here, we also want to run a health check by going to Administration -> System -> Troubleshooting and support tools. If all the steps were followed, everything should be green. If not, the items not in a passing state will link to documents to help you fix it.
And finally, we want to remove the firewall exception we setup to initially access JIRA during setup.
firewall-cmd --zone=public --remove-port=8080/tcpAnd now, we are done!
Congratulations! You know have a production ready JIRA instance. It’s a good bit of work, but we’ve made it! Go, take a break, relax for a few minutes. There are still steps you will need to do like add users (or preferably, a user directory), setup projects, and in general be *that* guy at your company. But for the moment, this task at least is done.
It’s been quiet the journey. I get it, this isn’t a trivial process. To help, I’ve long had a checklist that I follow to make sure I hit each step – and I’ve decided to make it public. Hey, if it’s good enough for a pilot preparing for takeoff, why not use it as an Admin preparing for a Production instance. You can access it in the link below
And Some closing notes
I’ve seen some people reminding me that the Atlassian JIRA Cloud offering is still a thing, and requires a lot less setup. And you are right! There are customers who need will need something quick, and have no need to learn how to set it up the way I have. For these customers, absolutely use JIRA Cloud. It does have it’s limit, but for small shops, it’s really the best option.
That being said, there are companies that don’t have that option. Either internal policies or relevant laws say they cannot have a cloud instance of JIRA. And they may not know the first thing about setting up a production ready instance. Those are the people I wrote this guide for.
Knowledge isn’t meant to be trapped and kept forever. It’s for us to share after we learn it, so that it can live on well beyond our time. I consider this just the start of giving back the knowledge I have gained from the greater Atlassian community.
So – as of this writing, I’m not actually sure what next weeks post will be about. I have several ideas, just not sure which one to chose. If you have anything you would like to hear me talk about, please let me know in the comments below! Until then, this is Rodney, asking “Have you updated your JIRA issues today?”
Discover more from The Jira Guy
Subscribe to get the latest posts sent to your email.

1 Comment