
So, I’ve been quiet here for a bit. There’s a reason. At the end of July, I was laid off. I’m told it had nothing to do with my performance, that is was just a matter of us loosing a major client and the numbers not adding up.
Either way, that puts me squarely back in the job market, which has been my focus for the past month. However…
The Jira Angle
The thing about a job hunt is – you gotta keep on it. It’s on you to follow up with an HR representative and figure out whats going on. Don’t be pushy, obviously, but be engaged. To that end, it was quickly getting to the point last week where I couldn’t keep track of all of it in my head.
Job hunting is also a project – and I happen to know a good deal about a highly customizable Project tracking tool. So, I fired up my personal Jira instance, patched it up to 8.3.1, and created myself a new project: JobHunt (JOB)

This was a custom project from the ground up. It was as much a task to keep my skills sharp as it was to solve a practical problem. But I’ve also realized it’s a great way to show just how flexible Jira really is. So I’m going to break it down for you, so if you also would like to do something similar, you can.
Workflow
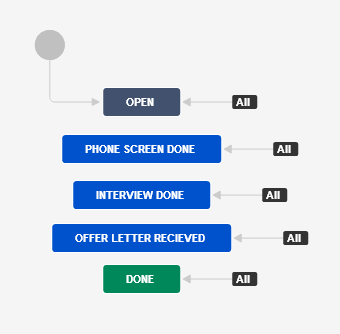
This project uses a simplified workflow. The reason I chose that style of workflow is simply the fact that it isn’t a terribly complicated affair. I don’t have to show parallel work on my end per application/recruiter, so there isn’t a need for subtasks, but at the same time I’m not trying to do automatic reassignments. Basically, a simplified workflow allowed me enough flexibility without becoming a burden.
Each status is a step in the process. As usual with such workflows, I like to use the past tense, with each issue in the project moving to that status when the appropriate condition is met, such as I’ve completed a phone screen with a given Recruiter or HR department, I’ve done at least one Interview with a given company, etc.
I understand this can probably be refined further, but the best way to see those refinements would be to use it, and in the past week of use those possible refinements have yet to reveal themselves to me.
Screen and Fields
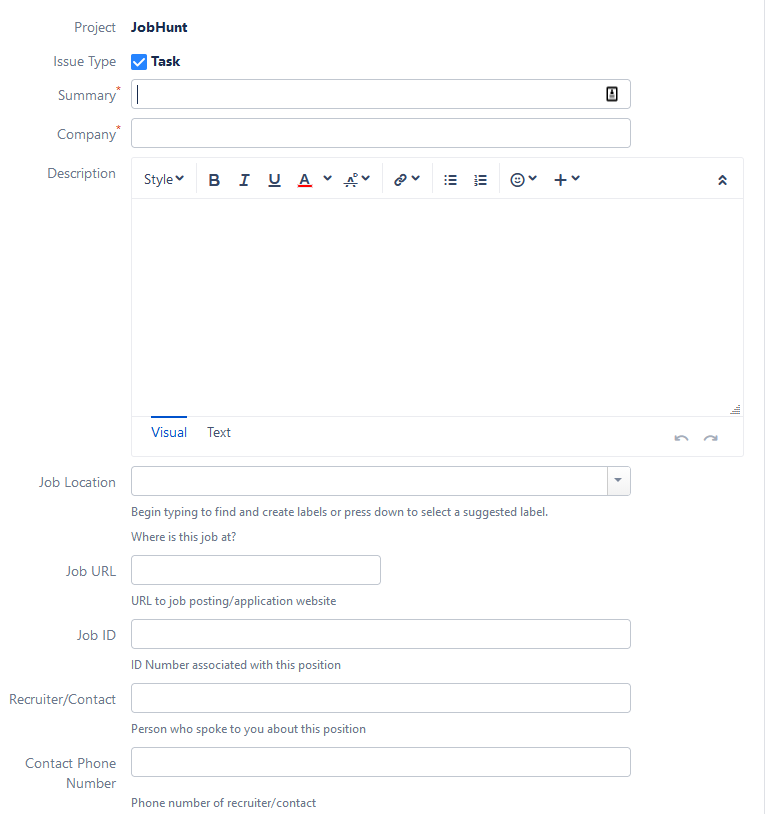
The Screen and fields have a number of custom fields that I’ve added to the project to help with retaining pertinent information on each position. In detail they are:
- Company – Single Text Field – This is fairly self explanatory…it’s the company the position is with. In cases where it is a recruitment firm on behalf of another company, I’ll put this in the format of “Company (via Recruitment Company)”
- Description – This is where I’m storing the Job Description. No need to create a new field when one is serviceable.
- Job Location – Label Field – This is a label field describing where the position is located. This saves me on retyping, as the location is usually only a handful of possibilities, but lets me add more on the fly without having to modify the field or reindex
- Job URL – URL Field – A URL field for a job listing so I can refer back to it later. It’s more of a “For your reference” field, and normally wouldn’t make the cut for my criteria for a custom field, but it’s saved me a lot of re-googling.
- Job ID – Single Text Field – a Field for storing a job ID number. This is helpful if I am contacted by mutliple recruitment agencies for a single position.
- Recruiter/Contact – Single Text Field – Okay, so confession time, I often have a hard time remembering names. So – put a field for it. Then I can remember it was Sarah that I was speaking to about that position at that one company.
- Contact Phone Number – Single Text Field – places to remember the number for my Contact for a given position. It’s also meant to cut down on looking up information.
- Contact Email – Email Field – Does the same thing as the line above. If possible, I’d prefer an email rather than a phone call, so I usually give priority to this field
- Last Contact – Date Field – When I last heard anything on this position. This is useful for knowing a) when to reach out to a contact about a given position, or b) when to give up on a position should I not be contacted at all about it.
- Rate – Single Text Field – Simply put – what I’ve put down as my desired pay for a given position, or what the company is offering.
A note here, On all but the most intuitive of Custom fields, I’ve added a descriptor text. This is always a good idea, as even though it may be clear to you right now what a field is for, it may not be as clear to a user. Because this is my personal instance, I was a little more informal here than I would be on a corporate Production instance, but even then I still felt the need to be consistent with using them.
Dashboard
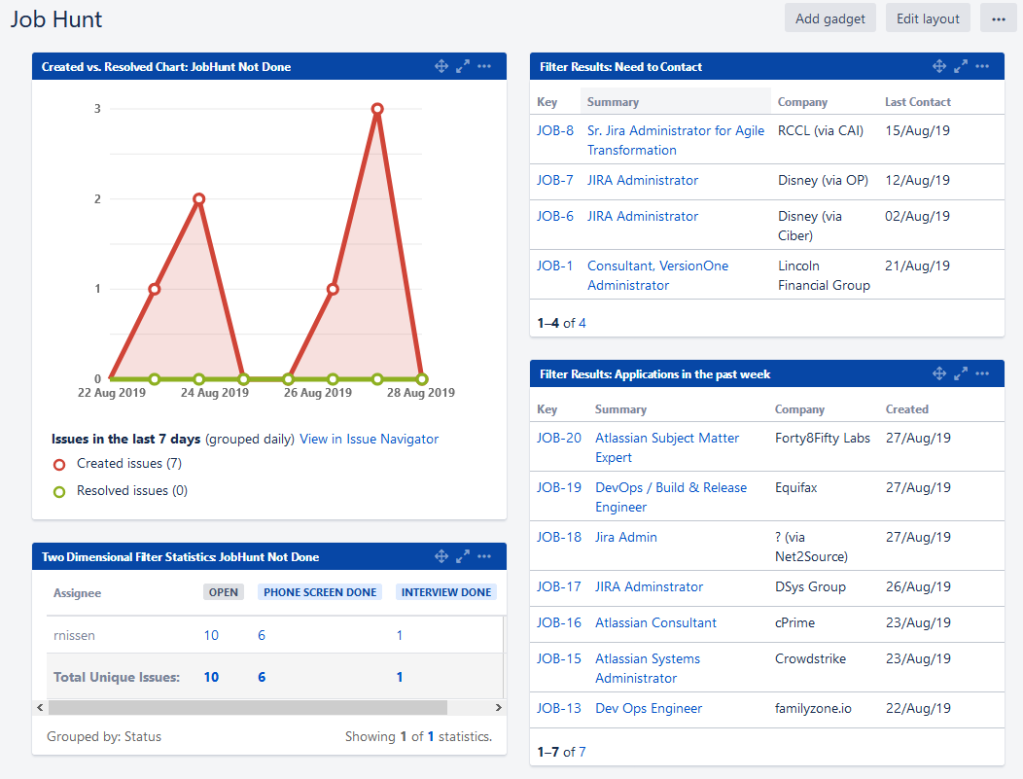
The Dashboard is a rather simple affair with four gadgets. Starting in the Upper Left, we have a Created vs Resolved gadget, then two Filter Result Gadgets, and then finally a two-dimentionsal Filter Stats Gadget. These are powered by three Queries. The first one is a simple query, which gives us everything not listed as done in the project.
project in (JobHunt) AND status not in (Done)This is used on the two left most gadgets. The thinking here is the only time I care about one of these being done is when I accept a position, which would invalidate the whole reason for this project to exist. As such, beyond noting why I didn’t get a position, it doesn’t need to be on my radar, and thus I let it fall off my Dashboard.
I use the Created vs Resolved more to track how many positions I’m applying to each day. I’d like to apply to at least one per day, so this is more for personal goal tracking.
The Two dimensional Filter stats gadget is more for personal reference. I obviously want as many positions to move forward as possible, so this helps me see where they are as a group and encourages me to keep checking back on the various positions.
The second query is to list those that I need to reach out to.
project in (JobHunt) AND "Last Contact" <= startOfDay(-7) AND ("Contact Email" is not EMPTY OR "Contact Phone Number" is not EMPTY)Basically, what this is doing is returning every position I haven’t heard back from in the past seven days, but only those that I’ve listed a contact phone number or email address for. It doesn’t help me to try to reach out to someone who I don’t have contact details for, so this is to help the list remain relevant.
The last query I use on this list is those I’ve applied to in the past seven days.
project = JobHunt AND createdDate >= -7dThis is again to help me visualize my goal of applying to at least one job per day. Now I don’t actively search on the weekends, but there are days I do get more than one position, so the average is usually better than one a day including weekends.
The Kanban Board
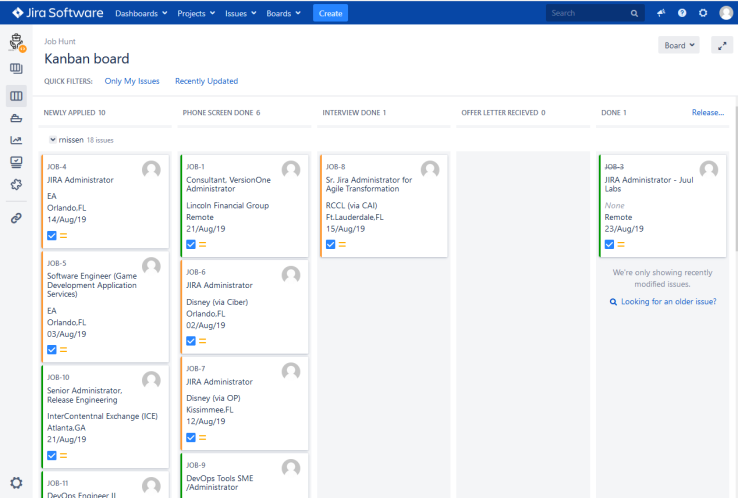
The final piece I want to look at is the Kanban Board. It’s fairly vanilla for the most part, with one column per status in the workflow above. The two areas I customized it, however, are two that don’t get alot of attention: the Card Layout and Card Color.
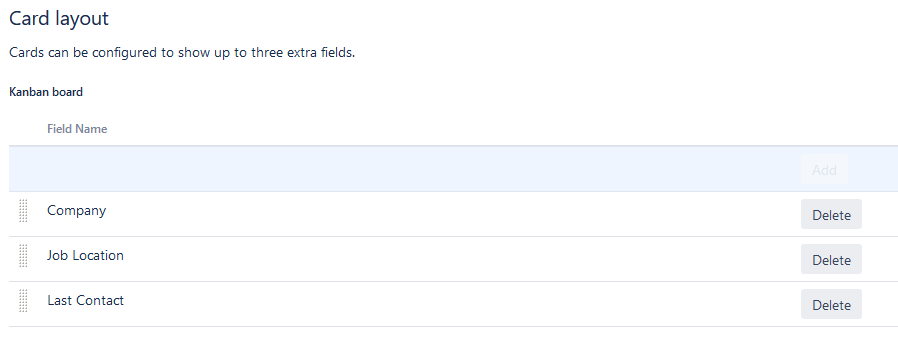
For the card layout, I wanted to be able to see the relevant information at a glance. As such, I’ve put the above three fields on it – Who is it with, where is it, and when was the last time I heard about it. This maxes out the card, but the Summary already answers “What it is”, and the “Why” isn’t something that will fit on a card anyways.
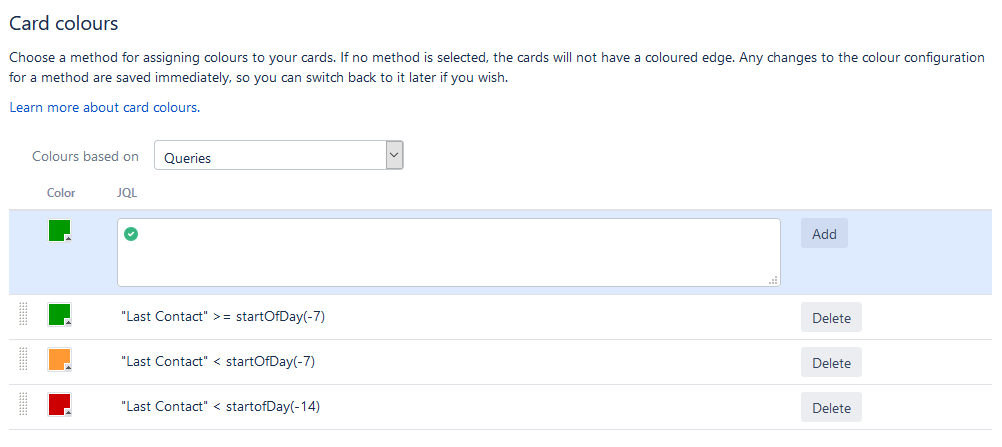
I also decided to use the card colors to help me identify how long it’s been since I heard back on a given position. This is more an aesthetic choice, but it does help me know what’s good and what’s in trouble.
Final Thoughts
So – I don’t know if this is going to help me in the long run – but as a Jira Admin, I do need to keep my skills sharp, so it at least does that. I’m going to try to post here more often, with my next post going to be on how to install Jira to a clean linux instance. Until then, I’m Rodney, asking “Have you updated your Jira issues today?”

This is glorious.
LikeLiked by 1 person