
So…last week. Well – last Thursday was a holiday in the U.S., and the prep work had me so busy last week that I couldn’t finish today’s article. But let’s make it a tradition to take the last week of November off from the blog and instead spend it with family.
But that’s last week’s news. This week, we have an actual user request!
It may not surprise you that I’m a geek. And like many a geek, I have plenty of geeky side projects, some of which require some space to put my code. What may surprise you, though, is I’m not using Bitbucket. Instead, since I had a drive failure that required me to reconfigure my homelab space, I’ve been using Gitlab. Why, you may ask?
Well, there are several reasons. First – and probably most important – Bitbucket Server doesn’t support automatic Repo mirroring. This is where as soon as I push new code, the Repo will, in turn, automatically push that code to another location – in my case, a Bitbucket Cloud repo. But to get this feature in a self-hosted Bitbucket, you must spring for Bitbucket Data Center, which is still a bit beyond my budget.
Secondly, I don’t have a Bamboo license. Nope – so if I want to do any CI/CD and automatic tests, I have to rely on Jenkins. This is fine, but the CI/CD on Gitlab is much smoother as both testing and code are integrated and managed in the same place.
This brings us to today’s request. A few weeks ago, a reader reached out to me asking if I knew anything about integrating Jira with Gitlab. Well – considering the above, I think I do! So today, I’ll go over how to set up these integrations (Yes, Plural!) and which is the best practice for the result you wish to achieve.
Don’t mix Deployment models.
Like Jira, Gitlab has both a cloud-native version (Gitlab.com) and self-hosted options (Gitlab EE – Enterprise edition and Gitlab CE – Community edition). This leads me to my first piece of advice – don’t mix your Deployment models. If you are already self-hosting Jira, do the same for Gitlab. The same goes for Jira Cloud. While it is entirely possible to integrate a self-hosted platform with a cloud platform, you will most of the time be dealing with a Firewall between the two, which does not make for a good day.
Today I will be integrating my Jira Server instance with my Gitlab CE Repos hosted within the same VM Cluster.
Integration Options
As I mentioned earlier, there are two ways to integrate Jira into Gitlab. You may configure both ways – I have before, but which you choose will entirely depend on how you want your Integration to work and where you want to set up the Integration.
The first Integration is set up in Jira using its DVCS Accounts page. This will allow you to use the Developer Panel in your issues and enable you to use Smart Commits to perform actions within your Jira instance. An important caveat that none of the documents mention is for this to work, your Repos on Gitlab must be under groups and not users. Ask me how long that took me to figure out.
The Second Integration is set up within Gitlab. This will enable Gitlab to post a comment on Jira issues whenever an Issue ID is posted in any commit, merge request or branch name.
Setting up a DVCS Account with Gitlab
So, you’ve set up Gitlab so that all your projects are in a group and are ready to set up DVCS. Great!
First, we must set up an OAuth 2.0 connection between Jira and Gitlab. You can find the official documentation here, but I’ll go over it in person as there are caveats that it doesn’t mention.
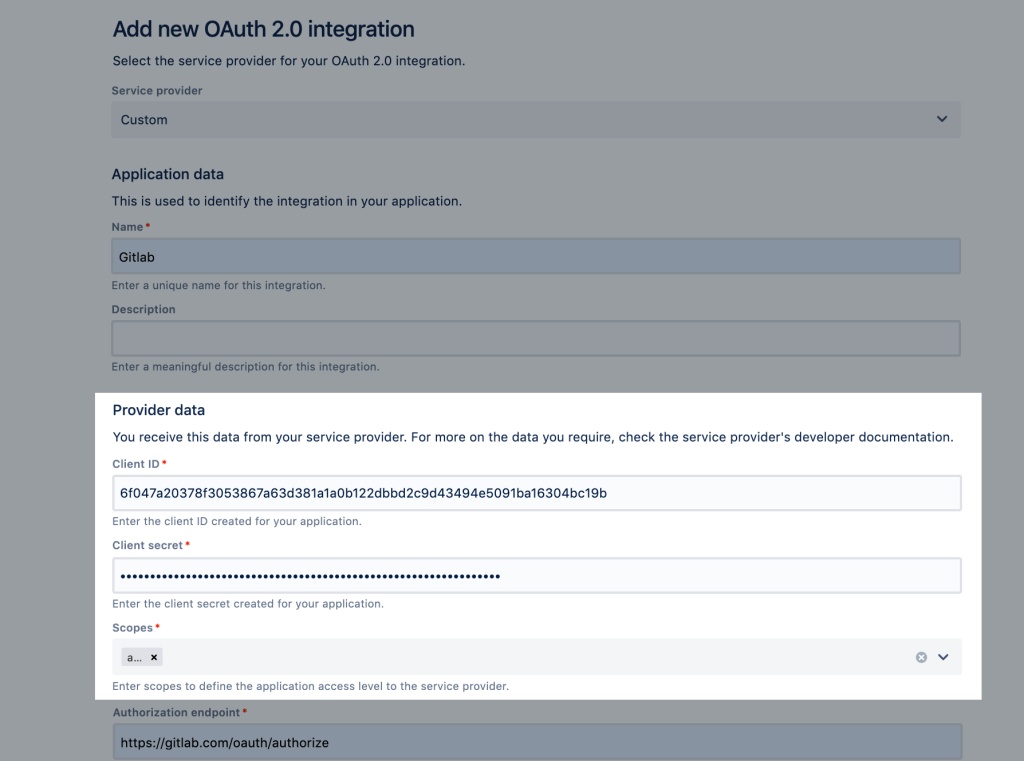
First, we must go to you Admin Panel -> System -> OAuth 2.0. Then, we’ll click “Add new Integration,” then select “Custom” for service provider. Under “Name,” we’ll put “Gitlab”. An important note is the name entry must be alphanumeric. If you try to put the domain name of your Gitlab instance – as I did – it will give you an error.
We’ll skip down to the Authorization endpoint. Here, we’ll enter our Gitlab URL, followed by ‘/oauth/authorize’. Do the same for Token endpoint, except it will end in ‘/oath/token’. So both should look like this:
Authorization endpoint: https://your.gitlab.url/oauth/authorize
Token endpoint: https://your.gitlab.url/oauth/token
With that done, click “Generate” next to your Redirect URL, and copy that URL to a safe place – we’ll need it shortly.

Here, we will skip over to Gitlab. On Gitlab, click on your Profile Picture -> Preferences. Once that page is open, locate “Applications on your left sidebar, and click that. Under Name, enter something to let you identify your Jira instance uniquely. Then, under “Redirect URI”, paste the URL we just copied in. Under scopes, select “api”, then click “Save Application” at the bottom.

This will give a screen with your Application ID and Secret. Keep this handy, as we’ll be copying these values into Jira shortly.

Now we switch back over to Jira. On the page we were working on before, scroll up to Client ID. Here paste in the Application ID from Gitlab. In Client Secret, you guessed it – we put in Secret. On Scopes, we manually type in “api”, then click “Create ‘api'” below it. Now we click “Save.”
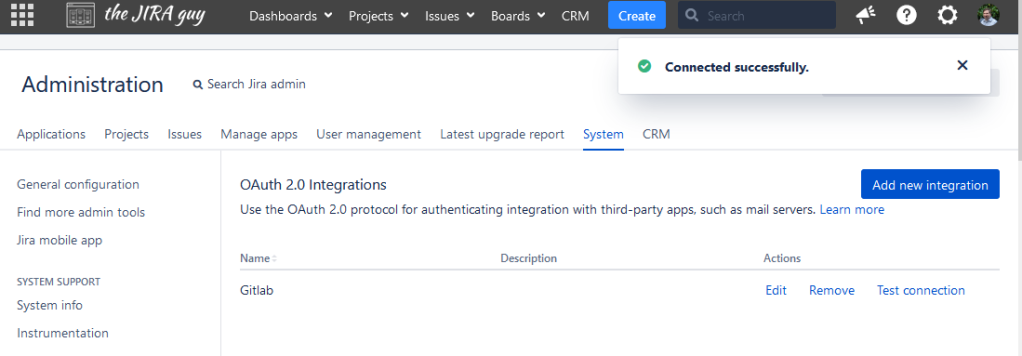
Once we are back on our OAuth 2.0 page, we can click “Test Connection.” If this works, you should get a popup in the upper right of your Jira saying “Connected Successfully”. Be aware it might redirect you to Authorize first – this is normal.
Now we can go set up the DVCS Account. First, go to your Admin Panel -> Application -> DVCS accounts. From here, click “Link an Account.”
This will give you a popup. On “Host,” Scroll down until you see “Gitlab” or “Gitlab Self-Managed.” We’ll be doing the later today.
Under “Team or User Account” – You must enter a group. If you have your Repos set up under a specific user account, you will need to transfer the Repo to a group to get it to work. Unfortunately, I have NOT been able to get this to work right with User-based Repos. Thankfully, Gitlab has a pretty thorough guide to setting up Groups and transferring projects to them.
Next, under Host URL, enter your Gitlab URL, including the HTTPS. You can keep Client Configuration as is – there is only one option there for us. When you are done, it should look like this.
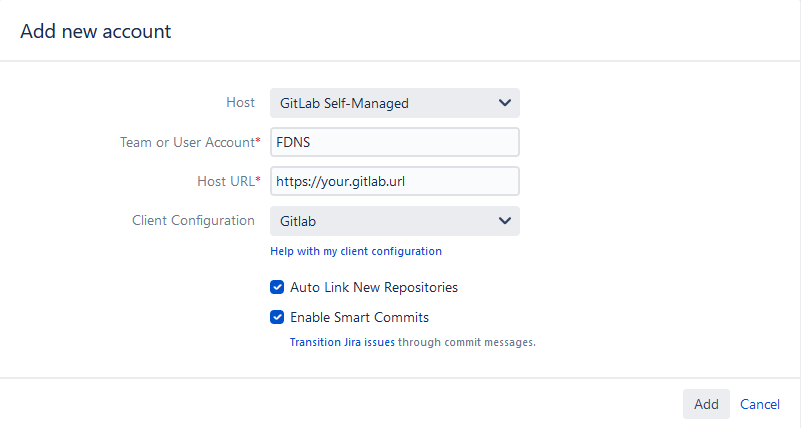
Not we click add. If all is working well, it should start syncing Repos right away. After it completes its sync, you can go into the Account by clicking its Name to see all the Repo’s listed!
Gitlab’s Jira Integration.
Thankfully, Gitlab’s Jira integration is less…demanding. To access it, as an Admin on Gitlab, you need to go to Menu -> Admin -> Settings -> Integrations. Then under “Add an integration,” Find Jira and click on it.

On this page, first click on “Enable Integration.” Then you will select where you want it to trigger from – either comments or merge requests. This will be where it searches for Issue IDs to run the Integration from.
Then select “Enable Comments,” then select how much detail you want in the comments it generates.

Now we enter the details for our Jira instance. For 99% of people, the Web URL and API URL will be the same, so enter the full URL, including the protocol.
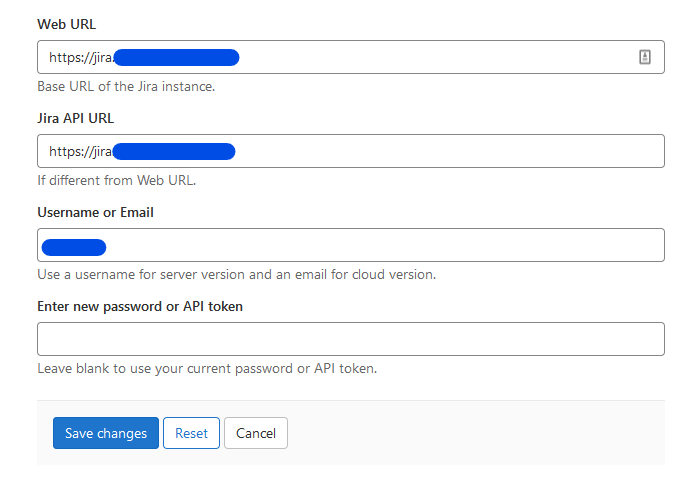
Next, you will be entering your username and password. If you are on Jira Cloud (or on Server/DC but using Resolutions API Token App), you will enter an API key here instead. Click “Save changes,” and that’s it! The Integration is done! I told you it would be less demanding!
So, what’s going on?
This has been a busy week for me – something I foresee going on until mid-December. For those of you who missed it, I made a guest appearance on Jexo’s Morning Coffee. Honestly – if you are not watching it, you are missing out on a great source of Atlassian News.
Next week, I’m looking to do my annual Jira Admin Gift guide. I’ve got some great ideas, and the list is coming together, so I’m looking forward to it!
But that’s it for today’s post. So what kind of Repo are you using these days? Let me know in the comments section! Don’t forget you can find all of the links to my social media on my Linktree. So be sure to comment, like, and share the content on the platform of your choice to help more people discover The Jira Guy.
If you really like what we are doing here, you can subscribe below to get new posts delivered directly to your inbox! I don’t joke when I say it’s the fastest way to get new content.
But until next time, my name is Rodney, asking, “Have you updated your Jira issues today?”
