
You know what? We’ve been a little system heavy the last few months. Lets try something different…
So, we all know JIRA workflows. They guide your issues through their life-cycle, apparently only know three colors, and otherwise just sit there, right? What if I told you that you can train your workflows to do tricks? It’s true!

Today we will go over some of the ways I have trained my workflows over the years, and when you’d want to use each trick. The ultimate goal here is to get you to see your workflow as an equal part of the issue life-cycle – that is to say not only as a faithful guide, but an active participant!
Some of these tricks will require a plugin to enable – but where so I will clearly mark them as such and give you a link to the plugin.
With that being said, let’s get into it.
Conditions, Validators, and Post Functions, Oh My!
So to get started, we’ll need to review the three parts of a transition: The Condition, Validator, and Post Function. Each of these are evaluated at a different part of the Transition execution, and therefore are able to do different things.
Conditions
These are evaluated any time JIRA needs to see if you are even able to see that the transitions exists. On the surface, seems straight forward enough. If a user doesn’t meet the conditions, they don’t see the transition, so what tricks could we do with that?
Trick: Secret Cleanup Transition
So, here’s the situation. As a part of your workflow, you require certain information be filled in to close issues normally. For example, you require a fix version be assigned to a new feature or bug. This is because your users had a bad habit of just closing critical bugs that really needed to be fixed.
Which is great, but as time goes along, the project lead comes to you, saying they have too many issues that being honest, they won’t ever get to. However, you realize that because of the requirements, you can’t just close those issues. You obviously don’t want to get rid of the requirements, but you want to enable the Project lead to do their cleanup. How do you do this?
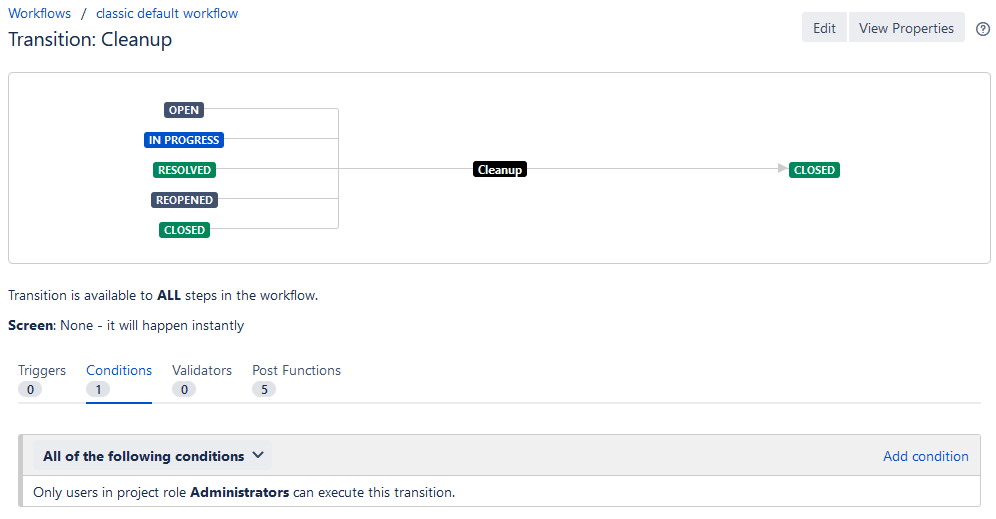
We can do this simply with one condition! First we’ll add an “All” transition to the closed state we’ll call “Cleanup” Then we’ll put a condition on it that says only Project Administrators can see this cleanup transition. This way we don’t open up the workflow to the abuse we’ve previously tried to stop, but we give the Project lead the power to cleanup when they need to.
Validators
Validators are similar to conditions in the fact that they evaluate whether a transition could occur. However, the key different is WHEN they do their processing. Conditions are evaluated before a transition ever occurs. On the other hand, a validator is evaluated during the processing of the transition.
One thing Validators are great for is that when they fail, they provide an error message. When a condition fails, the relevant transition just doesn’t show up. From experience, this usually leads to a lot of panicked questions from new people saying “I can’t close an issue!” This problem is avoided entirely if you use a validator instead. “Oh, I can’t close it because I need a Fix Version – cool.”
Trick: Written Approval
Note: Requires JIRA Misc Workflow Extensions
So, you have an approval chain workflow, but you want to be sure whoever approved it really MEANT it. Lets say this involves a P.O. process, so you want to know whoever approves it really meant you to spend that money.
This is easy enough with JMWE’s “Comment Required” Validator. To make sure the phrase is added as, we’ll add a conditional to evaluate the comment field.

issue.getAsString("comment") != "I Approve"
This is a bit counter-intuitive, but the condition is what makes the validator active in JWME. Here, the validator only ever validates if the comment is anything other than “I Approve” – which includes an empty string! Having the comment be “I Approve” disables the validator and lets the transition occur!
Post Functions
Post functions have no evaluation purpose, but are executed “After” all conditions are evaluated and things are ready to move forward. This gives you a chance to update fields, fire off internal events or web-hooks, or a myriad of other tasks. Most of the time when I’m looking to automate some function that is based on a workflow, Post functions are where I’ll look to first.
Trick: Auto-assign on transition
So this is great for any situations where a specific person needs to do something on a specific status….such as an approval chain. This lets you set it up to reassign the issue on demand without having the user remember to take that action. Very Handy!

To accomplish this, we’ll use the “Update Issue Field” Post function, select “Assignee” from the drop-down, then select the last radio button to specify which user you’d like to transfer it to.
There are additioonal post functions from various Apps that will do the same thing, but you can do this with just vanilla JIRA Functionality.
Workflow Properties: The forbidden technique
Okay, so maybe I’m being a little dramatic…

Transition and Status properties are a powerful technique for customizing how your workflow behaves. However, they are somewhat hidden, dubiously supported, and tricky to get right. Basically, if you do choose to go this route, you will be pretty much on your own, with your only company being whatever articles you can google. By the way, Hi googlers! Welcome to the blog!
In general, I don’t really like to use Workflow properties, but there are some cases where they can’t be helped. One use case I’ve used them for is to limit who can reassign an issue in a given status…which being honest I learned from another blog.
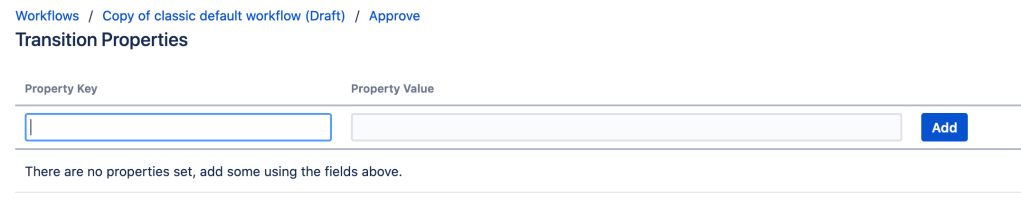
To access the properties screen, select your transition or status of your choice, then click “Properties”

This will open up another screen where you can see a list of that item’s properties. By default there should be none.
Trick: Re-order the Transition buttons
So lets say you have a project lead that is a little…particular. They want the most relevant transition to be the first button, with anything else being second. But you can’t re-order the Transition buttons, right?
Well, I wouldn’t be writing this section if that was the case. We can use a property on each transition called opsbar-sequence. This is a setting that will allow us to specify which transition gets priority on the issue view screen. To do this, we’ll need to add the key “opsbar-sequence” to each transition, along with a unique value. It is recommend you increment the value by 10’s on each transitiono, so if you add more transitions later, you have a place to put them between existing transitions
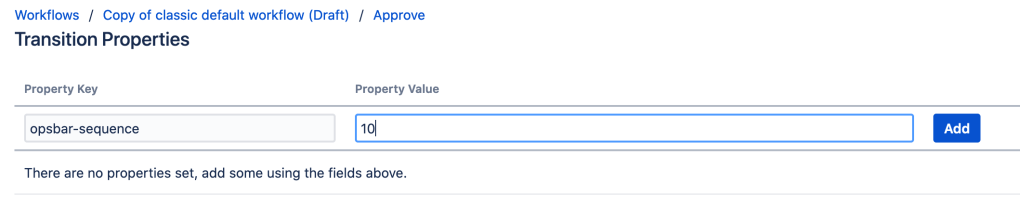
Remember, in this arrangement, the lowest opsbar-sequence value will go first, with each increasing value following afterwards.
You are now a workflow trainer!
My goal here is to get you to think about different automations you can enable for your users. It may seem trivial to you, but if you can save them 10 seconds on each transaction, that can really add up over time. And you don’t have to stop with this list! Look over what post functions, validators, conditions, and yes even properties you have available, and keep an open mind when you get these unusual requests.
However, a word of caution. If you go crazy with these, you may find you have too many workflows and actions within workflows to manage. It’s best to think of it like candy. Every once in a while is fine, and can make you feel happy for a bit. But too much too often can make you regret it before too long!
As always, don’t forget to subscribe to be notified by email of new posts! You’ll find a signup form at the bottom of the post. Also don’t forget to check out our Atlassian Discord Chat! It’s still ramping up, but I’m always happy to see people getting questions answered there! https://discord.gg/mXuRsVu
But until next time, this is Rodney, asking “Have you updated your JIRA issues today?”
Discover more from The Jira Guy
Subscribe to get the latest posts sent to your email.
