
So, when we left off as week, we had all the support system ready to go. As a review, we have the NFS Server, database, and Load balancer – each needed for JIRA Data Center to work to it’s fullest potential. Now we need to convert the actual JIRA instance into our first node for JIRA Data Center.
First, I want to address the elephant in the room. You may have noticed that this blog post is being released a little later than normal. That is because Atlassian released another vulnerability report today. This time its for Confluence Server and Data Center. I won’t be covering it today – I’d much rather get back to the JIRA Data Center install. But I’ll post it here for your own research
Also, as a cleanup note from last week, I forgot to mention one thing. All the systems you use should be configured to use the same NTP server for time synchronization. That is to say not the same *pool*, but the same *server*. What, me? Make that mistake? And only find it while writing this article? Never! </sarcasm>
Okay yeah, I did that. I am not perfect, and sometimes some things do slip by. But I don’t want you to make that same mistake, so I figured I’d own up to it now and not let you fall into the same problem.
Installing the JDC License
Before we do anything further, we need to install a JDC license key into JIRA. That way once we get things done and bring it online, you won’t have any issues.
To do this, we need to find our Server ID. This can be found by going to System -> System Support, then looking for “Server ID” on that page.

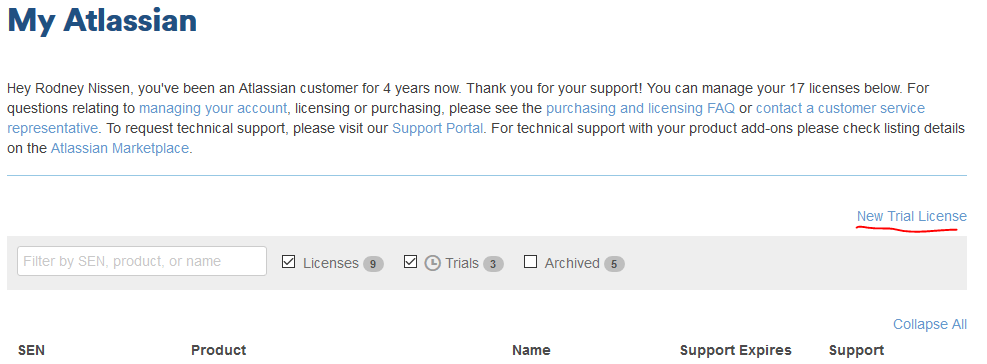
After you grab this, go to https://my.atlassian.com if you are getting a trial license. And honestly, I’d recommend you get a trial license while you are doing your initial testing. No need to put money down while you are doing a proof of concept.
Click on the “New Trial License”, then on the next screen select your JIRA flavor from the drop down (Either JIRA Software or JIRA Service Desk). Then once the rest pops up, select Data Center. You will then enter your Server ID we just grabbed.
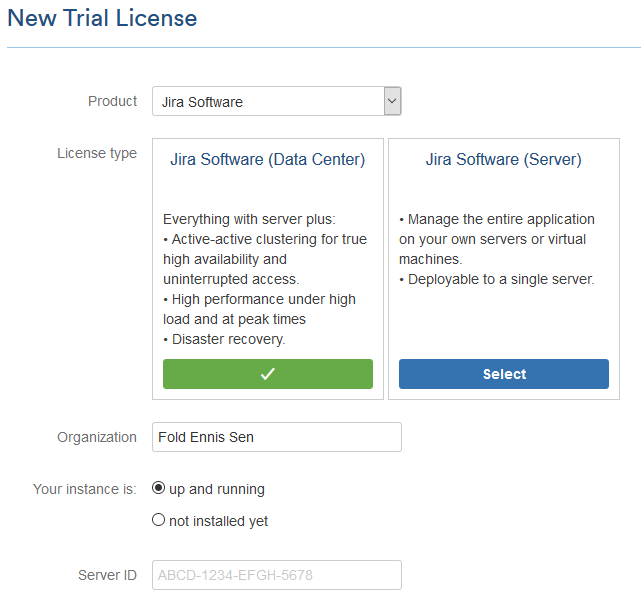
This will generate a trial license that lasts 30 days. You can renew this a number of times, but it’s not infinite, so use this time wisely.
Copy your new trial license, then in your JIRA instance, go to Application->Versions and licenses, and paste it in. Then you are done with this step, and we can begin making JIRA into a proper node.
Moving the Shared Home.
From here on out, we are going to be following the doc “Installing JIRA Data Center”
Per the guide, we are setting up our shared. First, shutdown your JIRA instance.
systemctl stop jiraOnce it has stopped, navigate to your JIRA Home Directory, and copy the following folders to your shared NFS directory.
- data
- plugins
- logos
- import
- export
- caches
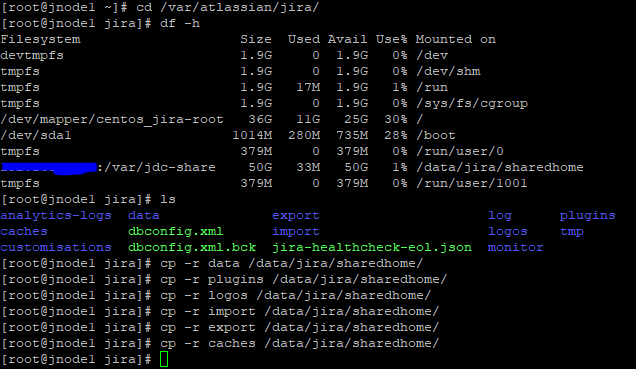
Once copied, be sure to change the owner back to jira so that it can work once you bring the system back up.
chown -R jira:jira /data/jira/sharedhomeAnd this part is done! One step closer to having JDC up and running.
Setup your cluster.properties file
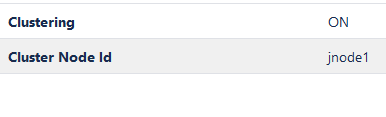
Now that we have the shared home setup, we need to setup the file that tells JIRA that a) It’s a JDC Node, and b) where to find the rest of it’s files. This is the cluster.properties folder, and it’s placed in the root of the local home folder.
This file will have the following settings:
# This ID must be unique across the cluster
jira.node.id = jnode1
# The location of the shared home directory for all Jira nodes
jira.shared.home = /data/jira/sharedhome
As a best practice, I like to put the system hostnames into the node id, that way we know where to look when we are having issues, but honestly it’s arbitrary, so use whatever works. The only requirement is that each node has a unique name.
There are some more options you have in the cluster.properties file, but unless you are having problems, you shouldn’t need to use them. But, I want you to at least be aware of them.
As a last setting, if you are running on linux (like we are), go to your <jira_install>/bin/setenv.sh file, and add the following line.
ulimit -n 16384Now we need to unblock two new ports that JIRA will use to communicate between nodes.
firewall-cmd --permanent --zone=public --add-port=40001/tcp
firewall-cmd --permanent --zone=public --add-port=40011/tcp
firwall-cmd --reload
At this point we can start JIRA as a data center instance!
systemctl start jiraIf all goes well, when JIRA will come up as a single node Data Center instance.
Standing up additional nodes.
Now, we can really take advantage of the super power of JDC: Adding nodes!
Now, if we want to go easy mode, we could just clone the VM and modify the cluster.properties file. But we are JIRA Guys, we don’t do easy mode here!
From a fresh install, we need to install the same version of JIRA that is on our first node. After this install, we need to see if we are using the same userid and group id for JIRA. If not, it will cause problems with NFS. So run the following on all nodes:
id jira

If any differs, it needs to be changed to match the existing nodes. Note this also means you will need to change the file permissions that belong to that particular JIRA user on that node. I could go through the guide on how to do this, but someone else has already done a much better job than I can.
With that minor annoyance out of the way, we can copy over the local home folder. The best way I found to do this is to tarball the entire thing up and scp it to the new node.
tar -czvf jira_home.tar.gz <jira_local_home>
scp ./jira_home.tar.gz <new_node>:~/
Once on the new node, unpack the tarball and move the home folder to the appropriate place. If you used default locations for both nodes, you can probably just unpack it at the root folder and it will find it’s way to the right place. Then we just make sure the permissions weren’t broken:
chown -R jira:jira <jira_local_home>Next we modify the cluster.properties folder, changing the jira.node.id to something unique in the cluster. As an added note, if your nodes do not resolve to DNS, you will need to add the following to this file.
ehcache.listener.hostname = "<ip_addr_of_node>"You will also need to do this for the existing nodes as well. I also like to take the extra step of adding the file share, database, load balancer, and all nodes to the hosts file of all systems involved. That way even if you do have a DNS Failure, your cluster won’t die. Host entry take the following format:
<ip_addr> <fqdn> <alternate_host_name>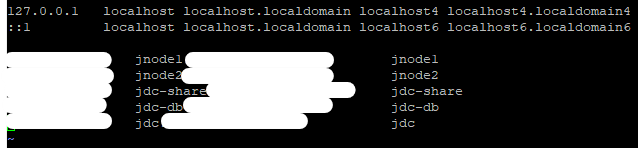
An ounce of prevention is worth a pound of cure, especially when IT decides to move up an upgrade of a DNS node without telling anyone. Yes, that’s a true story!
At this point, you should make sure that the system has the shared home mounted. You can do this by copying the entry for the NFS share from the first node’s /etc/fstab file and placing it into the second. Then make sure the folder structure up to the mount point is present. You can uses the -p flag on mkdir to make all required folders in one command.
mkdir -p /data/jira/sharedhomeYou can now mount the share with the mount command.
mount /data/jira/sharedhomeTake a second and test that the JIRA Account can write and see all files in there. Now unblock all the correct ports you need for JDC:
firewall-cmd --permanent --zone=public --add-port=8080/tcp
firewall-cmd --permanent --zone=public --add-port=40001/tcp
firewall-cmd --permanent --zone=public --add-port=40011/tcp
firwall-cmd --reload
If everything looks good, start up JIRA as you would on any other system, and follow the logs. IF all goes well, you should be able to access the node by going directly to the IP Address for it.
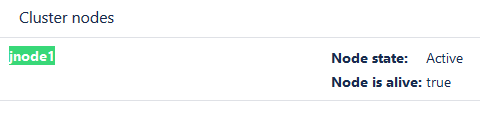
At this point, check the copyright info at the bottom. You should see the new node name at the bottom after the version info:

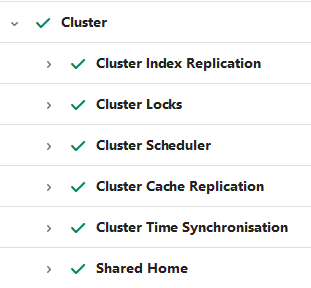
Log in, and check the Health Check, if all is good you should see green check marks on the Cluster.
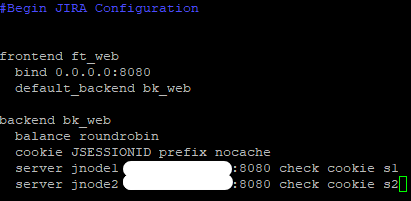
Now the only thing to do is add it to your haproxy config, restart haproxy on your load balancer, and start sending traffic to your new node!
And you made it!
It’s an involved process, I tried not to lie about that. But it’s not an Everest sized challenge. You might have to get a bit outside your comfort zone and play with some technologies that as a JIRA Admin, you haven’t played with before. But my view on it is in order for us to grow as Admins, sometimes we need to step outside our comfort zones. But at least you have a road map to help guide you on your Data Center Migration!
I’m still looking to do a Lightning round Q&A session next week, so get your questions in. Anything from how I do testing and capture images for the blog, to how do you deal with a particular challenge, to what kind of server(s) do I run, it’s all on the table.
Also have an article I’m excited to write up for the New Years – which incidentally enough, is a blog day.
So until next time, my name is Rodney, asking “Have you updated your JIRA Issues today?”

Thank you for this!
LikeLike
How much resemblance is there between setting this up in Windows and Linux?
I cannot find a single document that shows the process on Windows-based Jira instances. How does the shared home between nodes look like? Is SMB valid?
LikeLike
Honestly, I cannot say 100% as I’ve never set up DC on a windows system. I found a mention to SMB being an acceptable share in this document: https://confluence.atlassian.com/adminjiraserver/running-jira-data-center-in-a-cluster-993929598.html
So that should clear you from that hurdle. Otherwise, just make sure you are following the supported platforms document for your target version of Jira: https://confluence.atlassian.com/adminjiraserver/supported-platforms-938846830.html
LikeLike