Assumptions
This checklist assumes the following things.
System Setup
- OS: CentOS 7 Linux
- Database: Latest Supported MySQL
- RAM: 4 GB
- Processors: 2
- Root Hard drive of 30 GB
- Extra Hard drive of 50 GB to house the database and JIRA’s home directory
Database Installation
- Install yum-utils
- yum install yum-utils -y
- Get MySQL Repo installer
- Install MySQL Repo
- yum localinstall ./mysql80-community-release-el7-3.noarch.rpm
- Check RepoList for active MySQL Repo
- yum repolist all | grep mysql
- Disable MySQL 8.0
- yum-config-manager –disable mysql80-community
- Enable MySQL 5.7
- yum-config-manager –enable mysql57-community
- Install MySQL Server
- yum install mysql-community-server -y
- Start MySQL Server
- systemctl start mysqld
- Get Temporary Password form MySQL Logs
- grep ‘temporary password’ /var/log/mysqld.log
- Secure MySQL installation using mysql_secure_installation
- mysql_secure_installation
- You will need the temporary password from the previous step
- When setting up a MySQL root password, do not make it the same as the system root password
- Make sure MySQL will come up on system boot.
- systemctl enable mysqld
Setting up Database for JIRA
- Log into MySQL
- mysql -u root -pUse new root password you just set up
- Create JIRA’s Database
CREATE DATABASE <JIRADB> CHARACTER SET utf8mb4 COLLATE utf8mb4_bin;- Setup User for JIRA to connect with
GRANT SELECT,INSERT,UPDATE,DELETE,CREATE,DROP,REFERENCES,ALTER,INDEX on <JIRADB>.* TO '<USERNAME>'@'localhost' IDENTIFIED BY '<PASSWORD>';- Flush privileges to MySQL Recognizes new user and permissions
- flush privileges;
- Exit mysql
- exit;
- Open /etc/my.cnf for editing
- Add the following lines under the [mysqld] section
 <---- Start JIRA Specific Settings ---->
default-storage-engine=INNODB
 character_set_server=utf8mb4
 innodb_default_row_format=DYNAMIC
 innodb_large_prefix=ON
 innodb_file_format=Barracuda
 innodb_log_file_size=2G
<---- End JIRA Specific Settings ---->- Restart MySQL
- systemctl restart mysqld
OPTIONAL: Moving MySQL Directory
- Install SELinux Policy Tools
- yum install policycoreutils-python -y
- Allow MySQL to use new directory
- Replace <new_datadir> with your target directory
- semanage fcontext -a -t mysqld_db_t ” <new_datadir> (/.*)?”
- restorecon -R <new_datadir>
- Stop MySQL
- systemctl stop mysqld
- Move Database files
- rsync -av /var/lib/mysql <new_datadir>
- Modify /etc/my.conf
- change datadir to <new_datadir>
- Start MySQL
- systemctl start mysqld
Installing the JIRA Application
- Download JIRA installer to server
- Change permission on JIRA Installer to allow it to run
- chmod 755 ./atlassian-jira-software-*.bin
- Run installer
- ./atlassian-jira-software-<version>-x64.bin
- Hit “o” then Enter to confirm your wish to proceed
- Select 2 on installation option screen
- Enter install directory or hit enter to use default
- Enter home directory or hit enter to use the default
- Press enter to use default ports
- Hit “y” then enter to confirm your wish to install JIRA as a service
- Hit “i” then enter to confirm you wish to start the install procedure
- Hit “n” then enter to tell the installer you do not wish to start JIRA yet
Setting up the JDBC connector
- Download the JDBC connector
- Unpack Archive
- tar -xzvf ./mysql-connector-java-5.1.48.tar.gz
- Copy Connector to appropriate place in JIRA Install Directory
- cp ./mysql-connector-java-5.1.48/mysql-connector-java-5.1.48-bin.jar /lib/
- Start JIRA, Confirm it is started
- systemctl daemon-reload
- systemctl start jira
- systemctl status jira
- Set JIRA to start after system boot
- systemctl enable jira
- Add Temporary Firewall Rule to allow you access to JIRA
- firewall-cmd –zone=public –add-port=8080/tcp
Website Setup
After JIRA finishes it’s first load
- Navigate to <jira_url>:8080 to access JIRA
- On First screen, select “I’ll set it up myself”
- On DB setup screen, enter the following
- Database Type: MySQL 5.7+Hostname: localhostPort: 3306Database: <JIRADB> from Setting up Database for JIRAUsername: <USERNAME> from Setting up Database for JIRAPassword: <PASSWORD> from Setting up Database for JIRA
- Click “Test Connection”
- IF connection comes up green, Click Next.
- Please Note: This step will take a few minutes
- Enter Application Title and temporary base URL
- Application Title: Something Descriptive, usually <Company> JIRA or <Dept> – <Company> JIRABase URL: Whatever URL you are accessing it form now. We will change it later
- Click Next
- Enter your License from my.atlassian.com
- Click Next
- Please note, this step will also take a moment to finish
- Enter Details for your local Admin Account
- DO NOT use the same password as your system or mysql root password!
- If you have details, setup your outgoing mail server now.
- Click “Finished”
- Setup details about your admin account, and setup a project to start work with
Setting up the Reverse Proxy
Before starting this step, please be sure to have your SSL Certificate ready
- Install Apache and mod_ssl
- yum install httpd mod_ssl -y
- Navigate to Apache config directory
- cd /etc/httpd/conf.d/
- Remove all .conf files except ssl.conf
- mv autoindex.conf autoindex.bck
- mv userdir.conf userdir.bck
- mv welcome.conf welcome.bck
- Remove <VirtualHost> entry from ssl.conf
- Create jira.conf with following contents
- only include <contextpath> if you plan to run JIRA on a subdirectory
<VirtualHost *:80>
    ServerName <subdomain>.<domain>.com
    Redirect Permanent /<contextpath> https://<subdomain>.<domain>.com/<contextpath>
</VirtualHost>


<VirtualHost *:443>
    ServerName <subdomain>.<domain>.com

    ProxyRequests Off

    <Proxy *>
         Require all granted
    </Proxy>

    ProxyPass /<contextpath> http://<subdomain>.<domain>.com:<port>/<contextpath>
    ProxyPassReverse /<contextpath> http://<subdomain>.<domain>.com:<port>/<contextpath>

    SSLEngine On
    SSLCertificateFile /path/to/your/cert.pem
    SSLCertificateKeyFile /path/to/your/privkey.pem
    SSLCertificateChainFile /path/to/your/first_chain.pem
    SSLCertificateChainFile /path/to/your/second_chain.pem
    ...
    SSLCertificateChainFile /path/to/your/nth_chain.pem

</VirtualHost>- Test Apache Configurations
- apachectl configtest
- Add Firewall rules
- firewall-cmd –zone=public –permanent –add-service=http
- firewall-cmd –zone=public –permanent –add-service=https
- firewall-cmd –reload;
- Tell SELinux Apache can proxy
- setsebool httpd_can_network_relay on
- Start and Enable Apache
- systemctl start httpd
- systemctl status httpd
- systemctl enable httpd
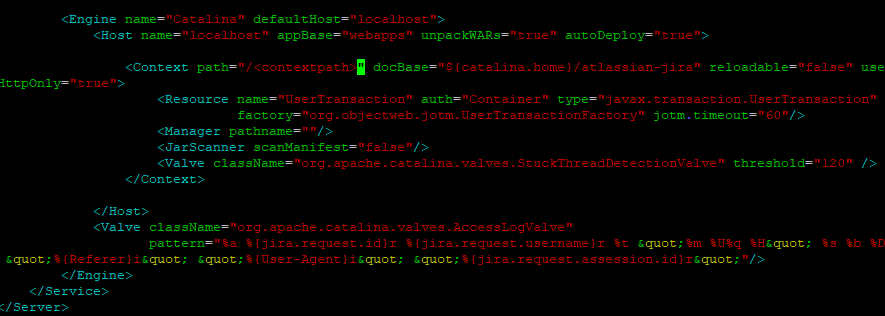
- Open <jira_install_dir>/conf/server.xml for opening
- Add the following options to the port 8080 Connector
- scheme=”https”
- proxyName=”<subdomain>.<domain>.com”
- proxyPort=”443″
- Add the following options to the port 8080 Connector

- If you are running JIRA under a subdirectory, also add the <contextpath> to the “path” option under Context
- Restart JIRA
- systemctl restart jira
- Remove temporary firewall rule
- firewall-cmd –zone=public –remove-port=8080/tcp
- Log into JIRA website with admin account using https
- Change the base URL to the new URL
- Run Health Check
- Administration -> System -> Troubleshooting and support tools
- And finally, relax, you’re done!
