
You are embarking on stage 8 of the Atlassian Dragon Quest. The dragon may be growing in strength and power, but so are you.
In this stage, you will install Atlassian Bamboo for continuous integration. Then you will get Bamboo talking to JIRA and run your first Bamboo build.
Time estimate: This stage will take approximately 30 minutes.
On this page:
Step 1. Create your Bamboo Database in PostgreSQL
Now you will create a database where Bamboo will store its data, and the user that Bamboo will use to connect to the database. We are assuming that you have already created your PostgreSQL database server in Dragons Stage 1.
![]() We are using pgAdmin 4, the administration user interface supplied with PostgreSQL. If you used the one-click installer in Dragons Stage 1, pgAdmin 4 will be already installed on your computer.
We are using pgAdmin 4, the administration user interface supplied with PostgreSQL. If you used the one-click installer in Dragons Stage 1, pgAdmin 4 will be already installed on your computer.
- Start pgAdmin 4.
- Right-click (or double-click) the database server name and log in using the password that you specified for the ‘postgres’ super user.
- Add a new login role called ‘bamuser’:
- Right-click Login Roles and select New Login Role.
- Enter the role Role name:
bamuser. - Enter a Password and enter it again to confirm it.
- Click the Role privileges tab.
- Select Can Login.
- Select Can create database objects.
- Select Can create roles.
- Click OK to create the user.
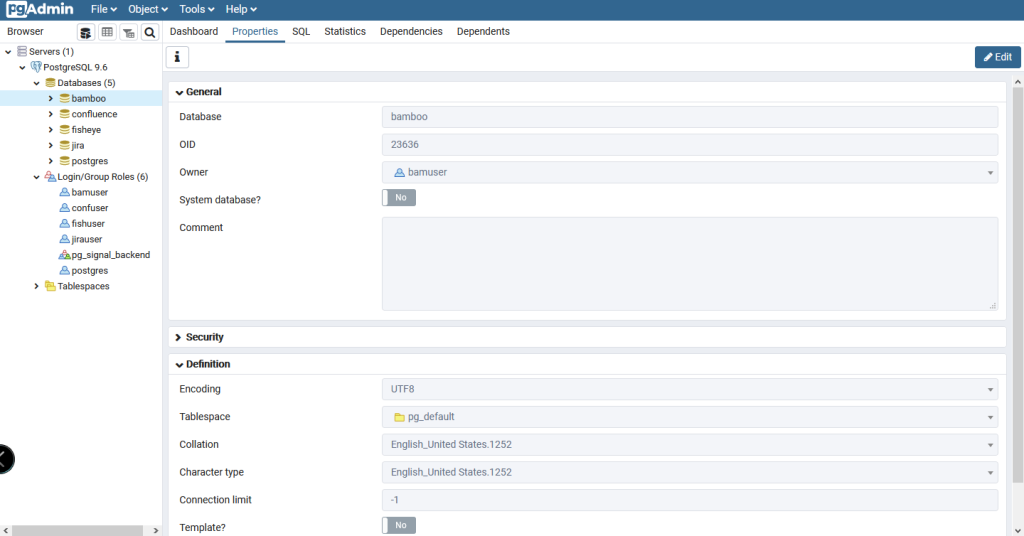
- Add a new database called ‘bamboo’:
- Right-click Databases and select New Database.
- Enter the database Name:
bamboo. - Select the Owner:
bamuser. - Click OK to create the database.
Alternatively, If you are on UNIX and do not have pgAdmin III, you can use the command line interface instead. Assuming that you are using the default installation directory of /opt/PostgreSQL/8.4/bin/, enter the following commands:
sudo -s -H -u postgres
# Create the Bamboo user:
/opt/PostgreSQL/8.4/bin/createuser -S -d -r -P -E bamuser
# Create the Bamboo database:
/opt/PostgreSQL/8.4/bin/createdb --owner bamuser --encoding utf8 bamboo
exit
Step 2. Install Bamboo
Requirements: Bamboo 7.0.4.
For Windows:
- Go to the Atlassian download centre.
- Download the Bamboo 7.0.4 installer for your Windows system.
 Please use the Bamboo version specified in this documentation. If the download centre shows a Bamboo version later than 7.0.4, click downloads archive and get Bamboo 7.0.4.
Why?We have tested the integration suite with this version. There is a chance that you will have problems integrating the other applications if you use a different version. - Log in to your computer as a Windows administrator.
- Run the Bamboo installer
.exefile. On Windows 7 or Vista, right-click the file name and click Run as administrator. - If a Windows 7 or Vista ‘User Account Control’ dialog box asks you to allow the installation wizard to make changes to your computer, specify ‘Yes’.
- When prompted, enter the Destination directory. This is the directory where you would like Bamboo to be installed. For example:
C:\Program Files\Bamboo
From this point onwards, we will refer to this installation directory as {BAMBOO_INSTALLATION}. - When prompted, tell Bamboo where to put its Bamboo home directory. For example:
C:\data\bamboo-home. - Click Finish to close the setup window when the installer has finished.
- Because Bamboo will be running on the same machine as JIRA, you need to ensure that the URL paths are different for Bamboo and JIRA. Change the default Bamboo path as follows:
- Stop Bamboo by running /
bin/stop-bamboo.baton Windows or /bin/stop-bamboo.shon OSX or Linux. - Edit the
server.xmlfile in your {BAMBOO_INSTALLATION}\conffolder. - Set the
pathattribute to/bambooin thecontextelement:<Context path="/bamboo" docBase="${catalina.home}/atlassian-bamboo" reloadable="false" useHttpOnly="true"> - Save the file.
- Stop Bamboo by running /
- Start your Bamboo server by running {
BAMBOO_INSTALLATION}\start-bamboo.bat. If you are running Bamboo in Windows Vista or Windows 7, you may need to run this file in administrative mode by right clicking it and selecting ‘Run as administrator’.
For Linux
- Go to the Atlassian download centre.
- Click the Linux tab and download the Standalone (TAR.GZ Archive) file for Bamboo 7.0.4. Please use the Bamboo version specified in this documentation. If the download centre shows a Bamboo version later than 7.0.4, click downloads archive and get Bamboo 7.0.4.
Why? We have tested the integration suite with this version. There is a chance that you will have problems integrating the other applications if you use a different version. - Unpack the tar.gz archive into a directory of your choice, avoiding spaces in the directory name.
- Tell Bamboo where to put its Bamboo Home directory:
- Edit the properties file at {
BAMBOO_INSTALLATION}/atlassian-bamboo/WEB-INF/classes/bamboo-init.properties. - Insert the property ‘
bamboo.home‘ with an absolute path to your Bamboo Home directory. For example:bamboo.home=/var/bamboo-home - Save the file.
- Edit the properties file at {
- Because Bamboo will be running on the same machine as JIRA, you need to ensure that the URL paths are different for Bamboo and JIRA. Change the default Bamboo path as follows:
- Edit the
server.xmlfile in your {BAMBOO_INSTALLATION}\conffolder. - Set the
pathattribute to/bambooin thecontextelement:<Context path="/bamboo" docBase="${catalina.home}/atlassian-bamboo" reloadable="false" useHttpOnly="true"> - Save the file
- Edit the
- Start your Bamboo server by going to {
BAMBOO_INSTALLATION} andrunning./bin/start-bamboo.sh.
Step 3. Set Up Bamboo
Now you can run Bamboo’s Setup Wizard and then check your default Bamboo capabilities.
The instructions below assume that you already have a build tool set up. You can use any of the build tools supported by Bamboo, such as Maven 1, Maven 3, Ant, PHPUnit and others. Bamboo calls them ‘executables’. See the Bamboo documentation. For this integration exercise, we assume that you are using Maven 3.
- Set up your Maven 3 environment:
- If you do not yet have Maven 3 installed, we recommend that you download and install the Atlassian Plugin SDK. Note that you do not need to configure an IDE. The SDK includes Maven 3 and a correctly-configured Maven
settings.xmlfile, as well as a number of shell scripts to speed up plugin development. It also includes the Java Activation and other JARs that you will need for a successful Maven build. - If you already have Maven 3, please ensure that you have the required additional JARs. See the FAQ for information on downloading these JARs.
- If you do not yet have Maven 3 installed, we recommend that you download and install the Atlassian Plugin SDK. Note that you do not need to configure an IDE. The SDK includes Maven 3 and a correctly-configured Maven
- To access Bamboo, go to your web browser and type this address:
http://localhost:8085/bamboo. - The Bamboo Setup Wizard will guide you through the process of setting up your Bamboo server and creating an administration user.
- Enter your license key. If you do not already have a Bamboo license, follow the prompts on the Setup Wizard screen to get an evaluation license key.
- Choose the Custom Installation setup method.
- Detailed instructions on the custom installation setup are in the Bamboo documentation. Below are the things you need to know for our Dragon Quest. Enter the General Configuration information as follows:
- Name:
Atlassian Bamboo - Base URL – Enter http://localhost:8085/bamboo
- Configuration Directory – Leave this at the default value.
- Build Data Directory – Leave this at the default value.
- Build Working Directory – Leave this at the default value.
- Artifacts Directory – Leave this at the default value.
- Name:
- Click Continue.
- Choose External Database for your database configuration and ensure that PostgreSQL 8.2 and above is selected in the dropdown menu.
- Click Continue.
- Enter the following information to connect to the Bamboo database created in step 1 above:
- Connection Type:
Direct JDBC connection - Driver Class Name:
org.postgresql.Driver - Database URL:
jdbc:postgresql://localhost:5432/bamboo - User Name:
bamuser - Password – Enter the password you specified in step 1 above.
- Overwrite existing data – Leave this checkbox unselected.
- Connection Type:
- Click Continue.
- For your ‘Starting Data’, select Create a new Bamboo home.
- Click Continue.
- Set up your ‘Administrator User Details’:
- Username:
charlie - Password – Enter a password that you will use for the administrator account and enter it again to confirm it.
- Full Name:
Charlie of Atlassian - Email – Enter the address of your administrator email account. We recommend that you give your own email address here.
- Username:
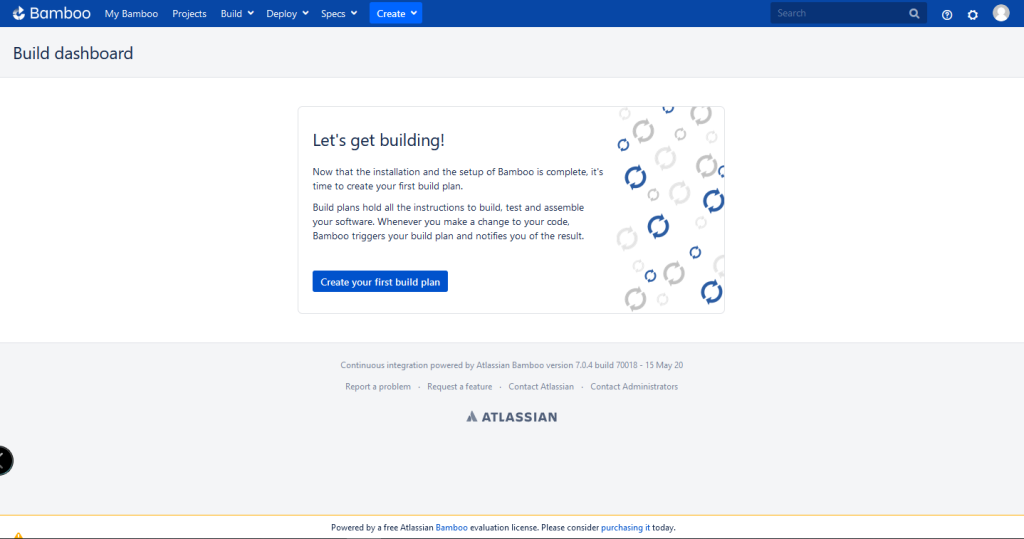
- Click Finish. The Bamboo home page will appear.
- Now you will check that your Bamboo configuration includes your default executable and JDK. Click
 > Bamboo administration > Overview in the top navigation bar.
 - The ‘Bamboo Administration’ screen will appear. Click Executables in the left-hand menu.
- The ‘Executables’ screen will appear. Look through the list on the left, to see if your build tool is included along with the default tools like Script, MSBuild or Bash. For this integration exercise, we assume that you are using Maven 3. In that case, you should see ‘Maven 3’ listed in the tabs on the left.
- If your executable is not included, click add an executable as a server capability near the top of the page. The ‘Add Capability’ panel will appear. Enter the following information:
- Capability Type:
Executable - Type:
Maven 3.x - Executable Label:
Maven 3 - Path – Enter the path to your Maven installation. This should be the same as the value that you have specified in your
M2_HOMEenvironment variable. For example:C:\maven3.2\apache-maven-3.2.1(Windows) or/usr/local/apache-maven/apache-maven-3.2.1(UNIX).
If you have installed the Atlassian SDK, Maven can be found in a sub-directory under your Atlassian PDK installation directory. For example,C:\atlassian-plugin-sdk\apache-maven\(Windows) or/usr/local/Atlassian/atlassian-plugin-sdk/apache-maven(UNIX). - Click Add.
- Capability Type:
- Check that your Bamboo configuration includes your JDK. Click JDKs in the left-hand menu. Note: Be sure this is a JDK and not a JRE.
- The ‘JDKs’ screen will appear. Look through the tabs on the left, to check that your JDK is included. You will need Oracle JDK 1.7 or higher. Note that the JRE alone is not enough. Stage 1 of these instructions will guide you through the JDK installation procedure. For this integration exercise, we assume that you are using JDK 1.7. In that case, you should see a ‘JDK’ tab on the left and a ‘JDK 1.7’ tab. Ensure that your Java Home environment variable is pointing to your JDK directory, not your JRE directory.
- If your JDK is not included, click add a JDK as a server capability. The ‘Add Capability’ panel will appear. Enter the following information.
- Capability Type:
JDK. - Label:
JDK 1.7. - Java Home – Enter the path to your JDK installation. This should be the same as the value that you have specified in your
JAVA_HOMEenvironment variable. For example:C:\Program Files\Java\jdk1.7(Windows) or/opt/java/java_sdk1.7(UNIX). - Click Add.
- Capability Type:
Step 4. Hook Bamboo up to JIRA for User Management
When you have completed this step, you will be able to manage your Bamboo users in JIRA and have the same usernames and passwords in JIRA and Bamboo. First you will define the Bamboo application in JIRA. Then you will define the JIRA user directory in Bamboo.
- Define the Bamboo application to JIRA:
- Go to your JIRA URL in your browser. For example,
http://localhost:8080. - Log in to JIRA with username
charlie. - Click > User Management
- Click JIRA User Server in the left-hand panel.
- Click Add Application.
- The ‘Add Application’ screen will appear. Enter the following information:
- Application Name:
bamboo - Password – Enter a password that Bamboo will use to access JIRA.
- IP Addresses – On a new line, add the IP address or addresses of your Bamboo server. For example:
192.168.10.12- If you are installing/testing locally add the IPv4 and IPv6 loopback addresses:
127.0.0.1 ::1 0:0:0:0:0:0:0:1 fe80:0:0:0:0:0:0:1%1
- If you are installing/testing locally add the IPv4 and IPv6 loopback addresses:
- Application Name:
- Click Save.
- If you get an authentication error, try hitting the back button and adding your hostname to the IP Addresses field.
- Go to your JIRA URL in your browser. For example,
- Define the Bamboo groups in JIRA:
- You should still be on the User Management screen for JIRA. Click Groups.
- In the Add Group section, enter
bamboo-userfor the Name and click Add Group. - If the
bamboo-admingroup is not already listed, add this group as well.
- Add charlie to the bamboo-admin and bamboo-user groups:
- Click Edit Members for the
bamboo-usergroup. The Bulk group edit members page will be displayed. - Select
bamboo-adminandbamboo-userin the left column (use shift-left mouse click). - Enter charlie in the right column and click Add selected users.
- Click Edit Members for the
- Set up the JIRA user directory in Bamboo:
- Go to your Bamboo URL in your browser. For example,
http://localhost:8085/bamboo. - Click > User management.
- Click User Directories in the left-hand panel.
- Click the Add Directory
- Select Atlassian JIRA.
- A panel will open up for the JIRA server details. Enter the following information:
- Server URL – Enter the web address of your JIRA server. For example:
http://localhost:8080 - Application Name:
bamboo– This is the application name that you used when you defined Bamboo to JIRA in the steps above. - Application Password – Enter the password that you entered when defining Bamboo to JIRA in the steps above.
- Server URL – Enter the web address of your JIRA server. For example:
- Leave the other settings at their default values and click Test Settings.
- Click Save.
- Click the “Up” arrow on JIRA Server.
- Go to your Bamboo URL in your browser. For example,
- Log out of Bamboo then log in again, with the same username
charlieand Charlie’s password in JIRA. You are now authenticating via JIRA!
Step 5. Get Bamboo and JIRA Talking
In this step you will configure an application link between JIRA and Bamboo, so that you can see your build information in JIRA and your issues in Bamboo.
- Go to your JIRA site in your browser.
- Click > Application Links.
- Click Application Links.
- The ‘Configure Application Links’ screen will appear. Enter the base URL of your Bamboo site (for example,
http://localhost:8085/bamboo) in the Application field and click Create New Link. - The ‘Link Applications’ screen will appear. Click Continue.
- You will be redirected to Bamboo to set up a reciprocal link. Log in to Bamboo as charlie when prompted.
- Click Continue to create the reciprocal link. You will be redirected back to JIRA.
Full details are in the JIRA documentation.
Step 6. Set up a Project and Run a Build
In this step you will create a Bamboo project and run a sample build. For the purposes of this integration exercise, we have provided a Bitbucket repository that you can connect to your Bamboo ‘Dragons’ plan. We have committed a code change with a JIRA issue key in the commit message, to match a JIRA issue you created earlier. This will allow you to see the JIRA, FishEye and Bamboo integration immediately, without having to do your own commit.
- Click Create > Create a new plan in the Bamboo header.
- The ‘Create Plan’ screen will appear. Enter the following information:
- Project name:
Dragons - Project key:
DRA - Plan name:
Main - Plan key:
MAIN - Plan description:
Dragon slaying plan
- Project name:
- Choose Bitbucket beneath ‘Link repository to new build plan’. Some more fields appear, enter the following information:
- Repository Host: Bitbucket Cloud
- Display name:
Dragons repository - Repository Access: Public
- Owner:
atlassian_dragons - Repository: atlassian_dragons/dragonslayers (hg)
- Leave the rest ‘Repository access’ at its default selection (‘Allow all users to reuse the configuration of this repository’).
- Click Configure Plan.
- The ‘Configure Tasks’ screen will appear. Click Add Task.
- The ‘Task Types’ screen will appear. Find and select Maven 3.x.
- The ‘Maven 3.x Configuration’ panel will appear. Enter the following information:
- Task Description:
Maven build - Executable:
Maven 3 - Goal:
clean test - Build JDK – Select your JDK version. For example:
JDK 1.7. - The build will produce test results – Uncheck this option. (Remove the tick from the box.)
- Task Description:
- Leave the rest of the fields at their default values and click Save. You have now defined one task in your plan.
- Click Create.
- Bamboo will immediately start a build, based on the plan that you have just created. The build may take a few minutes to complete.
- The ‘Plan Summary’ will appear, showing the ‘Main’ plan in the ‘Dragons’ project. Click #1 under ‘History’ to open the build result summary for build 1 of the Dragon slaying plan.
With any luck, the build will be successful.

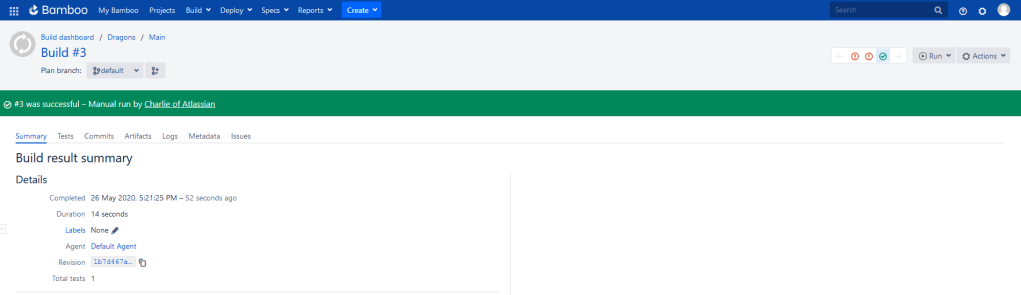
Victory!
Your Bamboo, FishEye and JIRA servers are fully integrated. Here are some of the highlights for you to try.
![]() You can link your builds to JIRA issues in various ways. For example, you can include a JIRA issue key in a commit comment. Details are in the Bamboo documentation. To see the integration happening right now, add a comment to your build:
You can link your builds to JIRA issues in various ways. For example, you can include a JIRA issue key in a commit comment. Details are in the Bamboo documentation. To see the integration happening right now, add a comment to your build:
- Click Comment on the Bamboo build result summary.
- Add the following comment:
This build is related to DRA-1. - Click Add.
![]() Notice the panel showing the JIRA issue details on the Bamboo build result screen. The issue key is hyperlinked so that you can open the issue in JIRA.
Notice the panel showing the JIRA issue details on the Bamboo build result screen. The issue key is hyperlinked so that you can open the issue in JIRA.![]() Click the Issues tab on the build result screen, to see the JIRA issues for a build result (you may be prompted to log in to JIRA and approve access first).
Click the Issues tab on the build result screen, to see the JIRA issues for a build result (you may be prompted to log in to JIRA and approve access first).![]() Go to JIRA to see the Bamboo builds that relate to a particular JIRA issue, project or version. Details are in the JIRA documentation about viewing the Bamboo builds relating to a JIRA issue, project or version. The screenshot below shows the build for a particular issue.
Go to JIRA to see the Bamboo builds that relate to a particular JIRA issue, project or version. Details are in the JIRA documentation about viewing the Bamboo builds relating to a JIRA issue, project or version. The screenshot below shows the build for a particular issue. ![]() When you link your FishEye and Bamboo projects to your own source repository and then commit changes, a source link will appear on your Bamboo build result. You will be able to click the source link to view the changed code in FishEye. Unfortunately, you cannot reproduce this now because our sample repository is read-only.
When you link your FishEye and Bamboo projects to your own source repository and then commit changes, a source link will appear on your Bamboo build result. You will be able to click the source link to view the changed code in FishEye. Unfortunately, you cannot reproduce this now because our sample repository is read-only.![]() When you release a JIRA version, you can select a Bamboo plan and choose the stages in the plan to run. Releasing the version will run the plan in Bamboo. If the plan is successful, the version will be released in JIRA. See the JIRA documentation.
When you release a JIRA version, you can select a Bamboo plan and choose the stages in the plan to run. Releasing the version will run the plan in Bamboo. If the plan is successful, the version will be released in JIRA. See the JIRA documentation.
