
There will be much flapping of wings and breathing of fire. You are embarking on stage 5 of the Atlassian Dragon Quest.
In this stage, you will install FishEye and hook it up to a Mercurial repository on Bitbucket for breathtaking overviews of your source code repository. At the same time, you will set up Crucible for piercingly insightful code reviews. Prepare to be blown away by FishEye/Crucible’s integration with JIRA and Bamboo.
NOTE: The Rest of the stages depend heavily on a Bitbucket Cloud Mercurial Repository. As these reposistories will be going away on July 1st, 2020, I cannot guarantee they will work beyond June 30th, 2020. If there is some update, I will update these documents accordingly.
Time estimate: This stage will take approximately 45 minutes.
On this page:
- Step 1. Install Mercurial
- Step 2. Create your FishEye Database in PostgreSQL
- Step 3. Install FishEye and Crucible
- Step 4. Set Up FishEye and Crucible
- Step 5. Connect FishEye to Bitbucket
- Victory!
Step 1. Install Mercurial
The first step is to install a source control management tool, so that you have a code repository for FishEye to look at. We will use Mercurial.
- Get Mercurial and Python and install them. I suggest Version 4.5.3
- Create a Mercurial configuration file at
C:\Users\MY_NAME\mercurial.ini(Windows 7) or~/.hgrc(UNIX). The file will contain your preferred editor and your username and should look like this: [ui] ; editor used to enter commit logs, etc. Most text editors will work. editor = notepad username = atlassian_dragons If you have a Mercurial configuration file already, edit it as desired.
Step 2. Create your FishEye Database in PostgreSQL
Now you will create a database where FishEye will store its data, and the user that FishEye will use to connect to the database. Crucible will use this database as well. We are assuming that you have already created your PostgreSQL database server in Dragons Stage 1.
- Start pgAdmin 4.
- Right-click (or double-click) the database server name and log in using the password that you specified for the ‘postgres’ super user.
- Add a new login role called ‘fishuser’:
- Right-click Login Roles and select New Login Role.
- Enter the role Role name:
fishuser - Enter a suitable Password and enter it again to confirm it.
- Click the Role privileges tab.
- Select Can Login.
- Select Can create database objects.
- Select Can create roles.
- Click OK to create the user.
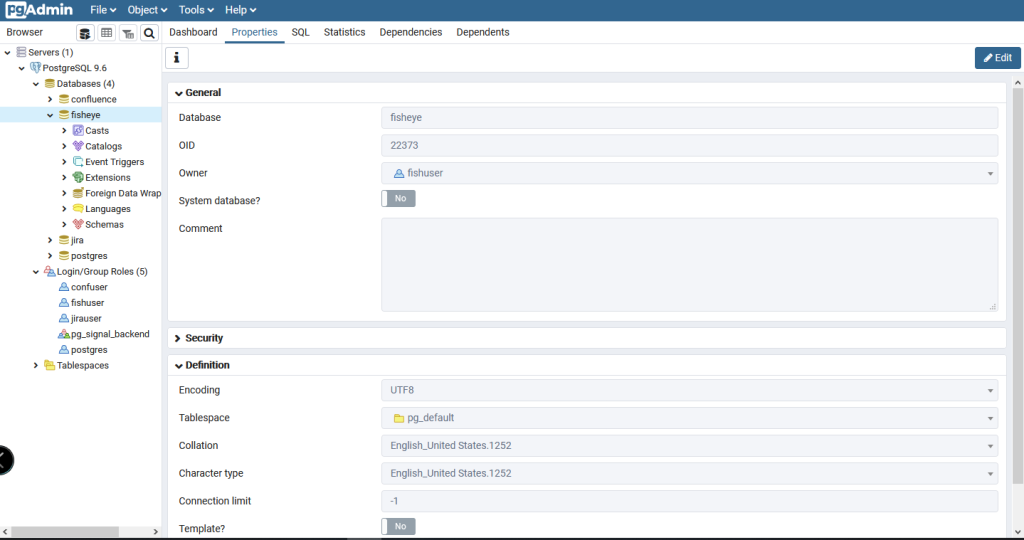
- Add a new database called ‘fisheye’:
- Right-click Databases and select New Database.
- Enter the database Name:
fisheye - Select the Owner:
fishuser - Click OK to create the database.
Alternatively, If you are on UNIX and do not have pgAdmin III, you can use the command line interface instead. Assuming that you are using the default installation directory of /opt/PostgreSQL/8.4/bin/, enter the following commands:
sudo -s -H -u postgres
# Create the FishEye user:
/opt/PostgreSQL/8.4/bin/createuser -S -d -r -P -E fishuser
# Create the FishEye database:
/opt/PostgreSQL/8.4/bin/createdb --owner fishuser --encoding utf8 fisheye
exit
Step 3. Install FishEye and Crucible
Requirements: FishEye/Crucible 4.8.2
For Windows
- Go to the Atlassian download centre.
- Download the FishEye 4.8.2 exe. This installer includes Crucible 4.8.2 as well.
 Please use the FishEye version specified in this documentation. If the download centre shows a FishEye version later than 4.8.2, click downloads archive and get FishEye 4.8.2.
Why? We have tested the integration suite with this version. There is a chance that you will have problems integrating the other applications if you use a different version. - Log in to your computer as a Windows administrator.
- To install Fisheye/Crucible as a service, you must run the Windows installer using a Windows administrator account. While you can run the Windows installer with a non-administrator account, your installation options will be limited.Run the Fisheye installer
.exefile. - On Windows 7 or Vista, right-click the file name and click Run as administrator.If a Windows 7 or Vista ‘User Account Control’ dialog box asks you to allow the installation wizard to make changes to your computer, specify ‘Yes’.Select Express Install as the installation option.
- Make sure that none of the directories in the path to your FishEye/Crucible files have spaces in them.
- FishEye/Crucible will be running on the same machine as JIRA (already installed), so you need to ensure that the URL paths are different for FishEye/Crucible and JIRA. Change the default FishEye/Crucible path as follows:
- Edit the C:\Atlassian\Data\fecru\
config.xmlin your FishEye/Crucible data directory. - Add the
contextattribute to theweb-serverelement:<web-servercontext="/fisheye">
- Edit the C:\Atlassian\Data\fecru\
- Restart FishEye/Crucible by going to the Start Menu, and selecting Fisheye > Stop Fisheye, then selecting Fisheye > Start Fisheye
For Linux:
Note, we recommend that you create a dedicated user for installing and running FishEye/Crucible. This user should not have admin privileges, but should have read, write and execute access on the FishEye home (install) directory and instance (data) directory. and read access to your repositories.
- Go to the Atlassian download centre.
- Download the FishEye 4.8.2 zip archive. This archive includes Crucible 3.7.0 as well. Please use the FishEye version specified in this documentation. If the download centre shows a FishEye version later than 4.8.2, click downloads archive and get FishEye 4.8.2.
Why? We have tested the integration suite with this version. There is a chance that you will have problems integrating the other applications if you use a different version. - Unpack the zip archive into a directory of your choice, avoiding spaces in the directory name. For example:
/opt/fecru-x.x.x
We will now refer to this location as the FishEye/Crucible installation directory. - Now you will create another directory where FishEye/Crucible will store local data, separate from the installation directory:
- Create the new data directory. For example:
/opt/fisheyecrucible
- Create the new data directory. For example:
- Set an environment variable called ‘FISHEYE_INST’ pointing to your new data directory:
export FISHEYE_INST=/opt/fisheyecrucible- (in addition to running this line interactively, you may also want to append it to your ~/.bashrc file, so that the environment variable will persist across future logins / system restarts)
Note: Ignore the fact that this environment variable is called ‘INST’. It has nothing to do with the installation directory. This environment variable points to the data directory, but it must still have the name specified above.
- Copy the
config.xmlfile from the root of your FishEye installation directory to the root of your new data directory. - Because FishEye/Crucible will be running on the same machine as JIRA (already installed), you need to ensure that the URL paths are different for FishEye/Crucible and JIRA. Change the default FishEye/Crucible path as follows:
- Edit the
config.xmlin your FishEye/Crucible data directory. - If it hasn’t already been done, edit the
contextattribute to theweb-serverelement:<web-servercontext="/fisheye">
- Edit the
- Start FishEye/Crucible from the command line by running
./bin/run.shfrom your FishEye/Crucible installation directory.- Wait a few minutes for the server to launch. This message will appear on the command line once ready:
‘INFO – Server started on :8060 (http) (control port on your-server-IP-address:8059)’.
- Wait a few minutes for the server to launch. This message will appear on the command line once ready:
Step 4. Set Up FishEye and Crucible
In this step you will do the initial setup of your FishEye/Crucible site. As part of this process, you will connect FishEye and Crucible to JIRA, so that you can manage all your users via JIRA and share information between JIRA and FishEye/Crucible.
- To access FishEye/Crucible, go to your web browser and type this address:
http://localhost:8060/fisheye. - The FishEye/Crucible setup wizard will start.
- If you already have a license key, click Enter existing license. Enter your FishEye license into the FishEye License Key field and your Crucible license into the Crucible License Key field.
- If you do not have a license key, click Obtain evaluation license and follow the instructions on screen. If prompted, ensure that you choose to include Crucible as part of this evaluation.
- Click Next. The ‘Connect to JIRA’ step will appear. Enter the following information:
- JIRA Base URL – enter the web address of your JIRA server. For example:
http://localhost:8080 - Admin Username:
charlie – this is Charlie’s username in JIRA. - Admin Password – enter Charlie’s password for JIRA.
- JIRA Base URL – enter the web address of your JIRA server. For example:
- Leave the other fields (the ‘advanced options’) at their default values and click the Connect to JIRA button.
- The ‘Set administrator password’ screen will appear. Enter an administration password and then enter it again to confirm it.
This is the password you can use to access your FishEye/Crucible administration screens, by clicking the ‘Administration’ option at the bottom of the FishEye screens. In addition, you will be able to access the administration screens using the usernamecharlieand Charlie’s JIRA password. - Click Next.
- Click Add repository to exit the wizard.
- Log in to FishEye/Crucible when prompted.
You can use the administration password that you defined in the previous step, or you can use Charlie’s login. We recommend that you log in as Charlie:- Click Log In in the top menu bar.
- Enter the username ‘
charlie‘ and Charlie’s password in JIRA.
- The FishEye/Crucible ‘Admin’ screen will appear. Now you will connect FishEye/Crucible to your database. In the left-hand ‘Admin’ menu, click Database under ‘Systems Settings’.
- Click Edit and enter the following details:
- Click Test Connection to verify that FishEye/Crucible can log in to the database.
- Click Save & Migrate, then click OK when the migration is complete.
- Finally, you will set the location of your Mercurial executable, which you will need in the next step:
- In the left-hand ‘Admin’ menu, click Server under ‘Global Settings’.
- Find the Hg executable section and click Edit Details.
- Enter the location of your Mercurial executable. If you installed TortoiseHg, the location will look something like this:
C:\Program Files\TortoiseHg\hg.exe
Step 5. Connect FishEye to Bitbucket
For this integration exercise we provide a Bitbucket repository that you can connect to your FishEye ‘Dragons’ repository. Bitbucket is a code hosting site for the Mercurial and Git distributed version control systems (DVCS). We recommend this repository because:
- We have committed a code change with a JIRA issue key in the commit message, to match a JIRA issue you created earlier. This will allow you to see the JIRA and FishEye integration immediately, without having to do your own commit.
- The sample repository is small, so that FishEye’s initial repository indexing process will be fast.
![]() FishEye supports Git, Mercurial, Subversion and a number of other repository types. When you start using FishEye outside this integration exercise, you will need to create another FishEye repository and connect it to your source repository as described in the FishEye documentation.
FishEye supports Git, Mercurial, Subversion and a number of other repository types. When you start using FishEye outside this integration exercise, you will need to create another FishEye repository and connect it to your source repository as described in the FishEye documentation.
For this integration exercise, follow the steps below to connect to our sample repository.
- If the FishEye administration screen isn’t already open, choose
 > Administration.
 - In the left-hand ‘Admin’ menu, click Repositories under ‘Repository Settings’.
- Click Add repository. The first screen of the ‘Add Repository’ wizard will appear.
- Enter the following information:
- Repository Type:
Mercurial - Name:
Dragons - Description:
Dragons repository
- Repository Type:
- Click Next and enter the following information:
- Repository Location:
https://bitbucket.org/atlassian_dragons/dragonslayers - Authentication Style:
No authentication
- Repository Location:
- Click Test Connection to verify that Bitbucket is properly connected to FishEye. Click Close on the window that displays the results of the test, then click Next.
- Leave the Final Settings and Checkout URL at their default values and click Add. The ‘Repositories’ section in the Admin page will display the ‘Dragons’ repository.
- Click Repositories > All repositories at the top of the screen.
- Click the star symbol next to the ‘Dragons’ repository to select it as a favorite. (Note: You need to be logged in as Charlie in order to see the star symbol. If you are logged in purely for administration, you will not see the symbol. If you are not logged in as Charlie, please log in now.)
- Click the FishEye + Crucible logo
 at top left of the screen to return to the FishEye dashboard. You should be able to see the activity stream showing recent commit messages for the repository.
If you do not see any activity, please wait a while for FishEye to finish scanning (indexing) the repository. With our sample repository, this should only take a few minutes.

Victory!
![]() You can now see your source in FishEye. Go to the FishEye dashboard, click Repositories > Dragons to browse the contents of your new ‘Dragons’ repository.
You can now see your source in FishEye. Go to the FishEye dashboard, click Repositories > Dragons to browse the contents of your new ‘Dragons’ repository.
![]() If your repository is large, FishEye may take a while to index all your files. If the index scanning is still underway, you will see a message at the top of the screen saying ‘
If your repository is large, FishEye may take a while to index all your files. If the index scanning is still underway, you will see a message at the top of the screen saying ‘NOTE: The repository is being scanned, some statistics may not be up to date. ...'
![]() Want an RSS feed of your repository activity? Go to the Activity tab on the ‘Source’ view. Click Tools then RSS Feed. You can get an RSS feed on the dashboard too.
Want an RSS feed of your repository activity? Go to the Activity tab on the ‘Source’ view. Click Tools then RSS Feed. You can get an RSS feed on the dashboard too.
![]() Click the changeset number (
Click the changeset number (922fd93) in the activity stream to see FishEye’s view of your source code. See screenshot 3 below.

