
It’s like having a date with a flame thrower! You are embarking on stage 4 of the Atlassian Dragon Quest.
In this stage, you will add Team Calendars to Confluence, so that you can see a consolidated view of team leave, project due dates, and other team events. Team Calendars is a plugin for Confluence.
Time estimate: This stage will take approximately 15 minutes.
On this page:
- Step 1. Install Team Calendars
- Step 2. Add a People Calendar
- Step 3. Add a JIRA Calendar
- Step 4. Add Team Calendars to your Confluence Home Page
- Victory!
Step 1. Install Team Calendars
In this step you will install the Team Calendars plugin into Confluence.
- Go to your Confluence URL in your browser. For example,
http://localhost:8090/confluence. - Choose
 > Apps. The add-on management screen will appear.
 - Click Find new add-ons.
- Enter ‘
team calendars‘ into the Search the Marketplace text box and press Enter. - Click the Confluence Team Calendars add-on name in the list of add-ons.
- The add-on details will appear. Click Free Trial.
- A window will open to show the progress of the installation. When Team Calendars has been installed, you will be prompted to enter your Atlassian account details to obtain and apply an evaluation license from Atlassian. If you logged in with your Atlassian account to install JIRA Agile and JIRA Capture recently (Stage 2), you should not need to do this..
- Click Get Started.
- Click on Calendars in the top bar
- Set the timezone on the Setup Team Calendars dialog.
- Click Cancel to exit the following Menu.
Full details are in the Team Calendars Installation Guide.
Step 2. Add a People Calendar
In this step you will add a calendar where Charlie and his team can keep track of their leave.
- If you are following on from the Step 1, you should be on the Calendars page. If not, click Calendars at the top of your screen.
- Click Add Calendar > Add New Calendar.
- The ‘Create Calendar’ screen will appear. Enter the following information:
- Name:
Team leave - Description:
Charlie's team leave calendar - Related space:
Dragons - Time zone: Leave the default value.
- Name:
- Click OK to create the calendar.
- The walk through will start. Go through the steps then click Done. Notice that ‘Team leave’ appears in the list of calendars on the right of the screen.
- Click Add Event to add an event to the calendar.
- Enter the following information:
- Event Type:
Leave - Who:
Charlie of Atlassian (charlie)
If the user name is not valid, try rebuilding the content index (Confluence Admin > Content Indexing > Search Index > Rebuild) - When: Leave the default value (today’s date).
- Summary: Vacation
- Leave the other fields at their default values too.
- Event Type:
- Click OK.
Step 3. Add a JIRA Calendar
In this step you will add a JIRA calendar where Charlie and his team can keep track of their JIRA issues.
- Make sure that you are still on the ‘Calendars’ screen. Choose Add Calendar > Add New Calendar.
- Enter the following information:
- Name:
Dragons - Description:
Dragons JIRA calendar - Related space:
Dragons - Time zone: Leave the default value.
- Name:
- Click OK to create the calendar.
- Now you will configure the calendar to show issue/version-related dates from JIRA. Click Add Event and enter the following information:
- Calendar:
Dragons - Event Type:
JIRA Issue Dates - Name:
Dragons - Issues - Display:
Project>Dragons - Show:
Single date>Issue Due DateandSingle date>Version Due Date
- Calendar:
- Click OK.
- Now you will schedule a JIRA issue and a JIRA version for today, so that you can see both of the events in your calendar.
- Go to your JIRA URL in your browser. For example,
http://www.foobar.com:8080. - Go to your JIRA dashboard and click the
DRA-2issue key in the ‘Assigned to Me’ gadget. - The issue details screen will appear. Edit the issue and set the Due Date to today’s date. Click Update to save your changes.
- Click > Projects, then click the Dragons project.
- Click Versions in the left-hand panel. A list of versions appears in the right panel.
- Click the ellipses under Actions for Version 2.0, then click Edit. Change the release Date to today’s date, then click save.
- Go to your JIRA URL in your browser. For example,
- Go back to the ‘Calendars’ screen in Confluence, and refresh the Dragons calendar. (Click
 to the right of the calendar and choose Refresh.)
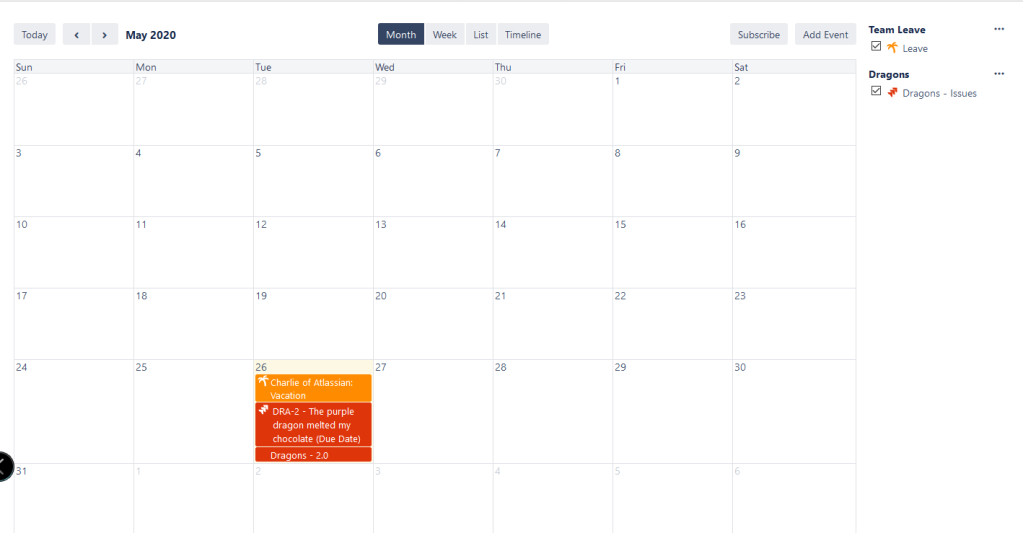
 - The calendar will show three events for today’s date:
- Charlie’s day of leave, from the ‘Team leave’ calendar.
- The due date for version 2.0, from the ‘Dragons – Issues’ calendar.
- The due date for issue
DRA-2, from the ‘Dragons – Issues’ calendar.
At this point, Charlie realises that he’s playing with fire by scheduling a day’s leave on the same day as the release is due!
Step 4. Add Team Calendars to your Confluence Home Page
In this step you will add a Team Calendars macro to the home page in your Dragons space, showing events from the two new calendars
- Go to the ‘Home’ page of your ‘Dragons’ space in Confluence. (Type ‘Home’ into the Confluence search box and choose the ‘Dragons Home’ page from the dropdown list.)
- Edit the page.
- Place your cursor after the Charlie badge at the top of the page, and press Enter to create a new line.
- Enter the following text, and format it as a heading level 2:
My calendarHint: Press Ctrl+2 or Cmd+2 as a keyboard shortcut to format a heading level 2. Click the question mark on the right of the editor toolbar to see all the keyboard shortcuts. - Press Enter to start a new line, then start typing:
{calendar,to add a Team Calendars macro. - The ‘Macro suggestions’ dropdown list will appear. Select Team Calendars. (Or open the Macro Browser and find the macro manually.)
- The ‘Insert Calendar’ screen will appear. Select Add Existing Calendar.
- In the ‘Add Existing Team Calendar’ window, start typing “Dragon” then select the Dragons checkbox when it appears in the list.
- Click Add.
- Click Got it, thanks! to close the tip that appears on the calendar.
- Add a new line and repeat the steps to add the ‘Team Leave’ calendar to the page.
- Save the page.
Victory!
You now have a consolidated view of events in a team leave calendar and a JIRA calendar.
