Beware, all ye who enter, for here be dragons. You are embarking on stage 1 of the Atlassian Dragon Quest.
In this stage, you will install Java and a database (PostgreSQL) to hold the data for your Atlassian applications. Then you will install Atlassian JIRA for bug tracking and issue management. JIRA will also act as a central user repository for all your Atlassian applications.
Time estimate: This stage will take approximately 90 minutes.
On this page:
- Step 1. Install Java
- Step 2. Install your PostgreSQL Database Server
- Step 3. Create your JIRA Database in PostgreSQL
- Step 4. Install JIRA
- Step 5. Set Up JIRA
- Step 6. Set up a Project and Create your JIRA Dashboard
- Victory!
Step 1. Install JAVA
Requirements: Oracle JDK 8 or 11. Note that the JRE alone is not enough.
If you do not have the right version of the Java Development Kit (JDK) already installed, follow the steps below to get it.
- Download the Oracle Java SE Development Kit (JDK).
- Get the latest version of the JDK 1.8.x.
- Follow the Oracle installation instructions.
- Make sure you have a
JAVA_HOMEenvironment variable pointing to the root directory of the JDK. Some JDK installers set this automatically.- Check by typing one of the following into a command window, depending on your operating system.
- On Windows:
echo %JAVA_HOME% - On Linux or UNIX:
echo $JAVA_HOME
- On Windows:
- If the above command does not show you the path to your JDK, please refer to the JIRA instructions on setting JAVA_HOME.
- Check by typing one of the following into a command window, depending on your operating system.
- Ensure that only one version of Java is installed on your machine. In Windows, use Add/Remove programs to remove old Java versions, and failing that you can use the Microsoft Fix it solution to remove corrupted versions of Java.
Step 2. Install your PostgreSQL Database Server
Requirements: PostgreSQL version 9.6.x.
- Download PostgreSQL – Get the latest 8.4.x. Note that Atlassian does not support PostgreSQL 9.x for some of the products in this tutorial. For the simplest installation, choose one of the one-click installers.
- Install PostgreSQL. If you chose one of the PostgreSQL one-click installers, this is simple: Run the executable that you downloaded and follow the prompts.
- Enter a password for the super user (‘postgres’). Remember this username and password. You will need it each time you log in to the database.
- Accept the default port
5432. - Accept all the other default settings but clear the checkbox to launch Stack Builder when the installation is complete.
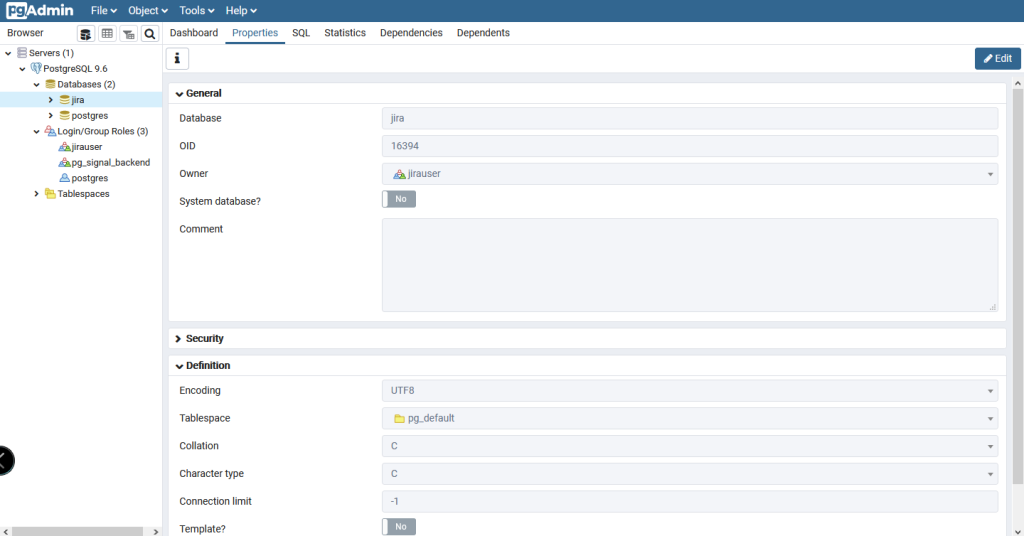
Step 3. Create your JIRA Database in PostgreSQL
Now you will create a database where the Atlassian JIRA application will store its data, and a user role that JIRA will use to connect to the database. We are assuming that you have already created your PostgreSQL database server in a previous step.
![]() pgAdmin 4 is not supplied with the installer, so you will need to download it separately and install it. I am using v4.21 for this.
pgAdmin 4 is not supplied with the installer, so you will need to download it separately and install it. I am using v4.21 for this.
- Start pgAdmin 4.
- Right-click (or double-click) the database server name and log in using the password that you specified for the ‘postgres’ super user.
- Add a new login role called ‘jirauser’:
- Right-click Login Roles and select Create > Login/Group Role….
- Enter the role Role name:
jirauser - Switch to the Definition tab and enter a Password and enter it again to confirm it.
- Click the Role privileges tab.
- Select Can Login.
- Select Can create databases.
- Select Can create roles.
- Click Save to create the user.
- Add a new database called ‘jira’:
- Right-click Databases and select Create > Database….
- Enter the database Name:
jira - Select the Owner:
jirauser - Click the Definition tab and enter the following:
- Template: template0
- Collation: C
- Character Type: C
- Click Save to create the database.
For Linux users, pgAdmin4 (version 8.4.x) is also available for installation on most Linux platforms. However, if you are on UNIX and do not have pgAdmin III, you can use the command line interface instead. Assuming that you are using the default installation directory of /opt/PostgreSQL/8.4/bin/, enter the following commands:
sudo -s -H -u postgres
# Create the JIRA user:
/opt/PostgreSQL/8.4/bin/createuser -S -d -r -P -E jirauser
# Create the JIRA database:
/opt/PostgreSQL/8.4/bin/createdb --owner jirauser --encoding utf8 jira
/q
Step 4. Install JIRA
Requirements: JIRA 8.5.4
For Windows:
- Go to the Atlassian download centre.
- Download the JIRA Software 8.5.4 installer for your Windows system. This is the latest Enterprise Release as of writing.
 Please use the JIRA version specified in this documentation. If the download centre shows a JIRA version later than 8.5.4, click downloads archive and get JIRA 8.5.4.
- Why? We have tested the integration suite with this version. There is a chance that you will have problems integrating the other applications if you use a different version.
- Log in to your computer as a Windows administrator.
To install JIRA as a service, you must run the Windows installer using a Windows administrator account. While you can run the Windows installer with a non-administrator account, your installation options will be limited. - Run the JIRA installer
.exefile. On Windows 7 or Vista, right-click the file name and click Run as administrator. - If a Windows 7 or Vista ‘User Account Control’ dialog box asks you to allow the installation wizard to make changes to your computer, specify ‘Yes’.
- Select Express Install as the installation option.
- The installer will display the ‘Installation Summary’. Click Install to confirm that you want the default options.
- When prompted, select Launch JIRA in browser and click Finish to close the installer. The installer will finish installing JIRA, then it will start the JIRA server and open the JIRA Setup Wizard in your web browser. See below for further instructions. If JIRA didn’t open automatically in your browser, skip to the next step for information on opening it manually.
For Linux:
- Go to the Atlassian download centre. Download the JIRA Software 8.5.4 installer for your system.
- Please use the JIRA version specified in this documentation. If the download centre shows a JIRA version later than 8.5.4, click downloads archive and get JIRA 8.5.4.
- Why? We have tested the integration suite with this version. There is a chance that you will have problems integrating the other applications if you use a different version.
- Open a Linux console and change directory (
cd) to the directory containing the.binfile. - If the
.binfile is not executable after downloading it, make it executable. For example:chmod a+x atlassian-jira-X.Y.bin
(where X.Y represents your version of JIRA)Execute the.binfile with root user privileges, to start the JIRA installer.- If you execute the installer with root user privileges, the installer will create and run JIRA using a dedicated user account. You can also execute the installer without root user privileges, but your installation options will be limited. To run JIRA as a service, you must execute the installer with root user privileges.
- Select Express Install as the installation option.
- The installer will display the default options. Accept the Install prompt to confirm that you want the default options.
- The installer will finish installing JIRA, then it will start the JIRA server and open the JIRA Setup Wizard in your web browser. See below for further instructions. If JIRA didn’t open automatically in your browser, skip to the next step for information on opening it manually
Step 5. Set Up JIRA
Now you can run JIRA’s Setup Wizard and then enable some JIRA features that are required for the later stages in this integration procedure.
- If JIRA didn’t open automatically in your browser, go to your web browser and type this address: http://localhost:8080.
- The JIRA Setup Wizard will start. It guides you through the process of setting up your JIRA server and creating an administration user. Detailed instructions are in the JIRA documentation. Below are the things you need to know for our Dragon Quest.
- You will be presented a choice of “Set it up for me” or “I’ll set it up myself”. Choose the latter one, as the first method only aims to help installations of evaluation copies.
- Click Next.
- Choose your server language
- Select My Own Database for the database connection
- Enter the following information to configure the database connection:
- Database Type:
PostgreSQL - Hostname: Enter the name or IP address of the server where you installed your PostgreSQL database:
localhost - Port: Enter the default port that you set up for PostgreSQL:
5432 - Database: This is the name of the database that you created in step 3 above:
jira - Username: This is the user you created in step 3 above:
jirauser - Password: Enter the password you chose in step 3 above.
- Schema: Leave this at the default setting:
public
- Database Type:
- Click the Test Connection button to test the connection settings.
- When you have a working connection, click Next.
- Enter the following application properties:
- Application Title:
My company JIRA - Mode: Accept the default mode:
Private - Base URL: Enter the full website address at which JIRA is running, not just ‘localhost’. For example, if your computer name is ‘coopers’ then the base URL should be:
http://coopers:8080. Or specify a website address, such ashttp://www.foobar.com:8080.
- Application Title:
- Click Next.
- License Key: If you do not already have a JIRA license, follow the prompts on the setup wizard screen to get an evaluation license key.
- Specify the administrator account. This will be your JIRA super user:
- Full name:
Charlie of Atlassian - Email: We recommend that you give your own email address here.
- Username:
charlie - Password: Enter a password for the administrator account and enter it again to confirm it.
- Full name:
- Click Next.
- Email notifications – For the purposes of the Atlassian Dragon Quest, we recommend that you configure email notifications later. This is the default setting.
- Click Finish.
If you changed the base URL in step 7, this is a good place to log out and log back in using the new base URL. - Click your language of choice, then click Continue.
- Click Next on the avatar selection screen.
- Select See a project in action
- Select “Project Management”
- Give it the Name “Demo”
- Accept the default Key
- Perform the following configuration steps:
- Add the groups that you will need later for Confluence and Bamboo:
- Choose
 > User Management.
 - Enter your password if prompted, to confirm that you want administrator access. (Note that the Atlassian applications will request this confirmation at various steps in the process. This guide will not mention this step again.)
- Choose Groups in the left column.
- In the Add Group section, enter a group name of ‘
confluence-users‘ and click Add Group. - Add the following groups as well
.confluence-administratorsbamboo-adminfisheye-userscrucible-users
- Choose
- Make Charlie of Atlassian a user and administrator in Confluence and Bamboo by adding him to the relevant groups:
- Click Bulk Edit Group Members.
- In the left-hand box, select the three groups:
confluence-usersconfluence-administratorsbamboo-adminfisheye-userscrucible-users
- In the right-hand box under Add members to selected group(s), enter the username:
charlie - Click Add selected users. Charlie’s name will appear in the middle box as a group member of the selected groups.
- Add the groups that you will need later for Confluence and Bamboo:

Step 6. Set up a Project and Create your JIRA Dashboard
In this step you will create some data in JIRA, including a project and an issue, for use in the subsequent stages of this integration procedure. Then you will create your own JIRA dashboard with a couple of gadgets. For this procedure, you need to be logged in as JIRA Admin.
- Create a project in JIRA:
- Click
 > Projects.
 - In the Projects page choose Create Project.
- Select the ‘Basic software development’ project type, then click Next
- Click Select
- Enter the following information:
- Name:
Dragons - Key:
DRA
- Name:
- Click Submit.
- Click
- Drop access to administrative functions:
- (As a matter of good practice you should drop access to administrative functions when no longer required.)
- Click Drop access link visible in the page header.
- Add two versions (1.0 and 2.0):
- Click the Gear at the bottom of the sidebar.
- Click Versions in the left-hand panel of the Dragons project screen.
- Enter the following information, then click Add:
- Name:
1.0 - Description:
Version 1.0
- Name:
- Do the same for
Version 2.0.
- Add an issue to your project:
- Click Create at the top of your screen in order to create a new issue.
- Enter the following information about your new issue:
- Project:
Dragons - Issue Type:
Bug
Click Next to see the full form - Summary:
Dragon slayer's equipment is defective - Affects Version/s:
1.0 - Assignee: Click
Assign to Me, which will assign this task toCharlie of Atlassian. - Description:
There's a hole in the dragon slayer's water bucket - Original Estimate:
1d
- Project:
- Click Create. You now have an issue with a key of ‘DRA-1’. Click the issue key and take a look at your new issue.
- Create a new dashboard for all your dragon-related tasks, issues and general fire fighting:
- Click Dashboards > Manage Dashboards at top left of your JIRA screen.
- Click Create new dashboard.
- The Create New Dashboard screen appears. Enter the following information:
- Name:
Dragon Development Dashboard - Description:
A dashboard for dragon slayers, fire fighters and like-minded brave souls
- Name:
- Leave the other fields at their default values and click the Add button at the bottom of the ‘Create New Dashboard’ screen (not the one next to ‘Add Shares’).
- Click on the dashboard name to edit it. You can now add gadgets.
- Click Add Gadget.
- The ‘Gadget Directory’ will appear, showing a list of the available gadgets for your JIRA dashboard. Enter ‘projects’ into the search box at top right of the gadget directory.
- The list of gadgets will change, to show only the gadgets that match your search term. Find the Projects gadget and click Add gadget.
- Find and add the Assigned To Me gadget in the same way.
- Click Close to go back to your dashboard.
- Drag the Assigned to Me gadget to the top right of your dashboard:
- Move your mouse pointer over the gadget’s blue title bar.
- The cursor icon will change to a four-pointed arrow
 (or a hand). Click the gadget title bar with the left mouse button then drag the gadget to the right. Drop it in the space labeled ‘Drag your gadget here.’
- Configure the Projects gadget to point to your ‘Dragons’ project:
- Select ‘Dragons’ from the Projects list in your Projects gadget.
- Leave the default values as configured for View and Number of Columns.
- Click the dropdown arrow next to Refresh Interval and select Every 15 Minutes.
- Click Save.
- Configure the Assigned to Me gadget:
- Leave the default values as configured for Number of Results and Fields to display.
- In Refresh Interval check off Every 15 Minutes.
- Click Save.
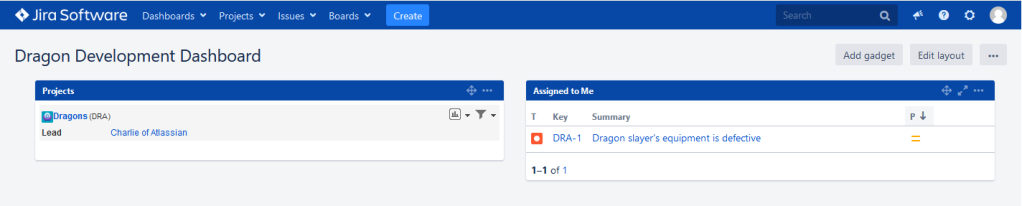
Victory!
![]() You can now see your project dashboard with 2 gadgets on it! The Projects gadget shows the project lead Charlie of Atlassian. The Assigned to Me gadget shows the single DRA-1 issue assigned to Charlie.
You can now see your project dashboard with 2 gadgets on it! The Projects gadget shows the project lead Charlie of Atlassian. The Assigned to Me gadget shows the single DRA-1 issue assigned to Charlie.