
So, I have a problem. I have a bunch of sensors around my house that gather temperatures, wind speeds, etc. Why? Because I’m also (not-so) secretly obsessed with the weather. But – they all use batteries. And, like all batteries, the ones currently in there will eventually run out of power. But right now, I find out whenever the device stops sending data long enough for me to notice. I’m not too fond of that.
What if it could create a Jira ticket for me to change the batteries instead? That is our goal today. We’ll use a platform called Node-RED to take in the information from the sensors, analyze the message’s contents, and, if appropriate, use Jira’s Rest API to create a ticket automatically.
Now, I can hear some of you saying this is a silly use case. And yes, it is. But the silly use case still conveys the power of what I’m trying to do. If I can take something like a radio signal and turn it into a Jira ticket, I can turn any signal into a ticket. Rather than a battery alert on a weather monitor, it could be a temperature alert on a server Rack sensor or an outage notification from an ISP. I want a way to turn any input I can get into a Jira Ticket in real-time – and it’s possible with Node-RED.
So, what is Node-RED?
Well, to use their byline:
Node-RED is a programming tool for wiring together hardware devices, APIs and online services in new and interesting ways.
In other words, Node-RED is a middleware, a piece of software meant to sit in between two things and act as a translator between them. So what sort of things can it translate? Well, in this case, that’s limited to your imagination. Currently, my Node-RED instance is doing three jobs.
- It’s taking information from rtl_433, translating it, and inputting it into an InfluxDB instance.
- It takes information from several API Points for current weather conditions, pollution, etc., interprets the response, and puts the data into an InfluxDB instance.
- It’s taking information from rtl_433, translating that, adding the sensors automatically to Home Assistant, then pushing the data from those sensors into Home Assistant via MQTT.
Today, we’ll add a routine that will take information from rtl_433. If the rtl_433 packet a) contains battery_ok, and b) battery_ok is equal to zero, we will then parse the information into the format Jira needs and fire off an API call with that information to create a ticket in Jira.
The Jira Cloud Rest API
So the other part of this will be the Jira API to create an issue. Thankfully, this is pretty well documented here:
The things we need to know for a successful API Call are:
- What kind of call are we making? Is it a POST, GET, PUT, or DELETE call?
- How are we authenticating? Thankfully, Atlassian doesn’t allow just anybody to make a call to your Jira instance.
- Is a post body needed, and if so, what format does the body need to be in?
So, in this case, we can see the following. First, we can see that the Create Issue is a POST Call. We can also see that their examples show an example header information below:
‘Authorization’: `Basic ${Buffer.from( ’[email protected]:<api_token>’ ).toString(‘base64’)}`
This example shows how we are authenticating – which is Basic Auth using a base64 encoded <username>:<api_token>, similar to how we Authenticate to Jira Data Center.
As for the body…yeah. The Documentation has a bunch of data in their examples, but we only need some of what they show. So looking at their example JSON object and pairing it down to *just* what we need, we can get away with the following body.
{
  "update": {},
  "fields": {
    "summary": "Main order flow broken",
    "issuetype": {
      "id": "10000"
    },
    "project": {
      "id": "10000"
    },
    "description": {
      "type": "doc",
      "version": 1,
      "content": [
        {
          "type": "paragraph",
          "content": [
            {
              "text": "Order entry fails when selecting supplier.",
              "type": "text"
            }
          ]
        }
      ]
    },
    "reporter": {
      "id": "5b10a2844c20165700ede21g"
    },
    "priority": {
      "id": "20000"
    },
    "labels": [
      "bugfix",
      "blitz_test"
    ],
    "assignee": {
      "id": "5b109f2e9729b51b54dc274d"
    }
  }
}
The ID numbers look intimidating, but they are not. This is how Jira refers to different things internally. We could use more API Calls to convert the Project names, Issue Types, etc., from what we see to their ID Numbers, but they don’t change once created, so in many cases, we can hard-code these values that we can reuse into variables. This method means that if we ever need to change them down the road, we only have to change them in one known place rather than hunt for wherever they may be in our code.
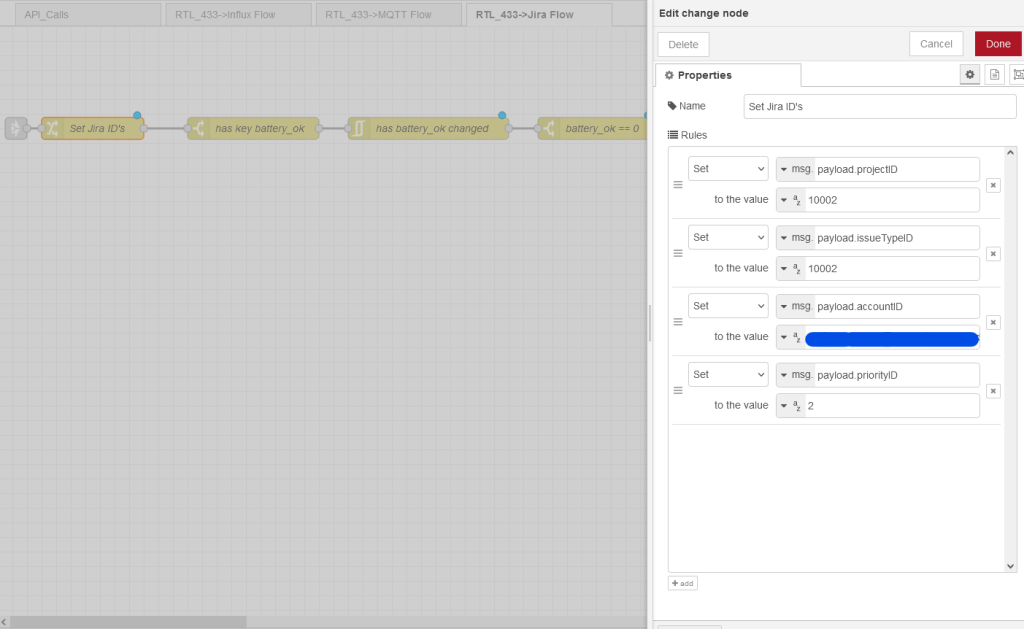
For this particular project, we will be using Project ID 10002, issuetype ID 10002. NodeRED will apply Summary, Description, and Labels from the data provided by rtl_433, so that leaves the user id.
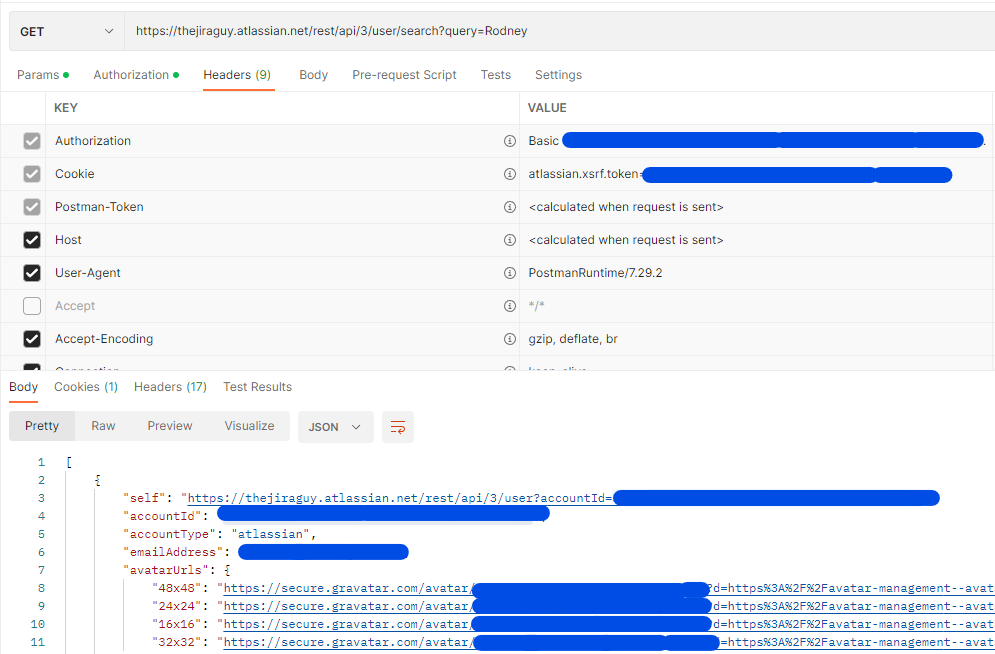
User ID was tricky, as I had to use the API to get that info. But that was a simple GET call using <your cloud domain>/rest/api/3/user/search?query=<display Name>. That gave me the UserID, which means I can start building out this flow.
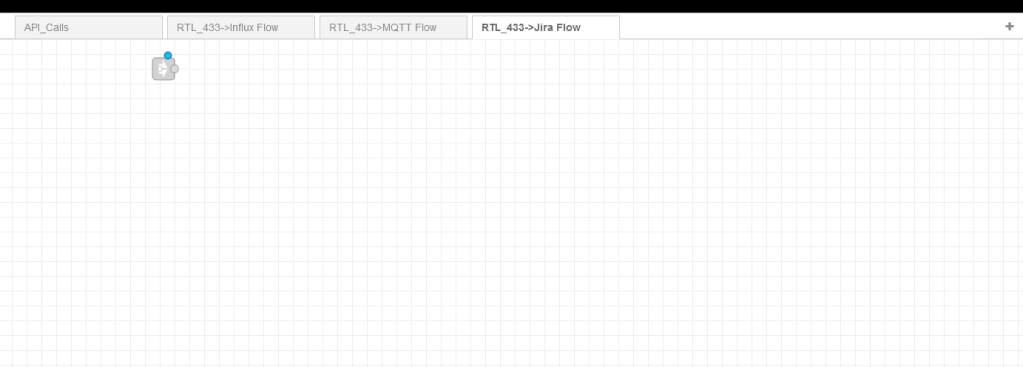
Now to Node-RED
So, the first thing I do in Node-RED is creating a New Tab just for this flow. This helps me keep things visually organized – anything on this tab is just for my outflow to Jira. Then I’ll bring in the rtl_433 input from the RTL_433->Influx Flow tab; that way, I’m not repeating some processing already taking place elsewhere. Having a place to pre-process will also allow me to do testing by manually setting the battery_ok property to test the process before a sensor actually has bad batteries. So, with all this, we have our starting point.
From here, I’ll add some of the data we’ve gathered above for the API Call. Then, I’ll use the “Change” node and set the values for msg.payload.<property> so they get included with the other variables I want to set. This will be my single point in setting these values should I ever have to change them down the line. I’ll also put a temporary debug node to ensure they are being set as expected.
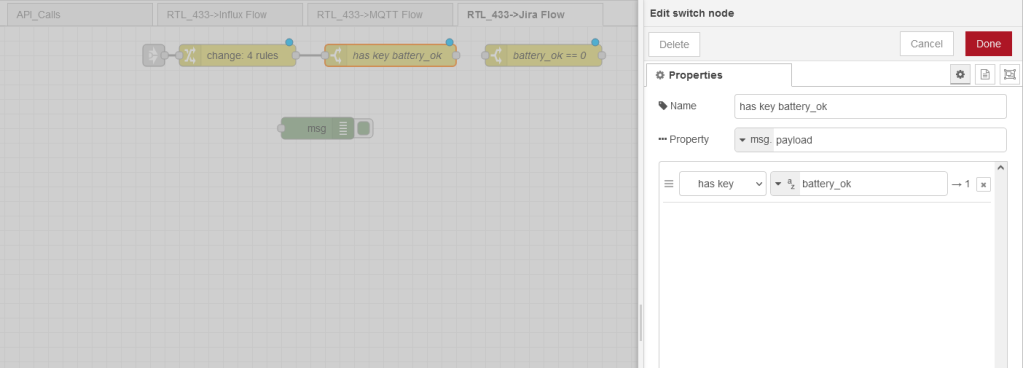
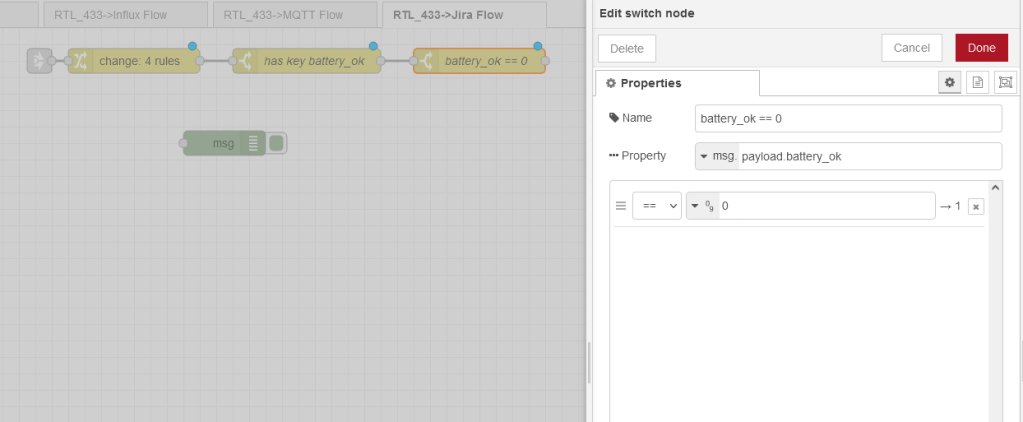
Next, I want to filter out all messages that either don’t have a battery_ok or battery_ok is set to 1. To do this, I’ll use a couple of switch nodes. Yes, I could do this in a single function block, but I prefer to use as few of those as possible, especially for this kind of filtering. Finally, I’ll move my debug tag and ensure that the message only shows up if the conditions are correct before proceeding.
From here, I’m going to plop down a new Function node and start crafting the body for my API Call in the new payload. First, I add a custom topic, as I can use this in the future to expand this flow, then use the variables that come from rtl_433 or I set to craft the rest of the body.
var newMsg = {
    topic: "Jira/" + msg.payload.model + "/battery_alert",
    retain: false,
    qos: 0,
     payload: {
     fields: {
       summary: msg.payload.model+"'s Battery is Low!",
       issuetype: {
         id: msg.payload.issueTypeID
       },
       project: {
         id: msg.payload.projectID
       },
       description: {
         type: "doc",
         version: 1,
         content: [
           {
             type: "paragraph",
             content: [
               {
                 text: "Battery Indicator on "+msg.payload.model+" is showing that is is low. Please change it!",
                 type: "text"
               }
             ]
           }
         ]
       },
       reporter: {
         id: msg.payload.accountID
       },
       priority: {
         "id": msg.payload.priorityID
       },
       labels: [
         msg.payload.model,
         "battery"
       ],
       assignee: {
         id: msg.payload.accountID
       }
     }
   }
};
return newMsg;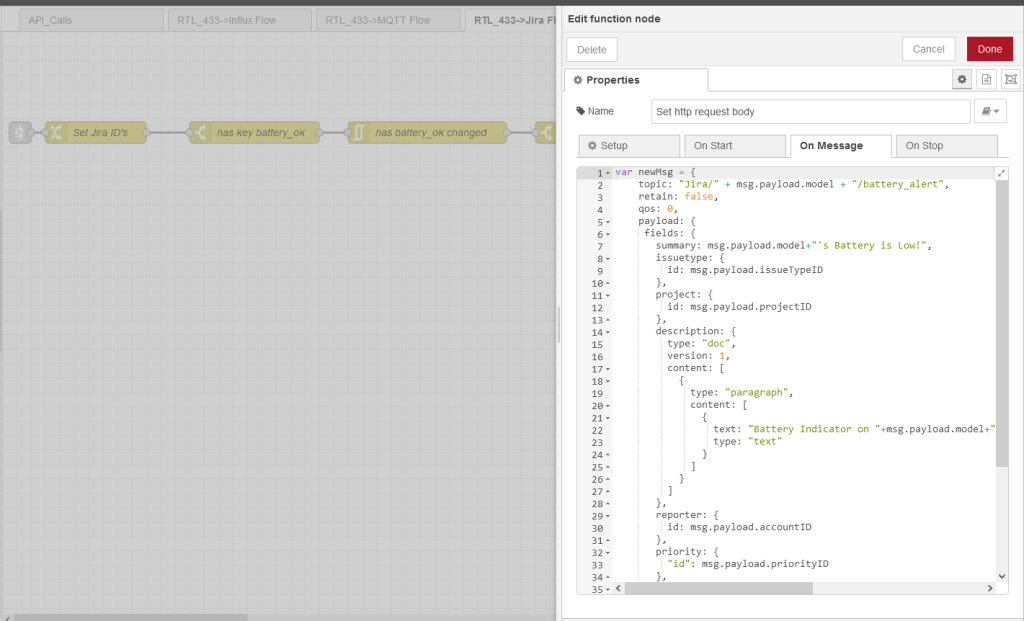
Now…rate limiting. I looked at how best to do it. I originally was going to use a delay node to rate limit responses to once a day, but that had a significant flaw. It would wait until the end of each period to send out a message for each topic it’s collected – which means you could wait upwards of a full day to get a notification. This setup would be fine for this use case, but for more critical alerts, it is not ideal.
Instead, I added a filter node, which looks for changes in the battery_ok field, and put it between the has key battery_ok switch and the battery_ok==0 switch. This way, it can see the battery_ok field change between 0 and 1 and forward messages accordingly. Then where the battery is now okay will be filtered out, meaning we’ll only see one message when the battery is no longer okay.

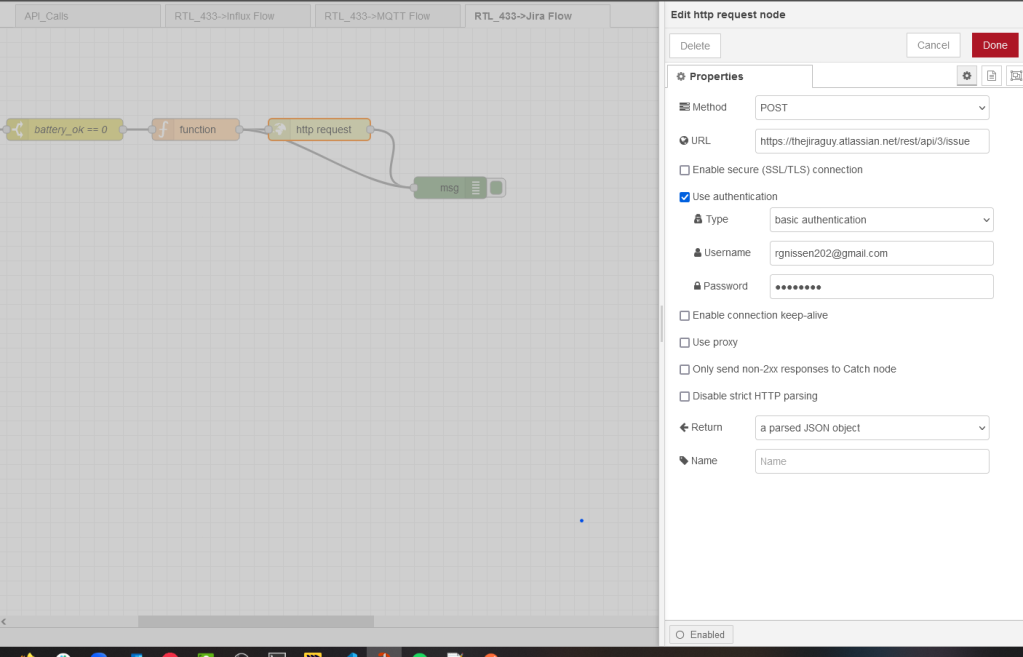
I can now add the http request node now that I have everything set. Here, I’ll change my method to POST, input my URL, add my Authentication as shown, and ask to return a parsed JSON Object. Your settings should look like this.
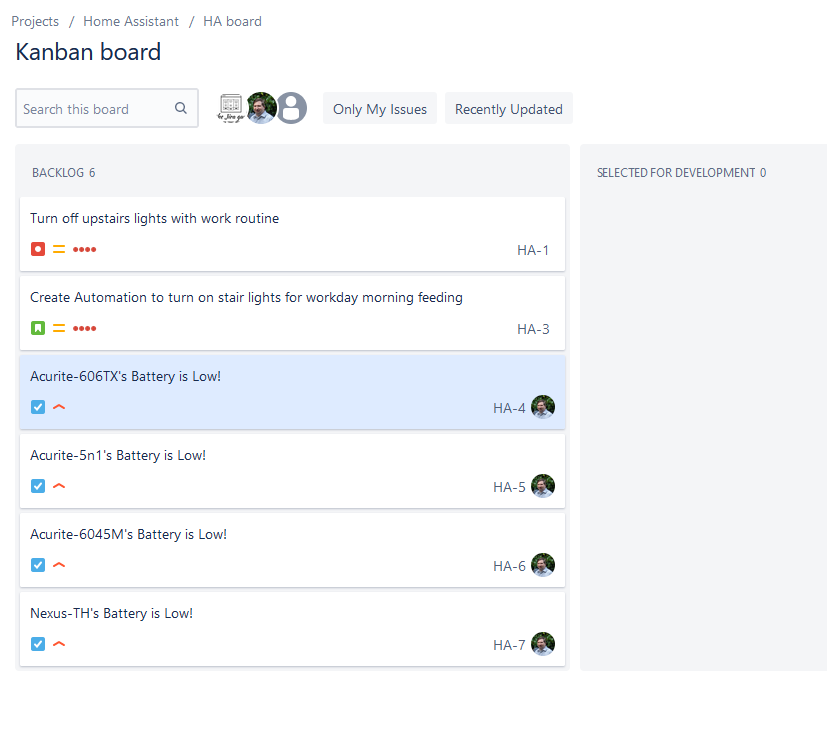
Pipe in your output from the function, and test, and you should see something like this in Jira. Congratulations, you have a successful test!

So, what do you think?
What use cases can you foresee with the ability to route between different platforms? Any other automations or such you can think of using NodeRED? Let me know! Comment here or on Social media on how you want to use NodeRED. If it’s interesting enough, I might cover it!
I’ll be live again tonight at 5:00 PM Eastern. I had some great engagement last week with users, and even came away with some topics to cover. I hope to see some of you tonight!
Don’t forget you can follow me on my Social Media Profiles found on my Linktree link. Please like, comment, and share the post on the social media of your choice, as that helps convince the algorithms that more people need to read The Jira Guy.
But until Next time, my name is Rodney, asking, “Have you updated your Jira issues today?”

Rodney, that is BREATHTAKING!
I’ve been using the API for years so that part was not too interesting but the rtl_433 and the NodeRED, not to mention the weather station stuff was awesome!
I wonder if you would write another article that explains what sensors you have, where you got them and how you hooked all this together. I would really like to try my hand at a similar system!
Thanks,
Dave
LikeLike
I didn’t go to in depth into that as, well, it wasn’t Jira related. But I might compile everything together and put together a weekend post on it here soon.
If you can’t wait, I used this as a start to my original setup.
https://www.hackster.io/andersot72/acurite-sensors-through-to-grafana-dashboard-7a1433
I don’t use those exact weather stations, but the hardware is what I still use otherwise. I’ve iterated several times over on his setup for NodeRED, so that will be interesting to cover.
LikeLike
Ha ha – I am a Home Assistant and Node-RED user too, and I guess You been hit by the – “I need something more to use Node-RED for…” need/feeling. There is also a Jira pallete for Node-RED by the way, but its quite limited – and it may not be Cloud compatible…. I also got the though: What can I use Node-RED for in Netic (where I work) – but I guess an automation ouside Jira in somethink to think about before implementing… But perhaps a P1 Incident could turn on a few Philips Hue bulbs in red !!!!
LikeLike