
So, if my count is correct, we’ve covered how to use the installer to install Jira and set up Jira Data Center on Kubernetes. But what if I said there is another way we can install Jira into a system? This way is a fair bit more advanced, but only because you are doing everything manually.
“And why would I want that? ” I hear you saying. Well, think about it. If you can do it manually, you can automate it. I have automated this process many times with several different tools over the years. And each time, it is based on the exact steps you would use for an Archive Install, which I will be going over with you today.
“Well, if you can automate it, why don’t you give us that?” All in good time, I promise. But before you can run, you must walk, and before that crawl.
Getting started – Supporting Environment
To get started, we must make sure we are on a good platform. So I’ll be starting with the following VM running Ubuntu 20.04.

As per my custom, I have the second disk attached to /archive, housing my working directories for the MySQL DB and Jira Home Directory.
I will be targeting the latest 8.13 Release, which means I should also check my Supported Platforms page to make sure my database and Java version is up to the task.
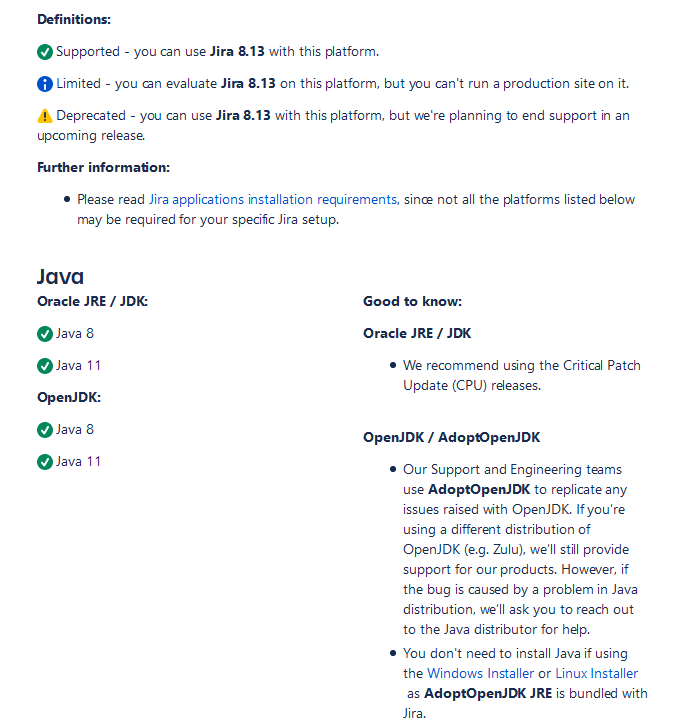
In this case, we will need to install OpenJDK 11 by using the following command.
apt install -y openjdk-11-jdk-headless

I will also need to install a database. Today I will be installing said DB on the same box with Jira. This arrangement has several Pros and Cons:
Pros:
- Almost no latency between Jira and DB
- Backups can be done easier as both Attachments and DB are on the same system
Cons:
- More Ram is required on the VM
- Have to watch that CPU load. Any high CPU usage has a double impact on Jira.
- If you move to a multi-node configuration, it’s one more thing to worry about moving.
We see that 8.13 supports MySQL 8.0 as the latest version. So this will be the version I’m targeting. In general, you want to target the latest version of any supporting software possible – as this will give you the longest time before you are forced to upgrade to a new platform. I won’t go into installing MySQL today, but if you are curious, here are few quick guides.
I will note you will also need to follow the Atlassian Documentation on Setting up the MySQL DB with the proper settings for Jira.
So now that we have our supported platforms figured out let’s get into the Install.
Jira Archive Install
Some quick checks
The first thing we are going to do is make sure that once Jira starts, it will find the Java installation. To do this, we are going to run the following commands.
java -version
echo $JAVA_HOME

Well, we got one for two. To set this permanently, we will add it into /etc/profile
export JAVA_HOME=/usr/lib/jvm/java-11-openjdk-amd64

With that added, relog in, and we should see a good test.

Now we need to add a user for Jira to run under. Atlassian gives us this command as:
sudo /usr/sbin/useradd --create-home --comment "Account for running Jira Software" --shell /bin/bash jira
Downloading a Jira Archive
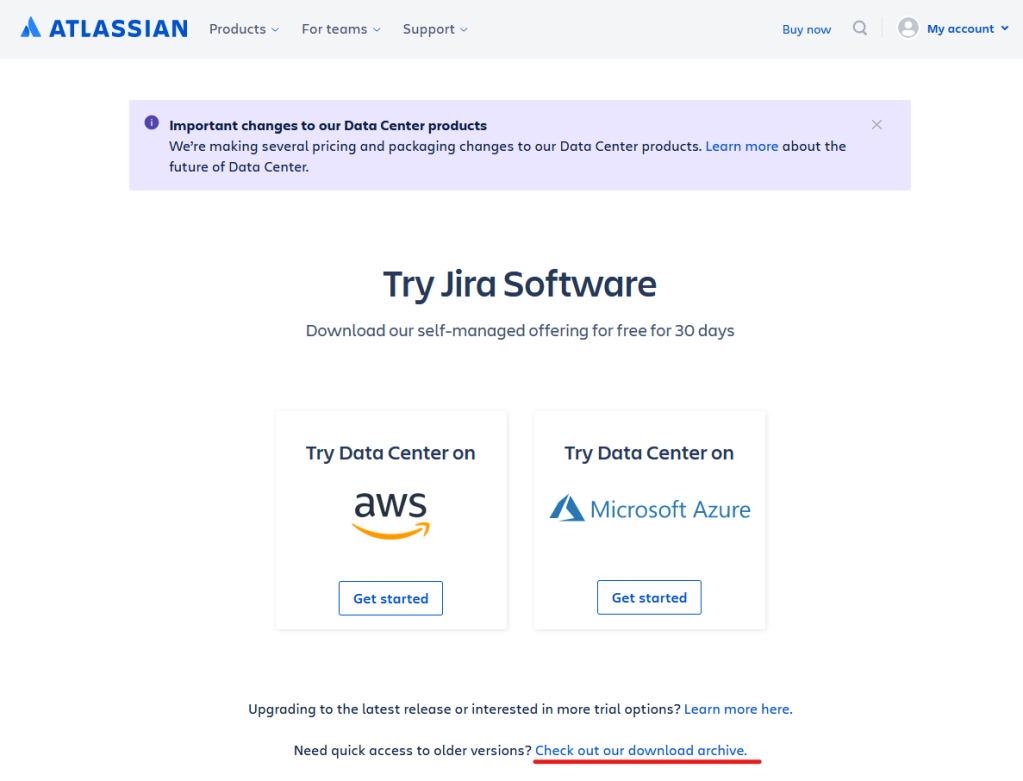
With that, we are all set to Download Jira and begin to kick things off. Go to the Atlassian Downloads site and scroll down until you find the link marked “Check out our download archive.” Click that link.
Now click “Show details” for version 8, then go down to 8.13. On the latest one there (which is 8.13.8 as of this writing), click the “Download” link.

This link will ask you who you want your download. First, select the “tar.gz Archive” Option, then click the “I agree” checkbox. Now right-click the “Submit” button and click “Copy Link.”

Now download this to your server with the following command.
wget <link you just copied>

Setting up the Install Directory
Alright, so now that we have our archive, let’s set it up a home. The default location for the Jira install directory is /opt/atlassian/jira.
mkdir -p /opt/atlassian/
tar -xzf atlassian-jira-Y-X.X.X.tar.gz -C /opt/atlassian/
mv /opt/atlassian/atlassian-jira-Y-X.X.X-standalone /opt/atlassian/jira
cd /opt/atlassian/jira
Now we need to fix permissions. We’ll be using a combination of chown and chmod to do what we need to do. It would also be nice to keep these commands handy. If any Junior Admins decide to run Jira as root, you can use the commands to fix the permissions.
chown -R jira:jira /opt/atlassian
chmod -R u=rwx,go-rwx /opt/atlassian

Setting up a home directory
The Jira home directory is where everything that makes your Jira instance individual lives. This directory will house information on connecting to your DB, the attachments for your instance, your user’s avatars, your logos, and even where to find the shared directory in a Data Center environment. So it’s a big deal.
It’s also a big deal in the fact that it will likely grow with your instance. For this reason, I like to house it in a separate drive from the Linux root, as I can both keep an eye on its size and expand it quickly that way.
So let’s start by making the directory and setting its permissions.
mkdir -p /archive/atlassian/application-data/jira
chown -R jira:jira /archive/atlassian/application-data/jira
chmod -R u=rwx,go-rwx /archive/atlassian/application-data/jira

We don’t need to worry about putting anything in this directory just yet – Jira will do that on its first run. But we do need to tell Jira where to find this directory. We can do that by modifying the jira-application.properties file.
nano /opt/atlassian/jira/atlassian-jira/WEB-INF/classes/jira-application.properties
jira.home = /archive/atlassian/application-data/jira

Setting up a Jira Service
So the Documentation doesn’t cover this, and I feel it’s a shame. But that’s why I write my guides and likely why you are reading this rather than their Documentation. I just figured I’d let you know when I’m doing more than just slight modifications to the Atlassian method, though!
We’ll need to set up a service file. Open up a new service file with the following command.
vim /etc/systemd/system/jira.service
And put the following into this file.
[Unit]
Description=Atlassian Jira
After=network.target

[Service]
Type=forking
User=jira
PIDFile=/opt/atlassian/jira/work/catalina.pid
ExecStart=/opt/atlassian/jira/bin/start-jira.sh
ExecStop=/opt/atlassian/jira/bin/stop-jira.sh
LimitNOFILE=32768
LimitNPROC=32768

[Install]
WantedBy=multi-user.target
Then you will want to execute a daemon-reload
systemctl daemon-reload
MySQL Connector
You can skip this step if you are using any other Database, but if you are using MySQL, there is one final step.
You will want to download the appropriate driver specified in the Supported Platforms document to the system. I usually do the platform-independent tar.gz archive. Once you’ve downloaded it, you can extract it to your home directory. Go down into the extracted folder, and copy the jar file to /opt/atlassian/jira/lib/
tar -xzf mysql-connector-java-8.X.X.tar.gz
cd mysql-connector-java-8.X.X
cp ./mysql-connector-java-8.X.X.jar /opt/atlassian/jira/lib/

First start!
Now that we have all the details down, we can hopefully get our first start.
systemctl start jira
systemctl status jira
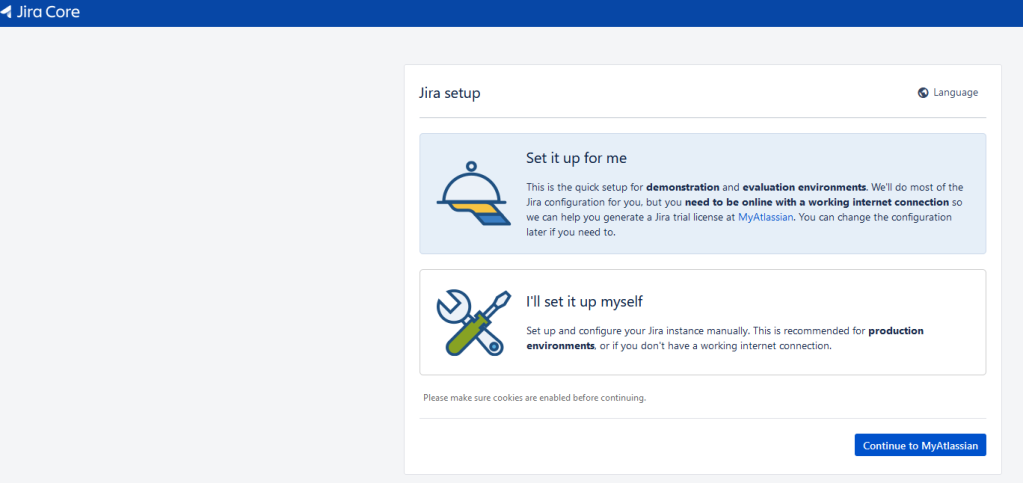
Wait about 30 seconds, connect to port 8080 of the system, and you should see this awesome visage!
Some final thoughts
This method is not the easiest path to install Jira. But it’s a powerful method because all of the steps can be automated in one way or another. It also gives you insight into what the installer does for you, which can be valuable in its own right. Of course, if I’m feeling lazy, I still use the installer. But honestly, that’s become less and less common for me, as I suspect it will do for you.
In speaking of Automation, I’d like to cover it, but I will need some proof from you that you want to see it. So, for the first time, I’m setting a like goal. So, if you guys can gather 50 likes on this article across the social media platforms, I’ll write up an article on automating this process. Deal?
Don’t forget you can find me on Facebook, LinkedIn, Twitter, or Instagram, where you can get the latest from the blog, new posts, surveys, and the latest news from the community. Don’t forget to comment and like while you are there to help others discover the blog! You can also subscribe below to get new posts delivered directly to your inbox, hands down the fastest way to be notified of new content from the blog! But until next time, my name is Rodney, asking, “Have you updated your Jira issues today?”

This is a great tutorial. Did you ever write-up how to automate the task? I’ve created a bash script that setup the environment but still missing a few steps.
LikeLike