Some number of years ago, I was asked to work on a Jira process for a company. They were trying to solve the problem that people were taking overtime un-evenly, costing the company a minor fortune every month. But no one had any visibility into who was taking how many overtime hours until it was time to run Payroll.
The solution they were seeking was to have an approval process where a manager would have to submit overtime requests to Upper management; that way, they would see who was taking the lion’s share ahead of time and suggest more even distribution.
However, this was a touchy subject, so while we would want to allow the rank-and-file to see their requests, management didn’t want them to see everyone else’s. So, how do you do this? Allow people to selectively see some issues and not others within a single project?
So…what are Issue Security Schemes?
Well, this is entirely possible, but to do so, we need to use one of the most under-utilized features in Jira: Issue Security Schemes. Issue Security is perfect for situations where many people need access to a particular project, but privacy still matters. It does this by limiting which people, roles, and groups can see a particular issue.
Let’s start with the basic concepts here. When you create an Issue Security Scheme, you start by setting up various “Security levels” for a given project. You can have as few as one or as many variants as you like. However, I usually only apply an Issue Security Scheme for projects that require privacy, so I usually only set up one level and set it to the default.
For each level you add, you can then define who can see the issue. Anyone not on the list won’t be able to see it. Yes – that even includes the Jira Admins. If they aren’t on the list, and that level is set for an issue, they won’t see that issue.
You can then set it to a project, and you should be good to go. The default Security level will only apply to new issues, so you might need to bulk-update older issues, but it will be there.
Before I get to the step-by-step guide on implementing them, I feel I should say when they should and should not be used. Your first instinct may be to go, “Oh, this would be great for super-secret projects a team might be working on.” And indeed, if a team refuses to work in more than one Jira project, it might be. At this point, though, you will have to add the “Security Level” field to your project screens and then hope that everyone remembers every time to set that field appropriately. Which – in my experience – rarely happens. That is why for this situation, I would still prefer to have “Super-Secret Project X” be in a separate project, with the restrictions placed at the project level. That way, users don’t have to remember to set that field every time.
Setting up an Issue Security Scheme
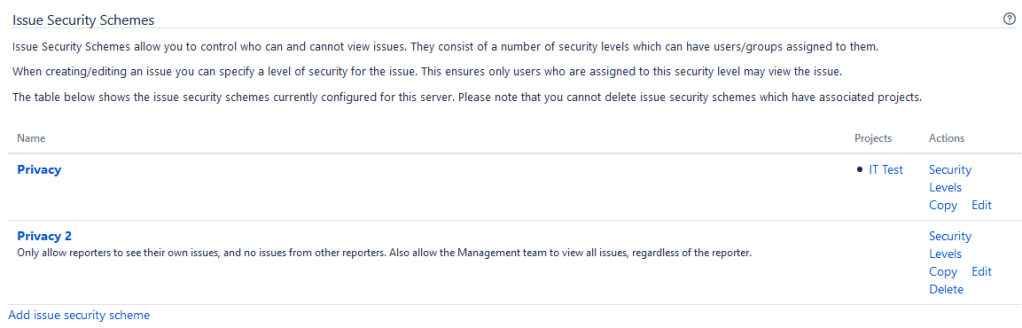
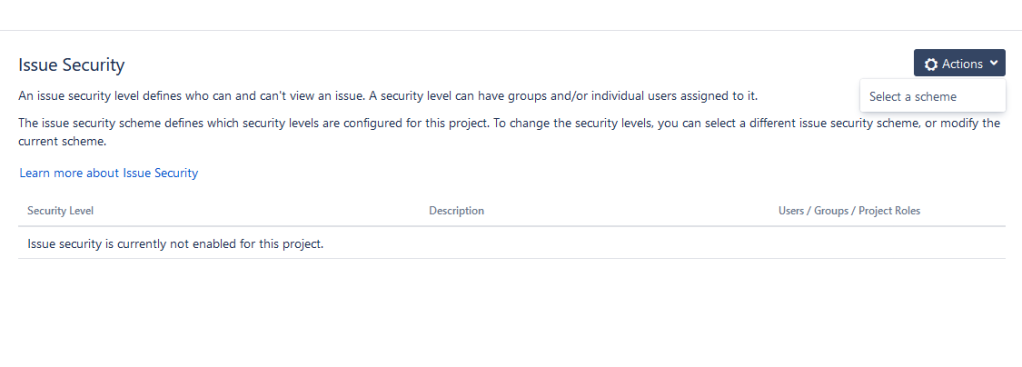
So you can find the Issue Security Schemes by going to your Administration Console -> Issues -> Issue security schemes. (Or, you can press the period key (.), and then search for Issue Security Scheme.) Here you can find the list of existing Issue Security Schemes, as well as create your own by clicking “Add issue security Scheme.”

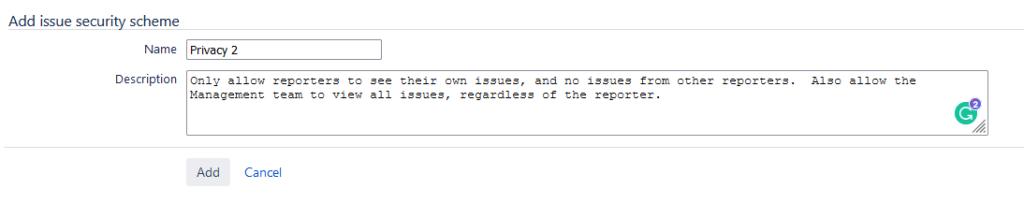
After clicking the link, we are first asked to enter some details about what the new security scheme is called and a brief description to allow us to identify why it was created. Once you are happy with both, click “Add.”
You will be taken back to the Issue Security Schemes page, this time with your new entry.
Now click on “Security Levels” next to the Scheme you just created. This action will take you to a screen where you can modify the existing security levels or add a new one.

Add however many you want. Be sure to add a description here for each level as to why it exists or how it is intended to be used. This description is to help not only future you but future admins on your instance know the logic about why the Security level was created. Once you are done, it should look something like this.

Now go to the first level, and click “Add” under actions. This will bring up a list of just about every way to group or organize users. This menu is how we add who can view issues for that security level. As a rule of thumb, I add the Reporter, the Developer Project Role, and Administrator Project Role for Private levels. As a note, your Jira Administration Group should be on the Administrator Project role for all projects in the instance. You can only add one role per click of “Add,” so be aware you will have to click “Add” multiple times.


Now, be sure to set a default, as currently, the default is to apply no Security Level to issues. You do this by clicking “Default” on the Security Level you want by default on issues. Now we are ready to add this to a project!
Go to the Project you wish to add this to and click on “Project settings” or the “Gear” on the lower-left hand side.
From here, select “Issue Security” on the left-hand toolbar.

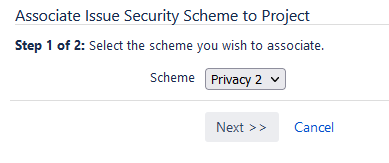
We’ll now go to the “Actions” drop-down, then click “Select a scheme.”
This action will take us through the “Associate Issue Security Scheme to Project” wizard. From the scheme dropdown, select our newly created Scheme, then click “Next > >.”
Jira will now analyze the Project and determine if any issues need migrating to the new Scheme. As there was no scheme previously, no migration is required, and we can click “Associate.”
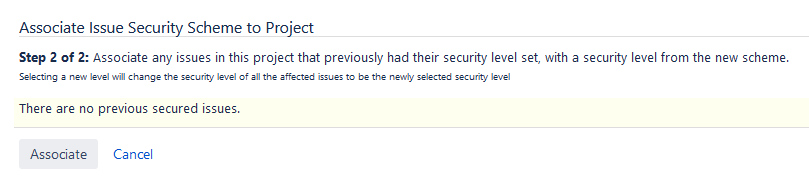
Jira will now associate this Scheme with the Project. It will set the default Issue Security scheme when created, but Jira will not return and set this value for past issues. Therefore, if you need this set retroactively, you will have to do a Bulk Edit on this Project to change the Security Level appropriately.
So now that we have the Scheme attached, we have a few last things to do on the Project. First, click “Permissions” on the left-hand sidebar. Under permissions, we want to ensure that everyone in the “Create Issues” Permission node also has the “Set Issue Security” permission. As we can see, right now, they do not. The lack of this setting means that Jira will set the default Issue Security Level upon creation, but no one will change be able to it if you have more than one set.
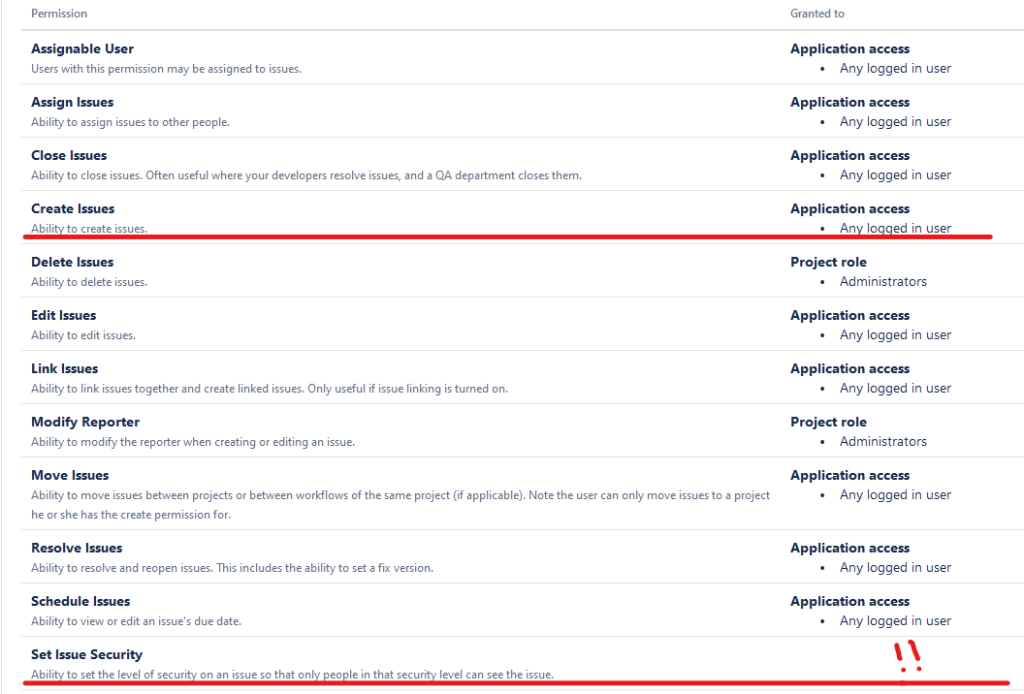
Go to the top of the Permission Scheme, and under the “Actions” drop-down, click “Edit permissions.”

We’ll then click “Grant Permissions,” select the “Set Issue Security” Permission node, then select the groups, roles, or access you want to be able to change the Security level. After that, we click “Grant.”


Lastly, we’ll add a field to the screens if we want to allow users to change the security level. Go back to your Project using the button in the upper right of the screen, then click “Screens” on the left-hand toolbar.

Now click on all relevant screens, and add the “Security Level” field to the screens. Please note you cannot add the “Security Level” screen to a Create Screen – only View and Edit screens. So if you use one screen for all, you will need to split it up.
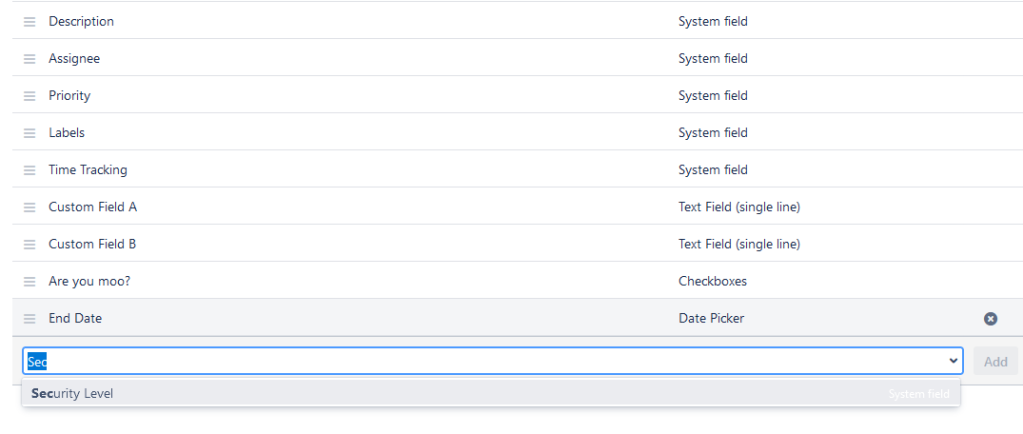
Move the new field to where you want it on screen, and repeat all relevant screens on all relevant issue types. And congratulations, you have now implemented an Issue Security Scheme.
So, what do you think?
Do you see a use for Issue Security Schemes in your Jira instance? I’ve only had to use it once or twice, but I still think it’s something nice to have in your skills toolbox – just in case the requirement ever does come up. But let me know if you have used this often overlooked feature before and what you did with it!
Don’t forget to comment, like, and follow me on LinkedIn, Facebook, Twitter, and Instagram. Doing so lets the algorithms know to share the information here with more people, so it helps! You can also subscribe directly to the blog to get new posts delivered directly to your inbox as soon as they are published. That is the fastest way to be notified about new posts. But until next time, my name is Rodney, asking, “Have you updated your Jira issues today?”

This was going great up until “Go to the top of the Permission Scheme, and under the “Actions” drop-down, click “Edit permissions.”” — then the screen shots didn’t match up with what I was seeing. Besides, why allow access to any logged in user? That seems to defeat the purpose of locking it down so anyone can see the issues.
Still – despite all of this – there’s nothing in there that says “If an issue type is, say, Overtime Payroll – then apply this new issue security scheme” If I create an “Issue Security Scheme” – how can I apply it to the “Overtime Payroll” issue type?
What am I missing here? Your example of having only x-number of people see an “Overtime Payroll” ticket type, is exactly what I need to do myself – yet numerous videos and blogs like this seem to not be able to get me over the proverbial finish line. Granted, I’m very new at Jira but I would think there’d be an easy way to do something like this.
LikeLike
You cannot have a security scheme automatically assigned to an issue type – there is no direct mapping.
The security scheme is treated as a field – which means to manually add it, you would need to include that field in your screen schemes to enable the user to apply it.
The other options is to set up an automation – either in the create step of the workflow, or using “Automation for JIra – that applies the security scheme (as a field option) when a new issue is created.
Hope that helps!
LikeLike
It does, thank you. We eventually figured it out but it wasn’t very user friendly in my opinion. As you said – there is no direct mapping of an issue security type, but it certainly would’ve made my life easier if that were the case.
And we did as you said – added the field to our screen scheme and then included it in the automation.
Thanks again. Your article was helpful. Unfortunately, being so new with Jira I needed a bit more hand-holding and steps to get me over the proverbial finish line.
LikeLike
Thanks, this was useful. Agreed, in all the years I’ve been administering this tool, this is one of the most rarely used features.
Helpful plugin for similar functionality is Issue Type Filters.
LikeLike
Am I correct in understanding that an Issue Security Scheme can only be applied to company-managed projects and not team-managed ones?
LikeLike
Hey there! I found this article super helpful and reassuring- thank you!
I have various groups of people that need access to tickets that have certain labels applied. To ensure that no one would have to remember to set the security level, I created an automation to apply a certain security level if a certain label is applied. This has worked very well for my team 🙂
LikeLike