
Well, you asked for it. No, you really did.

Last November, I attempted to write an article on using a CDN with Jira Data Center. I planned to use this with Cloudflare’s CDN. However, I could not get it to work as I wanted it to – for reasons I’ll go into later. As we all know, it failed, and I realized my mistake too late to be able to write up an alternate article. So I ended up taking a week off to rest and recharge. And…I didn’t come back to this.
But I’m trying to engage more with readers on Social media, so I figured I’d throw up a quick poll to see what this week’s topic should be. And there’s the CDN…again. So let’s get into this.
So…Why bother?
So, let’s say you (and your Jira servers) are based in the United States. But you have users on your system from India, Europe, the Middle East, China – basically all over the world. And everyone not in the United States is complaining that Jira is slow and painful to use. You cannot bring the Jira system closer to them without impacting your US users, which is the majority. But this slowness is starting to impact the other countries’ work.
This problem is where a CDN can help. It won’t make it as if the Jira is in their country, but by caching and staging the static resources (those that don’t often change when Jira loads a page), it can make the page load that much faster. It will also stop your system from serving these resources as often, which will save a bit of load on your system. Now that you know why you’d want one let’s dig into how to set one up.
Prerequisites
So to get started, you will have a couple of prereqs to satisfy. In no particular order, they are:
- Jira Data Center
- An internet-facing load balancer if your Instance is behind a firewall
- A CDN that will give you a dedicated address
Jira Data Center
This is one of the features you get with Data Center over Server. Under the Admin Console’s System section, you’ll notice a new entry for “Content Delivery Network.” It will be under the “Advanced” section of the right-hand menu. Or you can search for it by clicking “.” (period) on your keyboard from anywhere in the Admin Console, and typing “Content” into the search bar.
When you click on it, you should see a page like this. If you see this, Jira is ready for a CDN.

An Internet-facing Load Balancer
If your Jira system is behind a firewall, your CDN will never be able to see it, and therefore it will never be able to serve data to help your Jira system. This concept might go without saying, but sometimes people miss the simple details. So, you will need an internet-facing load balancer.
“But I don’t want public access to my Jira instance.” And honestly, too right! Having as many safeguards between your Jira instance and hackers is a great concept. But…it’s not going to get you out of this requirement.
However, Atlassian has provided details in their documentation to tell you how to allow your internet-facing load balancer only to serve static data. That way, you aren’t leaking potentially secure data online.
A Content Delivery Network
So – just putting this out there – I’m a Jira Expert. Not a CDN Expert. However, from my research, it appears CDN’s come in two flavors. They’ll either stand entirely in front of your system and pass back any dynamic content it needs from your Jira. Or it will stand beside your Jira Instance and serve the data your system tells it to. The easiest way to tell which type you have is to look at the URL you use to access the CDN.
If your CDN wants to use your primary URL, it will be the first type of CDN. This is the type I attempted to use back in November – which isn’t going to go well for how Atlassian wants this to be set up.
It’s the second type of CDN we want. This CDN will ask for your primary URL as a parameter but give you a secondary one to serve static Data. For this Proof of Concept, I’m using Amazon CloudFront, but I’d be stunned if Azure and Google didn’t have a competing offering.
Setting up your CDN
I’m going to assume you have your internet-facing load balancer and Data Center license taken care of and focus on setting up the CDN now. Thankfully, Atlassian has already provided a full CloudFormation Template to configure AWS Cloudfront for you.
You’ll want to download this template to your local system. You can do this by doing a “git clone” operation or copying the text and pasting it into a text editor, then saving it to the correct name.

Once you have the template downloaded to your local machine, you’ll need to go to AWS CloudFormation’s Console, and click “Create Stack” -> “With new resources (standard)”

You’ll then see a page like this where you upload your template. You will need to set the settings as such:
- Prerequisite – Prepare template: Template is Ready
- Specify template: Upload a template file
- Choose File: Select “AtlassianCDN.template.yaml” from your local filesystem.

Click Next, and you will be given some more options.
- Stack name: Enter a descriptive name that will identify this as being used for your jira instance
- Parameters-> Service URL: Enter Jira’s URL

After this, it will give you some advanced options – however, these are all optional and can be skipped if needed. The last page will detail your settings and ask you one last time if you are ready. If so, scroll down and click “Create Stack”

After this, it will give you some advanced options – however, these are optional and can be skipped if needed. The last page will detail your settings and ask you one last time if you are ready. If so, scroll down and click “Create Stack.” After about five minutes, your CDN will be created, and you’ll be given a URL for your CloudFront CDN.

Copy that URL, then go back to your Jira instance. Under the “Content Delivery Network” page on the Admin Console, click the “Settings” tab. Once there, click “On,” then paste your URL into the bar. Then click “Validate.” Once validated, you’ll get a “Connected” confirmation, then you can click “Save Settings.”

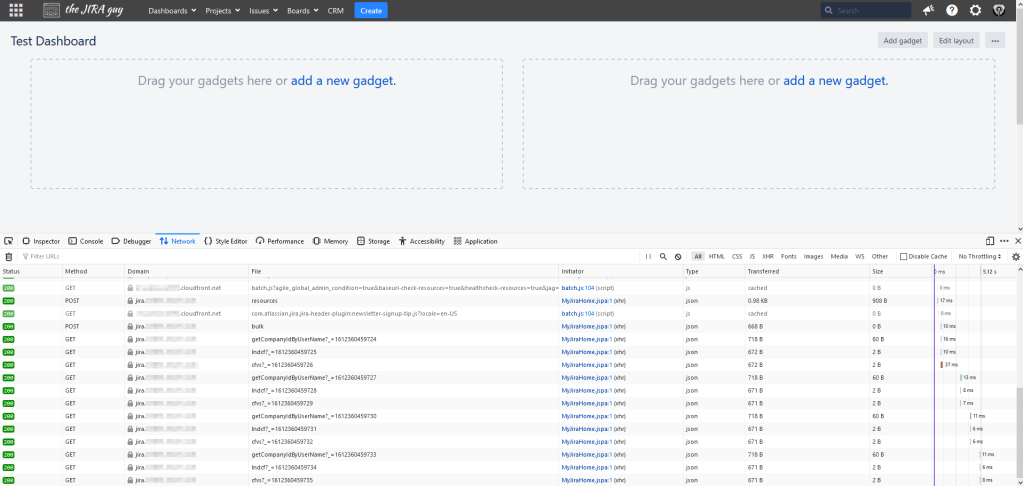
Now click “F12” on your keyboard, go to the “Network” Tab of your Developer’s tools, and click Refresh on the webpage. If setup correctly, you should see content being served from your CDN.
Did you find this useful?
As I stated, I am trying to engage more with readers to gauge what topics you are interested in reading. To that end, I have an ongoing poll on Twitter and Facebook to decide the topic for next week’s post. Depending on how it goes, I might roll it out to the other Social Media channels.
So if you want to keep up with me and have a chance to help decide what I cover, follow me on Facebook, Twitter, Instagram, or LinkedIn. If you find my guides especially helpful, you can also support me on Patreon. You can also subscribe below to get the latest posts directly to your inbox. But until next time, my name is Rodney, asking, “Have you updated your Jira issues today?”

(relatively) short and sweet – and a useful topic that I’ve been meaning to research myself! Thanks for publishing this =)
LikeLike
I was a little surprised at how uncomplicated it was once I was using the correct type of CDN. Using theAtlassian provided AWS template really did simplify things.
LikeLike