Well, this is a pleasant change—no talking about all the changes and upheaval in the Atlassian space. Just a good, old-fashioned technical guide.
So, do you know the number one mistake I see when I log onto a new Jira instance that hasn’t been managed well? The first thing I’ll often see is a bombardment of Permission Schemes – each individualized to a project and with permissions assigned directly to groups. Now, don’t get me wrong; this solution is functional. It’s just not efficient. You have to expend time and effort to figure out which Permission Scheme and which group to make any change. And there is no help if you have to make massive, sweeping changes. You’ll be at that all day.
So I thought I’d spend today talking about Project permissions, what they do, and how to use Project Roles to allow individualized permissions per project while minimizing the number of Permission schemes you have to manage.
So, what is the point of all this?

That is a fair question. For some people, the defaults will work just fine. So why bother with the minutia? Well, eventually, you will run across a use case that will require a slightly different permission setup. It could be a top-secret project to which you’d like to limit viewership. Or a process you’d like to be as transparent as possible. Understanding where and how to make changes will save you a lot of time when these situations come up.
There is also a performance concern. If you have one permission scheme per project on Very Large Jira Instances, that can quickly add up. Using an excellent method to share permission schemes can become key to helping your instance perform well. That’s why I always advocate the use of Project Roles. It’s a way to map permissions to users and groups so that you can reuse the permission scheme as much as possible.
Permission Nodes
So, what do all the permissions even do? If you read through the list on its own, it’s not immediately apparent. I mean, let’s take “Edit Sprints” and “Manage Sprints.” On the surface, they both sound like they should do the same thing, right? If you haven’t guessed, they are not the same thing. So – hold on, this section is going to pack a lot of information.
The first section here is “Project Permissions,” and they manage how you can interact with a given project and its issues – if at all.
| Permission Node | What it does (In English) |
|---|---|
| Administer Projects | Grants access to the Project Administration Screen |
| Browse Projects | Lets someone can see the project and its issues |
| Edit Sprints | Allows editing of the Sprint Name and Goal, but nothing else |
| Manage Sprints | Complete access to Create, Edit, Start/Stop, and Delete sprints |
| Service Desk Agent | On a Service Desk Project allows someone to interact with Customers and use the project’s JSM Features. Note: This will use up an Agent License on Jira Service Management |
| Start/Complete Sprints | Lets a person start or complete a Sprint |
| View Development Tools | Determines whether a person can see the Development integrations on issues |
| View Read-Only Workflow | Allows you to view a chart of the workflow on an issue |
The next section we have here is the “Issue Permissions.” This section determines how users interact with the issues in a given project, including who can create issues, be assigned to them, close them out, etc.
| Permission Node | What it does (In English) |
|---|---|
| Assignable User | Whether issues can be assigned to a user or not. |
| Assign Issues | Whether you are allowed to assign this issue to other people |
| Close Issues | Lets you move an issue into a final workflow state. |
| Create Issues | Lets you create new issues in the project. |
| Delete Issues | Grants the ability to delete an issue.* I’ll talk more about this shortly. |
| Edit Issues | Lets you modify issue fields after creation. |
| Link Issues | Allows you to link this issue to another issue shortly. |
| Modify Reporter | Lets you modify the reporter to someone else. |
| Move Issues | Allows you to change the issue type or move it to another project. Note: If moving to another project, you must have the “Create Issues” permissions in that project. |
| Resolve Issues | Allows you to set the resolution on an issue. |
| Schedule Issues | Grants you the ability to set a due date on an issue. |
| Set Issue Security | If configured, allows you to set the issue security on a given issue. |
| Transition Issues | Allows you to change the status on an issue. |
After this, we get a smaller section detailing how users can interact with voters and watchers on issues.
| Permission Node | What it does (In English) |
|---|---|
| Manage Watchers | Ability to add others as watchers on an issue |
| View Voters and Watchers | See who has voted on or is watching an issue |
Next is the permissions related to issue Comments. This one is where I’ll usually spend a fair bit of time detailing, as comments are one of the main ways people interact with issues. For example, if you wish for comments to be a record and therefore immutable, you’d want to remove anyone’s ability to edit or delete comments – even their own.
| Permission Node | What it does (In English) |
|---|---|
| Add Comments | Grants a user the ability to comment on issues within a project. |
| Delete All Comments | Give you the ability to delete anyone’s comments |
| Delete Own Comments | Allows you to delete only your comments |
| Edit All Comments | Lets you edit anyone’s comments |
| Edit Own Comments | Allows you to edit your comments. |
And now we have the Attachment permissions – which, as you can guess, controls who can post files to issues. These are set up very similarly to the Comment Permissions, so the same concepts apply.
| Permission Node | What it does (In English) |
|---|---|
| Create Attachments | Lets you attach files to an issue |
| Delete All Attachments | Grants you the ability to delete anyone’s files on an issue. |
| Delete Own Attachments | Gives you the ability to delete your files on an issue. |
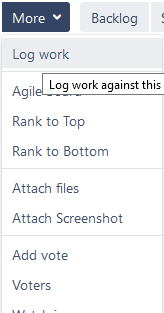
And lastly, we have the Worklog permissions. These permission nodes affect how users can interact with Work logs, one of Jira’s more obscure features. You can log work on an issue by going to an issue (where you have the appropriate permissions), Clicking “More” -> “Log work.” Here you can put how much time you’ve logged against an issue, when you did the work, and how much work is left to do. If you have already added a time-based estimate to the task, it will deduct the hours from the work log from the estimate automatically, as well.

| Permission Node | What it does (In English) |
|---|---|
| Delete All Worklogs | Gives you the ability to delete anyone’s work log |
| Delete Own Worklog | Grants you the ability to delete your work log |
| Edit All Worklog | Lets you edit anyone’s work log |
| Edit Own Worklog | Allows you to edit your work log |
| Work on Issues | The ability to go to “More“->”Log work” and submit a work log |
And that’s all the Project Permission nodes, which will be the boring part. I promise, if you’ve made it here, it gets better.

How to Assign Permissions
So – knowing what these permissions do is one thing. But how do you map them to users? Well, if we go to edit a Permission Scheme, this is what we get:

Here, we can see the various permission nodes we just talked about and who is currently assigned. We click the “Grant Permission” button on the screen’s upper right-hand side to add a new assignment.

Here, we are presented with a screen asking for a Permission node and who to assign it to.

Here, you can see we can assign permissions to a whole host of people based on several criteria. We can even specify it down to a custom field on an issue. However, I do not recommend you do too much anything below “Group” unless you have a particular use case for it (such as only the reporter can close an issue.) For the most part, I recommend you assign the vast majority of permissions to Project Roles. The exception here is you also want to add your Administrative group into the permissions schemes, so your Admin team doesn’t get locked out of projects.
So, what are these Project Roles you keep going on about?
Project Roles are a way to map users and groups to a project directly. You can see your current users assigned to the Project Roles by going to your “Project Administration Screen” -> “Users and roles.” Here you can see who is assigned to your Project and what roles do they currently reside in.

This feature is the key to how you can reuse permission schemes across projects without having to grant everyone access to all your projects. If you map a permission node to a Project Role and then a User to that same Project role, users get those permissions on your Project! This also lets your Project Admins control who can access their Project – greatly simplifying your workload.
Because who is on what Project Role is a per-project setting, the User is only granted permissions for your Project. Assigning them to a Project Role will not affect anyone else – even if you are using the same Permission Scheme. This method is how you reduce the number of Permission Schemes in your instance, by setting up Permission Schemes that use Project Roles and sharing them between projects.
So how do you setup your permission schemes?
The way I see it, there are five basic “Access Levels” for a given project. Generalized, they are as follows:
- Anyone can see, create, comment, and work on issues
- Anyone can see, create, and comment on issues, but only the Team can work on issues
- Anyone can see or create issues, but only the team can comment or work on issues.
- Anyone can see issues, but only the team can create, comment, and work on issues.
- Only the team can see, create, comment, and work on issues.
So, I’ll typically create these five Permission schemes, and all mapped to the appropriate Project Roles to create the desired Access Levels. Those are my five standard permission schemes.
Then, when I coach a new team on Jira, I’ll pull their manager aside, explain these five access levels, and ask where he thinks his Team lies and why. Based on their response, I’ll suggest an appropriate access level. Unless I have a good reason not to, I’ll always guide towards more visibility than less, which means most of my projects tend to be somewhere in the top 3 permissions schemes.
And that’s it for this week!
So, what is your opinion? Are you going to explore using Project Roles in your permission schemes? How would you set it up for your org? I’d love to hear your responses!
If you’ve found this or other posts useful, consider supporting me on Patreon! Not only will you be supporting my work here, but you will get content I won’t be posting here and swag you cannot get anywhere else. You can also subscribe below to get new updates directly to your inbox as soon as they publish. If you are the social media type, you can find me on Twitter, Facebook, and LinkedIn, where I share Blog news, New Posts, and my thoughts on all things Atlassian. Feel free to share and comment on those platforms to let the Almighty Algorithms know it’s content worth sharing. But until next time, my name is Rodney, asking, “Have you updated your Jira issues today?”

This is SUPER useful! Thank you.
I’ve never used Project Roles before, I’ve always groups my users but this gives me way more tidy control over what is happening.
Question for you. I’m now setting up Project Roles as you described and using 3 out of the 4 rules you described at the end of the article. Question is, how would you transition from Groups to Project Roles? I was thinking of setting all the roles up as needed then deleting the groups. Would that cause issues?
LikeLike
So long as you add the groups to the roles first, then add the roles to the permissions BEFORE removing the groups from the permission nodes, you should be able to transition without impacting the users at all.
LikeLiked by 1 person
Sorry to spam a little, but I’m having a bit of a weird one.
So I’ve gone through and created my project roles (which also show up under groups if that’s correct?) and as a test I’ve got one user and removed him from the previous group he was in and assigned him to the Project role which specifically has all access INCLUDING Manage sprints. However, he still can’t create, complete or control sprints……..I’ve checked his user profile and he’s ONLY in that role, I’ve checked the software scheme is assigned to the correct project, it is.
Any idea why he wouldn’t have the permission? I seem to have done everything I should have.
LikeLike
So, to make sure I understand this:
– You added him to the Project Role under “Users and Roles” on the Project Admin Screen
– Added that Project Role to the appropriate Permission Nodes on the Permission Schemes
– Set the Project to use that Permission Scheme
– Removed him from the old Group that was granting him permissions.
If you’ve done all of the above, I’m not sure why it would not be working.
LikeLike
Thanks for posting this Rodney!
Within the last month, I noticed the “Edit Sprints” permission, and didn’t even KNOW about Start/Complete Sprints until I read this post. I usually rely on “Manage Sprints” to gate who can or can’t, you know, manage sprints. ;-p
The more you know.
LikeLike
Thanks again, I figured it out.
I realised on Friday that the “Allow all users” rule was still listed in the schemes permissions page. So I went through and removed them all and was good to go.
Roles are so much better for this! I now have similar setup as you described and have been able to give specific access to users per project, which is super useful and easy to keep up.
LikeLike
This is an excellent article on the complexities of Jira permission schemes. I especially appreciated the 5 basic access levels as a simplified way of describing the Jira permission options.
Some questions that I would like to explore further though on those basic access levels:
1) How do you define “work on issues”? I find that depending on the situation this could mean “assignable user + edit and transition issues”, but other times the “edit issues” option might be more related to the “create” issues.
3) I have a sixth level of permissions that comes up in my Jira instance occasionally:
Anyone can see, comment, and work on issues, but only the team can create issues.
I wonder if anyone else has this situation too? Or is this unique to our teams.
Great article – thank you Rodney!
LikeLike
1) “Work on issues” has a very specific definition within Jira. It means you can use the “More -> Log Work” to say you’ve spent time against the hour-based estimate on the task.
2) I mean, it’s definitely an arrangement you can have. My 5 categories are based on my own experience and what I’ve seen work best, but if you have a unique use case, feel free to experiment and find what works for your teams!
LikeLiked by 1 person