So, I was recently contacted by a good friend. He isn’t a JIRA Admin, at least by trade, but he’d kind of found himself in the role anyways. He’s facing an upcoming upgrade, and wanted to know if I wanted a side gig helping out.
Unfortunately, as I’m a consultant in my day job, there was some concerns about me doing the same thing on the side, so I had to decline. However, that doesn’t mean I can’t help out.
A JIRA upgrade is no trivial manner, but they happen everyday somewhere. If you know what you are doing, you can even automate it – to a point. I obviously don’t recommend automating a production upgrade, but for testing it wouldn’t be a terrible idea.
For this I’m going to use my JIRA Test instance. It’s running on CentOS and MySQL 5.7, and is currently running JIRA 8.4.3. For this I’ll be targeting the latest Enterprise release 8.5.3. Your system may vary a bit, but so long as you are on linux it should still be the similar enough that you can follow the post.
And yes, I am aware of you windows folks out there. I do owe you an install and upgrade guide too. But I only have one windows server license – and well…it’s in use. So that will have to wait for another day.
Data Center?
So, this guide here today is for JIRA Server. There are a few extra steps in a Data Center Upgrade, but the benefit to Data Center is you can upgrade without downtime, as you upgrade each node one at a time. So, I’ll cover a Data Center upgrade next week.
When you need an expert
So, my day-job is as an Atlassian Partner and Consultant. So – it’s my job to help people with their JIRA problems. And sometimes that includes helping people plan and execute their JIRA upgrades. So trust me, sometimes experts are needed.
So, when do you need an expert? Well…that depends. How confident are you in doing this yourself? Do you foresee problems you don’t know how to fix? What’s your support plan?
I’ve learned a lot by doing upgrades myself and getting help when I ran into a problem I couldn’t fix. But I had the benefit of working with Atlassian Premiere Support, and every time I came across a problem I’d work closely with them to learn what went wrong, what it’s supposed to do, and how to fix it.
That being said, I’ve been known to live off of adrenaline, and some people’s tolerance for this sort of thing is…less. Ultimately, there are no hard rules I can give you for when you need help. It comes down to your unique situation. But if you feel you do need help, don’t be afraid to reach out to an Altassian Partner. That’s what we are here for.
Planning it out
So, you want to go forward with the upgrade. What’s next? What are the questions you want to answer?
Well, the first question is “When should you upgrade?” This depends on your teams, but I find a good rule of thumb is to try to get an upgrade in every six months. This not always going to happen, but you shouldn’t let it go more than a year out. Updates to JIRA Server not only include new functionality, but a multitude of bug and security fixes as well.
However, you don’t always get your way. When I was working with Development teams, I’d always avoid an upgrade leading up to and immediately after a release. This is a time your teams depend on JIRA most, and having it down just isn’t an option, even for an hour.
Next question you have to answer is “What Version am I upgrading too?” To determine this, I’ll spend an hour or two with the JIRA Release notes. Not only will I go over each feature release, taking notes on which new features are available, but I’ll also look at each feature release’s upgrade notes for gotcha’s and changes. As I’ve stated in previous post, I give a heavy preference to an Enterprise Release.
After this, you should ask yourself “Will I need to upgrade anything else?” It doesn’t happen often, but sometimes Atlassian will deprecate support for a particular Database or JRE Version. So you should check the Supported Platforms Section to see if your systems are still good. Assuming you are, you can move on to testing. If not, take the time to get your supporting systems up to a supported version, then proceed.
And the last question you should be asking is “How will this affect my Addons/Apps?” Not every app is compatible with every version of JIRA. In order to account for changes in the JAVA API between different versions, a particular version of an app will only be compatible with a particular set of versions of JIRA.
Thankfully JIRA manages all this for you. You can even get a report of what apps will be compatible with the version of JIRA you are going to. Go to Manage Apps -> Manage Apps -> JIRA Upgrade Check

Here, you can select another release of JIRA, and it will give you a list of what apps are good to go as is, what apps will be good to go if updated, and what apps are not available for that version of JIRA. This will give you a heads up on what changes you need to make to be ready.
Now an App upgrade should be treated with the same respect as a JIRA Upgrade – even though it is far easier. App upgrades can change features your teams depend on, so always do them first in test and have your teams review that functionality to make sure it works as expected.
Test Test Test
So you have all the questions answered, what’s next? Well, Testing! Wait, is this déjà vu ?
Yep, I actually did cover how to go about testing last week. You should go back and read that. 😉
I’ll take a backup of my test instance, and upgrade it, then figure out what breaks. Then I’ll figure out how to fix that, document the fix, reset the instance, and test the full upgrade – including fix – again. I’ll rinse and repeat until I have a fully documented upgrade with no bugs.
This is always a bit of work, but I’d much rather break it in testing than in production. The last thing you want is to come into work the Monday after the upgrade to find a line at your desk. Trust me on that one.
Once you are happy with your test system upgrade, now comes the wait. You should give a week or two for end users to test the new version of JIRA before you put it into production. Not every user will test things out, but those that care the most will. So give them a chance to find what you might have missed.
Doing an Upgrade on System
So, this is the main event. Whether you are doing it as a test, or in production, the process should be the same. That being said, I suggest you practice it in test first to get a good feel for doing it yourself.
Now I shouldn’t have to say this after last week’s post, but here it goes. Backup now. Even if it is a test, give yourself an easy way back to a pre-install state. If you must do it manually, backup JIRA’s Home Directory and take a database dump. IF you can, just take a snapshot of the VM. But make sure you can undo this upgrade easily if you need to.
Either way, you will need to get the download first. Go to Atlassian’s JIRA Download Page. Once there, find the “All Versions Link”, then navigate to your chosen version.

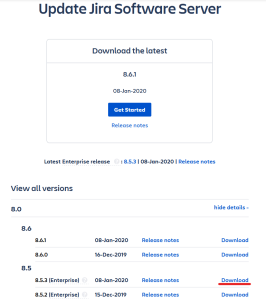
Once you click the “Download” link, you will select “Linux 64 Bit” from the dropdown, click the check box to approve the EULA, then download the software. After this, you will need to transfer this file to your server via your favorite method.
Once on your system, you should have a file named “atlassian-jira-software-<version>-x64.bin”. We will make this file able to be run as a program using a chmod command. Be sure you are running the commands that follow as root.
chmod 755 ./atlassian-jira-software-*-x64.binBefore we start the upgrade, we will need to shutdown JIRA.
systemctl stop jiraAnd once it’s stopped, we can initiate the upgrade
./atlassian-jira-software-<version>-x64.bin
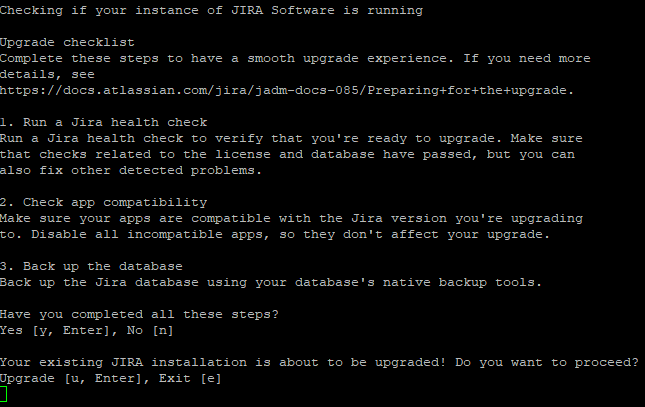
The first option we face is just making sure we intended to start the installer. Take a second here and confirm the version matches what you are intending to upgrade to, then click “Enter”

After this, it will ask you the operation you intend to undergo. The Installer will detect that JIRA is installed on the system, and set the default option here to 3, which is upgrade. So press “Enter” to proceed.

The next option will ask you to confirm your installation directory. Take a second here and confirm this is correct. If it is, press “Enter” to proceed. If it is not, enter the correct directory, then proceed by pressing “Enter”

The next screen will ask you to backup your home directory. Technically, you should have already done this before you started (right?). Therefore, I often skip this step as it can eat up valuable time and disk space. And I already had a backup. But if you didn’t heed my earlier warning, this is your last chance to back up that information.

Next JIRA will check for modified files. These normally aren’t but two or three, with the most common suspect being <jira_install>/conf/server.xml. Open up a separate terminal window and copy these out of the install directory. Once you have these backed up, hit enter.
Next will give you a final checklist, and one last chance to back out. If you proceed from here, you are committing to changing the install directory, and will need to restore your backup to get back to a pre-test state. So hit “Enter” once to confirm you’ve completed the checklist, then hit “Enter” proudly once more. You are ready.
Here, JIRA will backup the current install directory, then replace it with a new one for the new version. For JIRA 8.5.3, it will not copy over any modifications you make, but we’ll get to that in a bit. Once done, it will ask if you if you want to start JIRA. Say “No”.

And JIRA is Upgraded….mostly. Time to deal with those modified files.
Re-adding modifications
So, you can just drop in the modified files you backed up during the install and have things right, correct?

Atlassian will on occasion make drastic changes to these files – changes that if not present, will cause JIRA not to run well – or at all. One such test I did on an upgrade, where I just copied over the files from a previous install, all I had from JIRA was a blank white page. Took me two days to figure out what I had did wrong.
Seriously, don’t be me. Or at the very least learn from my mistakes.
The easiest way we can tell how much has changed is with linux’s diff tool.
diff <backed up version of file> <current version from install directory>
If all you see are your modifications, then probably not a lot has changed. You should still use this as a road map to remake those modifications to the new files. Even a minor change can have an impact, no sense in risking it. Do this with all the files. Slow and steady keeps you out of trouble, after all.
It may also be worthwhile to store these modified files within a git repo – that way you can track what has changed with each upgrade across time. I’ve done it with various productions systems over the years, and it certainly cannot hurt.
After you’ve done this for all modified files, you are clear to start JIRA:
systemctl start jiraFor the first start after a new install, I like to follow the logs to see if anything goes wrong.
tail -f <jira_home>/log/atlassian-jira.logAssuming all is well, we can now log into JIRA’s UI to do the next step.
A note about modified files in JIRA 8.6 and above
As I noted when I looked at JIRA 8.6, the JIRA installer will start looking at your modified files and where it can, copy over the modifications to the new install. To be honest, I don’t like it.
If you’ve been in this business for any length of time, you too likely have a rather healthy skepticism to anything that happens “Automagically”. Even doing this, I’d be one to copy the modified files out during the install and compare the old ones to the new ones.
That being said, I admittedly haven’t done a JIRA 8.6 install yet, and their docs didn’t provide much detail on how the process works, so it could be fine. Just a warning to you in the future that an ounce of caution here might be worth a pound of cure later.
Updating Plugins
When you first get onto JIRA, it will warn you again about those modified files. Ignore the warnings to continue onto JIRA. From here, log in, then go to the Admin Console -> Manage Apps.

Given how App compatibility works, it’s likely you will have a few to upgrade. Take this time and upgrade these as well. Just click “Update” next to each one.
Be aware when you upgrade the “Atlassian Universal Plugin Manager”, you will need to refresh this page to proceed. That alone usually makes that plugin my first target.
Also be aware that any plugin update will require you to do a re-index. You don’t need to do a re-index for each update, but be sure you do one after you finish.
Wait…that’s not right…OH SHI
Now this guide assumes everything went well. As I’ve stated, everything doesn’t always go well. Hopefully this is in test and you have time to work it out. Even if it’s not, just take a second, and breathe, and relax. This isn’t ideal, but you got this.
IF this is in test, collect any logs files or support packets you can to your local system, then reset your instance back to before you started the upgrade. Try it again to confirm you did everything as you expected to. IF the problem reoccurs, you now have a pattern, and two data points.
Then open a ticket with Atlassian Support, and include everything you have, including a detailed account of the system you are running on, the version you were on, the version you are upgrading too, and all the files you got from the system.
If this is production, get what files you can, and execute your back out plan now. Restore the system to before the upgrade using the backups you have taken (don’t forget to also restore the Database) and bring it back up on the previous version of JIRA. There is no shame of backing out of a bad upgrade. There is shame on keeping your teams without JIRA “while you figure it out.”
Take those artifacts and open a ticket with Atlassian. Because this was production, and an issue that (presumably) didn’t pop up in Testing, it can often get a higher Business Impact than a test system problem.
And that’s it?
Yes, really, that’s it! You have JIRA Server running on a new version! Whether this is test or production, the above instructions should be sufficient to get you across the finish line.
At this point in my career, I’ve honestly lost track of how many Upgrades I’ve done. Using the method outlined above, I can usually complete an upgrade cycle – from kickoff to production upgrade complete, in about three weeks. Most of this time is to give end users a chance to test new features before they hit production.
So…humble brag. January is now the best month the blog has had to date, both in page views and visitors.

I cannot thank you all enough for coming by each week to see what I’m writing about. January has been an interesting month for me, with a lot going on. But being able to sit down at some point each week and share with you something about this tool has been both affirming and stabilizing. So thank you. Now lets see if we can make February even better!
Don’t forget that if you need help, we have a discord community. Stop by, ask questions, and chat with fellow Atlassian Admins: https://discord.gg/mXuRsVu
And until next time, this is Rodney, asking “Have you updated your JIRA Issues today?”

3 Comments