
Okay, okay, you guys talked me into it. Today and next week we’ll discuss when you should start thinking about Data Center, what support systems you will need to put into place, and what the process looks like for converting your single-server instance into a multi-node JIRA Data Center instance.
It was actually an email from one of you that made me decide to cover JIRA Data Center. I love hearing from people about how much they are learning from this blog, So don’t be afraid to send me a comment, use the contact form on the blog, or send me a DM on LinkedIn.
Now, some forewarning here. A Data Center install is an involved process. This is something you absolutely should practice doing on a test instance. Actually no, you should practice it several times. It’s not something you want to just do on production. So, without any more delays, lets get to this.
When should you look to convert to Data Center?
So, question time. When should you look to migrate from JIRA Server to Data Center? Is this something that will even be worth the expense and time?
This is a question that I’ve actually struggled with too. I actually pushed back against a Data Center Migration for a while there, with my reasoning being that we weren’t experiencing any significant problems with performance, why take on the extra cost and effort.
It was actually a mid-day downtime event that made me reconsider. The VM host that JIRA lived one unexpectedly went down. Now the VM infrastructure wasn’t my responsibility, but the resulting corruption of the JIRA Index was. JIRA was actually down for an additional 1.5 hours because we had to rebuild the index from scratch.
So I’m going to tell you now, don’t be me. Use actual numbers and metrics to inform your decision. Atlassian recommends you look at three things. These are not a hard and fast checklist, but a way to start the conversation about whether this is right for your organization.
1. Active User Count
The first Criteria is User base. Atlassian’s own studies have shown that organizations typically start running into performance issues on JIRA Server when supporting between 500 and 1000 active users. So if your instance has a peak load of around 450 users – it might be time to bring this up.
2. Performance Degradation
The second is actual performance. If you are experiencing regular performance degradations after you’ve done every optimization you can find – it might be time to bring this up. You can only “grease the track” so much before your single node can’t support any more.
3. Downtime and Outages
The third factor to consider is how critical your instance or and how tolerant you can be of downtime and outages. If your business needs dictate that JIRA has to be up, period, you guess it. It might be time to bring this up.
Now these do provide some numbers and guidelines, but they leave a lot up to your judgement. Take your time and consider these things carefully. This is not something to shout “Leeroy Jenkins” and run into head-first.

What support systems will I need to setup?
So you’ve looked at everything and decided, “Yes, Data Center is for me.” What next? Well, that’s actually going to be the focus of rest of today’s post. In order for JIRA Data Center to work, each “JIRA Server” Node needs access to a common shared set of resources. You can actually read more about it in this week’s Document, simply titled “JIRA Data Center”
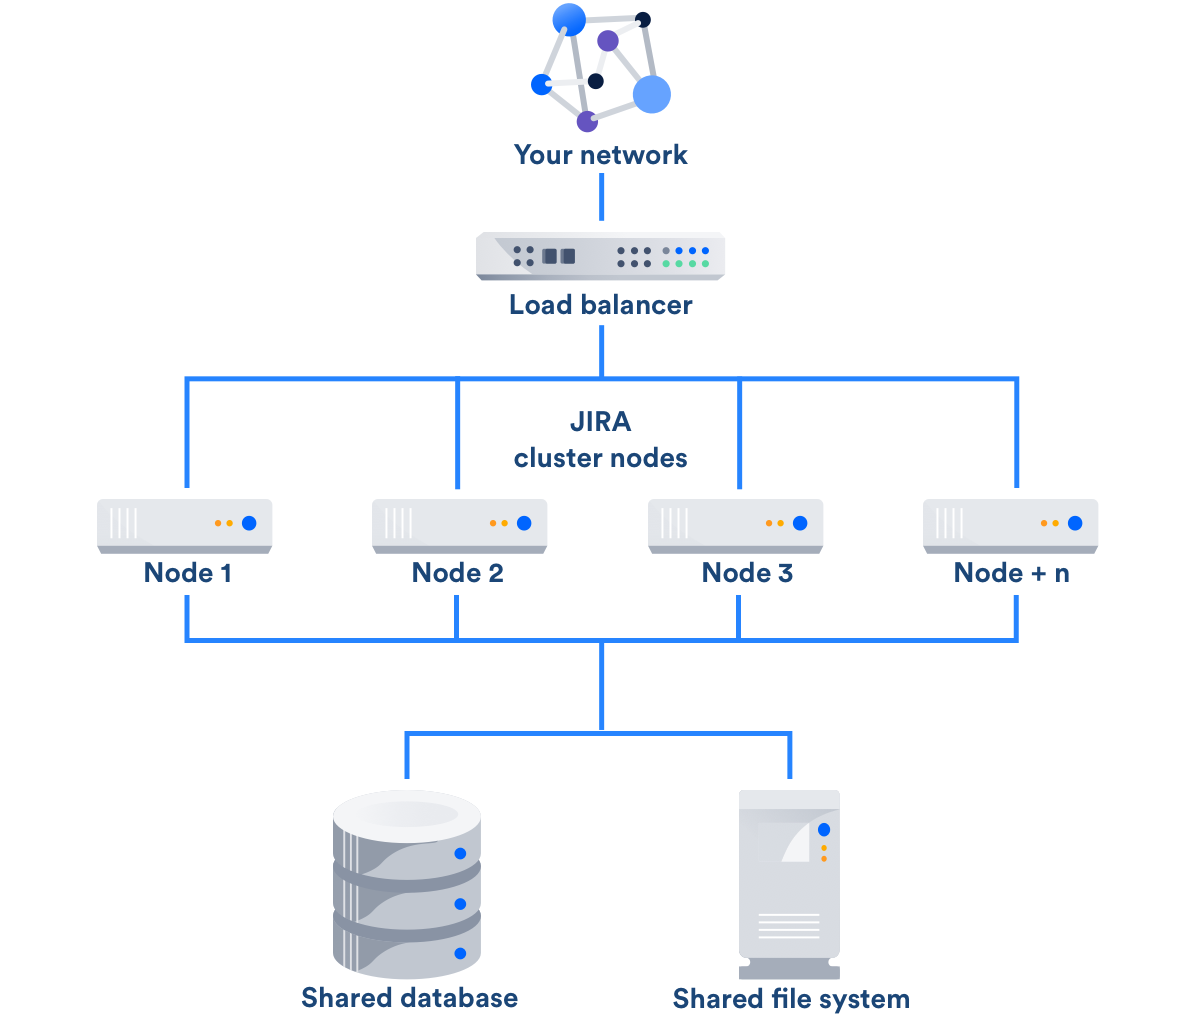
As you can see, the three things we’ll need are a shared Filed System, a Load Balancer, and a Shared Database. As far as Databases go, JDC supports the same selection as JIRA Server. This means we can setup the Database the same way we did for Server, only we’ll need to tweak the settings a bit to make it friendly for Network use.
For the file share, I’ll be setting up a dedicated NFS Share Server for this function. I’ll also be setting up HA Proxy for the Load Balancer. Both of these, as well as the Database, will be running on CentOS 7 systems. These are both my preferences…you could use SMB/Windows File shares if you were running in a windows environment. Or you can run Nginx as your load balancer. If you have the funds, you can even run an F5. As I’ve stressed multiple times: Follow the supported platforms sheet, but use what you or your team knows.
Assumptions
Alright, so I am assuming a few things here. First, I am going to assume that you are at least familiar with how I setup JIRA Server, based on my posts here, here, and here, and that you have set up your Server instance following those instructions. I am also assuming that the database is currently on the JIRA Server.
These are assumptions I need to make in order to write this guide, as I need to know where you are starting from. However, I also think that you are smart enough that where your configuration is different, you can figure it out from what I’ve provided.
Setting up an NFS Share for the Shared Home
So…this is annoying. There doesn’t appear to be a good guide from Atlassian in setting this up. But that’s okay, I’ve setup NFS before for other purposes, so we got this.
Start with a fresh CentOS 7 machine. Our first job will be to install the package nfs-utils.
yum install nfs-utils -y
After this we’ll make a directory where the share will live. For monitoring ease, I’m also going to put this on it’s own drive separate from the root filesystem, but one step at a time.
mkdir /var/jdc-shareNow that we have a directory for the share, lets map it to a drive. To do this in a sustainable way, we need to find the UUID of the new drive – which for my example is /dev/sdb1
blkid /dev/sdb1
We then take this, and using the text editor of your choice, modify /etc/fstab, adding the following line:
UUID=e64ff994-a046-407e-96fe-3bc8ba149254 /var/jdc-share xfs defaults 0 0
If you have your fstab correct, all you should have to do is mount the folder. I will also check df -h to be sure it mounted as I expected:
mount /var/jdc-share
df -h
Next we need to make sure the permissions are correct so that we don’t have any issues when we configure it for NFS. To do this, we need to set the folder’s permissions and file ownership:
chmod -R 755 /var/jdc-share
chown nfsnobody:nfsnobody /var/jdc-share
Now that we have the filesystem prepared, we can configure the NFS service to actually share that folder. Open up the /etc/exports folder in the text editor of your choice and add the following line
/var/jdc-share <ip range of JIRA nodes>(rw,sync,no_root_squash,no_all_squash)For the IP range – you might need a network engineer to help you. Most of the time though, you can get a close approximation by doing the following. Take the IP address of your first node or JIRA Server, as appropriate, and replace the last octect (number) with 0, then add a /24 to the end. So if your JIRA Server’s IP is 172.16.1.63, your IP range will likely be 172.16.1.0/24. This only works if all your JIRA nodes will be in the 172.16.1.0 subnet! Talk to your Network Engineers or whoever provisions your IP addresses to confirm!
So with that configured, start the following services:
systemctl start rpcbind
systemctl start nfs-server
systemctl start nfs-lock
systemctl start nfs-idmap
This will start your services. Now we need to make sure the Firewall won’t block your incoming nfs requests:
firewall-cmd --permanent --zone=public --add-service=nfs
firewall-cmd --permanent --zone=public --add-service=mountd
firewall-cmd --permanent --zone=public --add-service=rpc-bind
firewall-cmd --reload
Now it’s time to test. Remember, you are not done until you’ve confirmed it’s working yourself. Go to your JIRA Server and install nfs-utils, the same as we did for the NFS Server. Then to a temporary mount using the following command:
mount -t nfs <ip address of nfs Server>:/var/jdc-share /mnt
You can use a domain name for this, but DNS then become yet another point of failure, so for the support systems, I like to use IP addresses where possible. If all goes well, you should see no error. Try writing a file or two to /mnt/ from the JIRA Server, and see if you can see it on the NFS Server.


If all looks good, we can go ahead and enable those services for the NFS Server, and add a fstab entry to all your future JIRA nodes, then mount the share.
On NFS Server:
systemctl enable rpcbind
systemctl enable nfs-server
systemctl enable nfs-lock
systemctl enable nfs-idmap
This is the following line that needs to be added to the /etc/fstab in every JIRA node in your JDC deployment:
<ip address of NFS Server>:/var/jdc-share /data/jira/sharedhome nfs defaults 0 0Make sure the mountpoint ‘/data/jira/sharedhome’ is created on each node, then manually mount the share to that node. By adding it to the /etc/fstab, it will also auto-mount on each boot.
umount /mnt
mkdir -p /data/jira/sharedhome
mount /data/jira/sharedhome
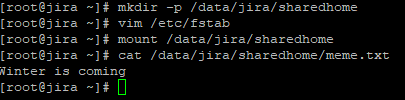
And that’s the Share. We can’t really use it until we go to transform our JIRA Server into JIRA Datacenter – unlike the Load Balancer and Database. But we’ve at least tested it working as expected.
Setting up HAProxy for use with JIRA DC
Unlike with the file share, Atlassian has some documentation around setting up your Load Balancer.
So, for this we’ll also be starting with a fresh CentOS 7 instance. To install HAProxy, we’ll run the following command.
yum install haproxy -y
This will install the application on your system. To configure it, first take a backup of the file /etc/haproxy/haproxy.cfg, then open it in the text editor of your choice.
cp /etc/haproxy/haproxy.cfg /etc/haproxy/haproxy.cfg.example
nano /etc/haproxy/haproxy.cfg
Once open, remove the following sections from the default config:
- frontend main
- backend static
- backend app
After this, add the following to the bottom:
#Begin JIRA Configuration
frontend ft_web
  bind 0.0.0.0:8080
  default_backend bk_web

backend bk_web
  balance roundrobin
  cookie JSESSIONID prefix nocache
  server s1 <JIRA Server IP>:<JIRA Server Port> check cookie s1
#End JIRA Configuration
Once you enter this, start haproxy with the following command:
systemctl start haproxyYou should be able to go to port 8080 on the Load balancer server and get to your JIRA instance. This assumes that port 8080 is open on your JIRA server and the load balancer. If it passes, enable the service so that it survives a system restart:
systemctl enable haproxyA note here: My configuration assumes you are going to put a proxy in front of the load balancer to handle SSL translation. You would do this similar to how we did it for JIRA Server, just pointing to the load balancer instead of the JIRA application. You can also set up HAProxy to handle SSL directly as well, but lets keep thing easy here.
Database?
The database is the easiest part of all this. If you’ve already setup the database as a remote resource, congrats, you are already done with this section. However, if you haven’t, please read on.
From yet another fresh CentOS install, follow the database setup we went through with JIRA Server. All the settings will be the same for this, save for a few details. First, we need to tweak the SQL statement that grants access to the JIRA User.
By default it looks like:
GRANT SELECT,INSERT,UPDATE,DELETE,CREATE,DROP,REFERENCES,ALTER,INDEX on <JIRADB>.* TO '<USERNAME>'@'<JIRA_SERVER_HOSTNAME>' IDENTIFIED BY '<PASSWORD>';
However, we need to make sure JIRA can log in remotely, so instead of “<jira_server_hostname>”, we’ll be putting ‘%’, so that it now looks like:
GRANT SELECT,INSERT,UPDATE,DELETE,CREATE,DROP,REFERENCES,ALTER,INDEX on <JIRADB>.* TO '<USERNAME>'@'%' IDENTIFIED BY '<PASSWORD>';
Granted, you could add a grant for every JIRA hostname, but in reality this adds alot of overhead for only marginal security gains, so it’s not really necessary.
Next we need to add a firewall rule to allow traffic to mysql:
firewall-cmd --permanent --zone=public --add-service=mysql
firewall-cmd --reload
And that will be your Database ready to host a JIRA database. Now we just need to migrate a JIRA DB to it. First thing you should do is shut down your JIRA instance as to guarentee there will be no changes to the data while you work. If you setup your JIRA instance as a service, enter the following.
systemctl stop jiraNow go to your current JIRA host, and enter the following command, using the JIRA DB’s username and password for that host:
mysqldump -h localhost --user=<JIRA_DB_USERNAME> --password=<JIRA_DB_PASSWORD> --single-transaction --quick --opt <JIRA_DB> | gzip > "jiradb-$(date +%Y-%m-%d).gz"Transfer the resulting file, which should be named “jiradb-<today’s date>.gz”, to your new centralized DB server. Once it’s there, import it into that database using:
gunzip < jiradb-<today's date>.gz | mysql -u root -p <JIRA_DB>You should take a moment here to connect to the new database with a remote tool, like mysql workbench, using the JIRA DB username and password. Make sure you can see your JIRA Database as you’d expect it before we can move on. If you can connect to it, JIRA should be able to connect to it, assuming no network obstructions.
Once you completed that, you should be ready to cut JIRA over to the new database. Go to the JIRA home folder on your JIRA Node. There you will find a file called, “dbconfig.xml”. Take a backup of it, then open that up in your text editor of choice.
In here we are looking for the fields “username”, “password”, and URL. Change your username and password to match your new database system.
Now startup JIRA, and monitor the logs to make sure it connects cleanly. Also, once it’s done loading, go into the UI to make sure everything looks normal. Also check under the System -> Troubleshooting and Support tools that there are no errors, and check the System -> System Info to make sure it’s connected as you expected.

If everything looks good, congratulations! Your system is now ready to be converted to JIRA Data Center – which we’ll focus on next week.
A quick note here: This only works if you are staying on the same database platform. If you are using this opportunity to migrate to another Database platform, like moving from MySQL to PostgreSQL, I suggest you read the following Documentation. However, the gist of it is, you will need to run an export of your entire instance, stand up a new instance on the new Database Platform, then Import your backup into that new instance, followed by copying over the attachments.
Can’t I have one system do all three support roles?
In an ideal world, yes. Save the resouces, run only one VM. We don’t live in an ideal world. The idea here is to spread the risk around to multiple systems so that any one point is less likely to be a problem. Having one machine perform multiple roles increases the complexity of that system, and therefore increases the likelihood of something going wrong. As my engineering professors used to say: “Keep it simple”
But you have some pretty big single points of failure you got right there.
This is a valid criticism of my configuration here. With enough time and resources, ideally you’d want to make every system here redundant – and they all support redundancy. However, is it always worth it? My goal is to point you in the right direction. In my lab setup, I have one VM server, with limited resources. There is also time to consider. I have a self-imposed deadline for these articles as well.
But if you have the time and resources, you should definitely research how to run each of these services redundantly. If our goal is no downtime, it will do a lot to guarantee that. Understand this is an example project, and not a production system.
So what’s Next?
Well, next week we’ll talk about converting your JIRA Server system into a JIRA Data Center Node, and then what you need to do to setup each additional JDC Node after that.
Also a note about the coming weeks. We are about to enter the holiday season here in the United States, so I’ll actually be off work (though on call) for the blog posts on the 25th and the 1st. Given that, I’d like to do something special for those. So, send me your quick JIRA questions and I’ll do a lightning round Q&A, assuming I get enough questions in. And remember, I am always willing to take on reader requests for topics, so even if you don’t think your question is small enough for a lightning round, ask it anyways! This very post started as a reader request!
So until then, this is Rodney, asking “Have you updated your JIRA Issues today?”

Thanks, Rodney
For your quick turnaround time for me, I am so excited about your blog on the data center setup.
LikeLiked by 1 person
No Problem!
LikeLike