
When I was leaving VMware, I discovered something interesting. My junior admin – who, in two weeks, would be the senior admin – had never done an install of JIRA from scratch.

Obviously, this would not do. Over the next two weeks, we did several intensive training sessions, where I’d do an install why he took notes. Eventually we tested the new docs by having him do the install solo while I watched. He passed -with some tweaks to the documents.
Looking online, there just isn’t to many details on how to do an install from front to back. Yeah, all the pieces are there, but it’s up to a new admin to put them together – which if you’ve never done it before, can be daunting. But I intend to fix that, starting here.
My original idea for this article was to do it from the ground up. That is, setting up the VM, installing the OS, installing the prereqs, configuring the DB, installing JIRA and then the proxy. Upon reflection, I think it’s safe to assume a few things. First, you know how to setup a VM and install an OS…or at least, you know who to ask. Second, you don’t need 100% hand holding. So I will be scaling this article back some. If you are interested in how I go about setting up my VM’s and linux installs, let me know in the comments and I’ll write up that article.
OS Selection
Though I’m assuming you know how to install an OS, there is a myth that I see often: that you must run JIRA on Linux. Let me squash this right now.
IT DOESN’T MATTER WHAT OS YOU SELECT!
My advice is to use what you know. You don’t know linux but you can run a windows server? Use that! You want to run it on a Mac in the corner? Well…that might actually be an issue. It will run, but your support from Atlassian may not be there.
I’m not saying you can ignore the supported platforms document. You should double check with your choices here. But I am saying when your choices are as varied as they are in the doc, you have options.
To me, it is much more important you be familiar and comfortable with the operating system than following the crowd. Java, by it’s design, will take care of making sure it can run on your system. I started out as a Linux Admin, and can configure and tune Linux in my sleep. So I use what I know. But you don’t have to.
That being said, with only a few considerations, you can migrate an instance from one OS to another with minimal headaches. It’s not the easiest operation ever, but can be done well enough in a change window. Just something to keep in mind.
System Setup
Okay, now that we have that out of the way, I’m going to put down a few details about how the system is setup and what assumptions I am making.
JIRA System Specs
- OS: CentOS 7 Linux
- Database: Latest Supported MySQL (5.7 as of the writing of this article)
- RAM: 4 GB
- Processors: 2
- Root Hard drive of 30 GB
- Extra Hard drive of 50 GB to house the database and JIRA’s home directory
So a few things I want to note here. First off, I chose four gigabytes of ram for a reason. The way I like to break down a new system is like this: 2 GB (ish) for JIRA’s Heap memory, 1 GB of Ram for MySQL, and 1 for system resources. This usually gives you enough room to grow for a bit before it gets to be a problem.
Second, I like to keep a 2:1 ratio between GB of Ram and Processors. This isn’t listed anywhere as a best practice for VM’s, just something I’ve always done, and I’ve never had a cause for change the practice. When it does cause something to happen, I may re-evaluate the practice then.
Lastly, I like to keep the JIRA Home and Database on a separate drive from the system resources. This makes monitoring easier, as these will be the two directories that will grow the most as your JIRA instance matures. It’s strictly speaking not required, but I like to think it helps in the long run, even if it is more work up-front. For my system, I’ll have it mounted to /archive.
MySQL Database Setup
JIRA, at it’s heart, is a web based front end for the Database. This makes your database choice pretty important. As of this writing, JIRA supports the following database systems:
- PostgreSQL 9.4, 9.5, and 9.6
- MySQL 5.6 and 5.7
- Oracle 12cR1
- Microsoft SQL Server 2012, 2014, and 2016
- Azure SQL
As with the OS Selection, it’s important to use what you know. I’ve used PostgreSQL and Microsoft SQL Server in systems before, but I’ve developed queries and databases for – as well as ran and tuned as a system – MySQL. Therefore, outside of concerns for performance, I’ll use what I know best.
Slow down there!
Take a moment and think not only about the system as you currently envision it, but as you will use it years down the road. Unlike OS Selection, JIRA is very much a pain to migrate from one Database to another, requiring you to do an XML export and import on an entirely new instance on the new DB system. It may get to the point before you realize it that it becomes wholly impractical to do so.
As such, consider where you see this instance in 3 years. If you plan for this to be used by a lot of people simultaneously, PostgreSQL might be the way to go. There are use cases for Oracle, MS SQL Server, and Azure as well, all depending on how you want to use it. Now is the time to just take a second and think about it. Your future self will thank you.
Documents
While we are slowing down, there are a few documents we will need to check out.
The first document we’ll need is from MySQL. CentOS ships with MariaDB in it’s repos. Normally that’d be fine, and in some cases even preferred, but JIRA expressly doesn’t support MariaDB. As such, we’ll need to add the Yum repos for MySQL to our soon-to-be JIRA server.
Next, there’s Atlassian’s guide to setting up a MySQL database for use with JIRA. This will tell us what accounts to create, settings to set, and things to do to get MySQL running smoothly with JIRA.
These are mostly compatible with the settings you need for Confluence, Bitbucket, and Bamboo, so you can centralize the database if you so wish. However, that also introduces a huge single point of failure for your whole system, so I don’t really recommend it.
Yeah, but your scientists were so preoccupied with whether or not they could, they didn’t stop to think if they should
Dr. Ian Malcolm, Jurassic Park, 1993
Getting Started
To start with, we’ll need a way to manage yum repositories, so the first step should be to install yum-utils. This will come in handy in a few later steps, so might as well take care of it now. I will be running this as root via the esxi interface (I disable root from remote connections), but use sudo where you need to.
yum install yum-utils -yAs stated in the MySQL Document, we need to do is get the RPM for the MySQL Yum Repo onto the server. You can do this by downloading it to your local system and transferring it via scp/sftp/ftp/séance with the dead. But why. I prefer to get the link to the actual RPM (may take a couple of menus!), then use a utility called wget to retrieve it directly to the machine.

wget https://repo.mysql.com//mysql80-community-release-el7-3.noarch.rpmYou are free to use the above command, but I can’t guarantee it will work forever, so I always suggest you double check that link against MySQL’s website and renew it as needed.
Now that we have it downloaded, we do a yum localinstall against it. This will setup Yum to have the MySQL repo.

yum localinstall ./mysql80-community-release-el7-3.noarch.rpmSo now we have the Yum Repository for MySQL installed, but we still have a problem. MySQL will default to the latest available (MySQL 8) unless we tell it otherwise. As such, we first need to see what is enabled and not. To do so, we’ll use the following command:
yum repolist all | grep mysqlWe should see the following output:
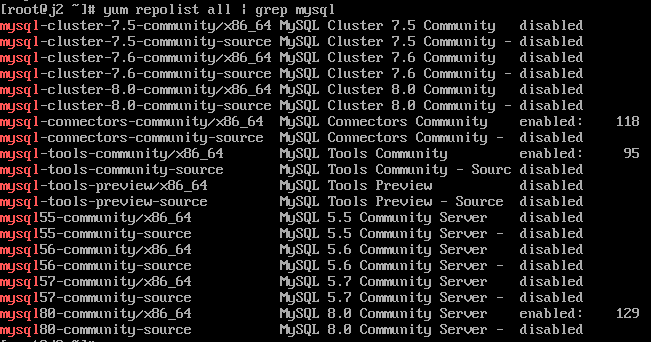
Here we see three repos enabled.
- mysql-connectors-community/x86_64
- mysql-tools-community/x86_64
- mysql80-community/x86/64
To disable this and enable mysql57-community, we run the following two commands, in order
yum-config-manager --disable mysql80-community
yum-config-manager --enable mysql57-community
After you run these, re-run the yum repolist command to confirm the correct repo is enabled:

Main Event Time
Install the mysql-community-server and all it’s prerequisites with the following command:
yum install mysql-community-server -yI know this seems anticlimactic considering how much you have to do to just get here. But that is one of the beautiful things here – it’s mostly automated. The install will take a second, but not terribly long in the grand scheme of things. Once done, start the MySQL server with the command below.
systemctl start mysqldWait a few seconds, then query the log for the temporary password. You’ll need it here in just a second, so might as well grab it.
grep 'temporary password' /var/log/mysqld.logTake this password and run the command:
mysql_secure_installationThis is a script that will guide you through locking down your MySQL instance. You will need the temporary password we just got, but you will get a chance to setup a proper root password. Please be sure to set your MySQL root password to something unique and complex. You don’t want to be the one to be hacked because your DB root password was the same as your user password.
For the rest of the questions on this script, select Yes. This is just a fast way to do all the good hygiene stuff you should do when you make a new MySQL DB.
From here, we can run one more command to make sure MySQL comes up as part of the system’s boot sequence, and we are ready to start configuring the Database for JIRA.
systemctl enable mysqld.JIRA’fying this DB
Here’s where we’ll start following the Atlassian Document I referenced earlier. Log into the machine, either via a console or ssh, and connect to MySQL using the following:
mysql -u root -pHere you will use the Database Root password you just set within the Secure Install script. Here we’ll run a number of queries to setup the database and user JIRA will connect through.
CREATE DATABASE jiradb CHARACTER SET utf8mb4 COLLATE utf8mb4_bin;
Yes, you do need to set it up as utf8mb4 with a collation of utf8mb4_bin. Not using these will cause JIRA to throw errors, and in some cases fail altogether. This will setup the Database with MySQL. Note that there is no requirement to call the DB “jiradb”. You are free to use any name here, though I’d recommend you use one that is readily identifiable.
Next, we’ll setup the user using this next two queries.
GRANT SELECT,INSERT,UPDATE,DELETE,CREATE,DROP,REFERENCES,ALTER,INDEX on <JIRADB>.* TO '<USERNAME>'@'<JIRA_SERVER_HOSTNAME>' IDENTIFIED BY '<PASSWORD>';
flush privileges;
In the GRANT statement above, we’ll replace the following as such:
- <JIRADB> is whatever you named the database above
- <USERNAME> is the username JIRA will use to connect to the DB
- <JIRA_SERVER_HOSTNAME> to the name of the JIRA server (localhost in our case)
- <PASSWORD> to the password JIRA will connect with
It’s important to security that the JIRA password be different from the root password. Don’t be that guy. Please do not be that guy.
After this, we are safe to exit MySQL (run the query ‘exit;’), and make some changes to the MySQL configuration file. This one…is very poorly named, considering history, but you can find it at /etc/my.cnf.
Yes, poorly named….
Anyways, it will ask you to make a number of changes. For the sake of brevity, I will include a copy of the config file that shall not be said aloud:
[mysqld]
datadir=/archive/mysql
socket=/var/lib/mysql/mysql.sock

symbolic-links=0

log-error=/var/log/mysqld.log
pid-file=/var/run/mysqld/mysqld.pid

#<---- Start JIRA Specific Settings ---->
default-storage-engine=INNODB
character_set_server=utf8mb4
innodb_default_row_format=DYNAMIC
innodb_large_prefix=ON
innodb_file_format=Barracuda
innodb_log_file_size=2G
#<---- End JIRA Specific Settings ---->
Note that I’ve changed the datadir to the /archive mount I mentioned before. Not necessary, but I still feel it will be beneficial long-term. Just a note, if you also intend to move the datadir in your MySQL install, and you are running on CentOS or REHL, you will need to adjust a few Selinux policies. Just run the following commands:
yum install policycoreutils-python -y
semanage fcontext -a -t mysqld_db_t "<new_datadir>(/.*)?"
restorecon -R <new_datadir>
Edit: Future Rodney stepping in here. It seems I missed recording a few steps, so I wanted to add them.
First, if you are moving the datadir in the mysql config file, you will also need to move the physical files as well. You can do so with the following command:
rsync -av /var/lib/mysql <new_datadir>Second, after making any changes to the MySQL config file, be sure to restart MySQL with the following. Be sure you do the file move first, as well as the Selinux policy step if you are on RHEL/CentOS.
systemctl restart mysqldNow returning you to your regularly scheduled blog post.
And there we are!
We’ve now setup a database and configured it for Linux. I think we are going to call it here (wow this one is long) and move on to installing JIRA next week. I also have a crazy plan to see if I can install this on a Raspberry Pi 4…while not supported, I do think it *might* be possible! Of course if I do achieve that, I’ll write up a how-to on that one as well! Until then, I’m Rodney, asking “Have you updated your JIRA issues today?”

6 Comments